Brontes Book
Documentation for Brontes users and developers.


Brontes is a blazingly fast and modular blockchain analytics pipeline, designed to systematically identify MEV.

Why Brontes?
Brontes, developed by Sorella Labs, is a blockchain analytics pipeline built on top of Reth. It addresses a critical challenge in blockchain research: the overwhelming flood of data and tedious preprocessing that often derail researchers from their core focus.
Key features:
- Transforms raw Ethereum data into a structured, analyzable format
- Enhances analysis with off-chain data (metadata, CEX prices, p2p data...)
- Provides a modular framework to easily implement user-defined inspectors for custom analytics
Blockchain data analysis, especially at the trace level, can overwhelm even seasoned researchers. While a few masochists might find satisfaction in the chore of data preprocessing and normalization, most of us are captivated by the intellectual challenge of crafting innovative analytical techniques.
Our Inspector Framework allows you to focus on developing and applying novel methodologies. By eliminating initial hurdles, Brontes frees you to immerse yourself in creative analysis rather than getting bogged down in preprocessing.
Who is this for?
Brontes is designed for:
- Blockchain researchers and data scientists
- MEV analysts and strategists
- DeFi protocol developers
- Anyone working with large-scale Ethereum data
Navigating This Book
- Installation: Get started with our step-by-step guide
- Running Brontes: Follow our quick-start instructions
- Under the Hood: Explore Brontes' architecture
- MEV Identification: Dive into our mev-inspector methodologies
Licensing and Community Involvement
Initially developed and currently maintained by Sorella Labs, Brontes is licensed under the Apache and MIT licenses. We actively welcome community contributions, aiming for a future where the project is led collaboratively, by and for the community.
Installation
Brontes runs on Linux and macOS. We currently support source installation only, but welcome contributions to support Docker images.
Hardware Requirements
Requirements vary based on your setup:
| Component | Historical Analysis | With Reth (Archive Node) |
|---|---|---|
| Disk | 2TB SSD (TLC NVMe recommended) | 5TB+ (TLC NVMe recommended) |
| Memory | 16GB+ | 32GB+ |
| CPU | 8+ cores (the more the merrier) | High clock speed prioritized |
| Bandwidth | 30Mbps+ stable connection |
- See reth installation guide for more details on Reth's hardware requirements.
Installation Steps
Setup Steps
-
Clone the Brontes Repository
- Retrieve the latest version from GitHub:
git clone https://github.com/SorellaLabs/brontes
- Retrieve the latest version from GitHub:
-
Build from Source
- Compile the software in the cloned directory. This is the base command for a standard setup:
cd brontes RUSTFLAGS="-C target-cpu=native" cargo install --path crates/bin --profile maxperf --locked - Note: The
RUSTFLAGSenvironment variable &maxperfprofile is optional but recommended for performance improvements. We strongly recommend against including them when running tests or debugging.
- Compile the software in the cloned directory. This is the base command for a standard setup:
-
Set Up Environment
- Before running Brontes or downloading the db snapshot, configure your environment by referencing the
sample.envfile provided in the repository. This file contains necessary environment variables and their explanations. Renamesample.envto.envand update the values according to your specific setup.
- Before running Brontes or downloading the db snapshot, configure your environment by referencing the
Data Setup Options
Brontes relies on extensive off-chain data to classify complex MEV strategies. Due to the data's size and prohibitive egress costs, we currently don't offer public query access. Instead, choose from these setup options:
Option 1: Historical Analysis (Recommended for Data Analysts / Researchers)
For users focusing on historical data without chain tip updates:
- Download the Brontes libmdbx snapshot:
Note: For the full range since the merge block, omitbrontes db download-snapshot -s $start_block$ -e $end_block$-sand-eflags. This is strongly recommended for large ranges as it downloads the complete database instead of multiple partitions, significantly speeding up the process.
- Snapshots are updated every Monday and Thursday at midnight.
Option 2: Running with Reth Archive Node (Recommended for Developers)
For developers extending Brontes with:
- New action or discovery classifiers that fetch on-chain state
- Support for additional DEX protocols requiring pool state
- Custom modules that interact with the Reth database
- Set up a Reth Archive Node:
- Follow the Reth Installation Guide.
- Use Merkle Snapshots for faster syncing.
Note on Snapshots and Traces
Currently, snapshots include pre-generated traces, which occupy significant space. Users running Brontes with Reth don't require these traces, though they can speed up processing. We welcome contributions to improve our snapshot downloader for more flexible options.
Chain Tip Access
Currently, we don't offer chain head access due to resource constraints. However, if you're interested in collaborating on a public query API solution, we'd welcome your contribution. Feel free to reach out via the Brontes Telegram group chat to discuss a potential collaboration.
Run Brontes
This section provides instructions on how to run Brontes and introduces some notable command-line options available to customize its operation.
To start Brontes after installation:
brontes run
Specifying a Block Range
- Start Block: The block number from which Brontes begins processing (inclusive). If omitted, Brontes will run at tip until manually stopped, provided you have access to the db API.
- End Block: The block number at which Brontes stops processing (exclusive). If omitted, Brontes will run historically and continue at the tip until manually stopped, provided you have access to the db API.
brontes run --start-block 1234567 --end-block 2345678
You can also specify multiple block ranges to be run in parallel by using the --ranges flag:
brontes run --ranges 100-120 750-900 3000-5000
Notable Parameters
- Quote Asset Address: This sets the asset used to denominate values in the analysis. The default is USDT (Tether) and we recommend sticking to it. To change the default, use:
brontes run ... --quote-asset [ASSET_ADDRESS]
Note
For a complete list of command-line interface (CLI) options refer to the CLI reference section in the documentation.
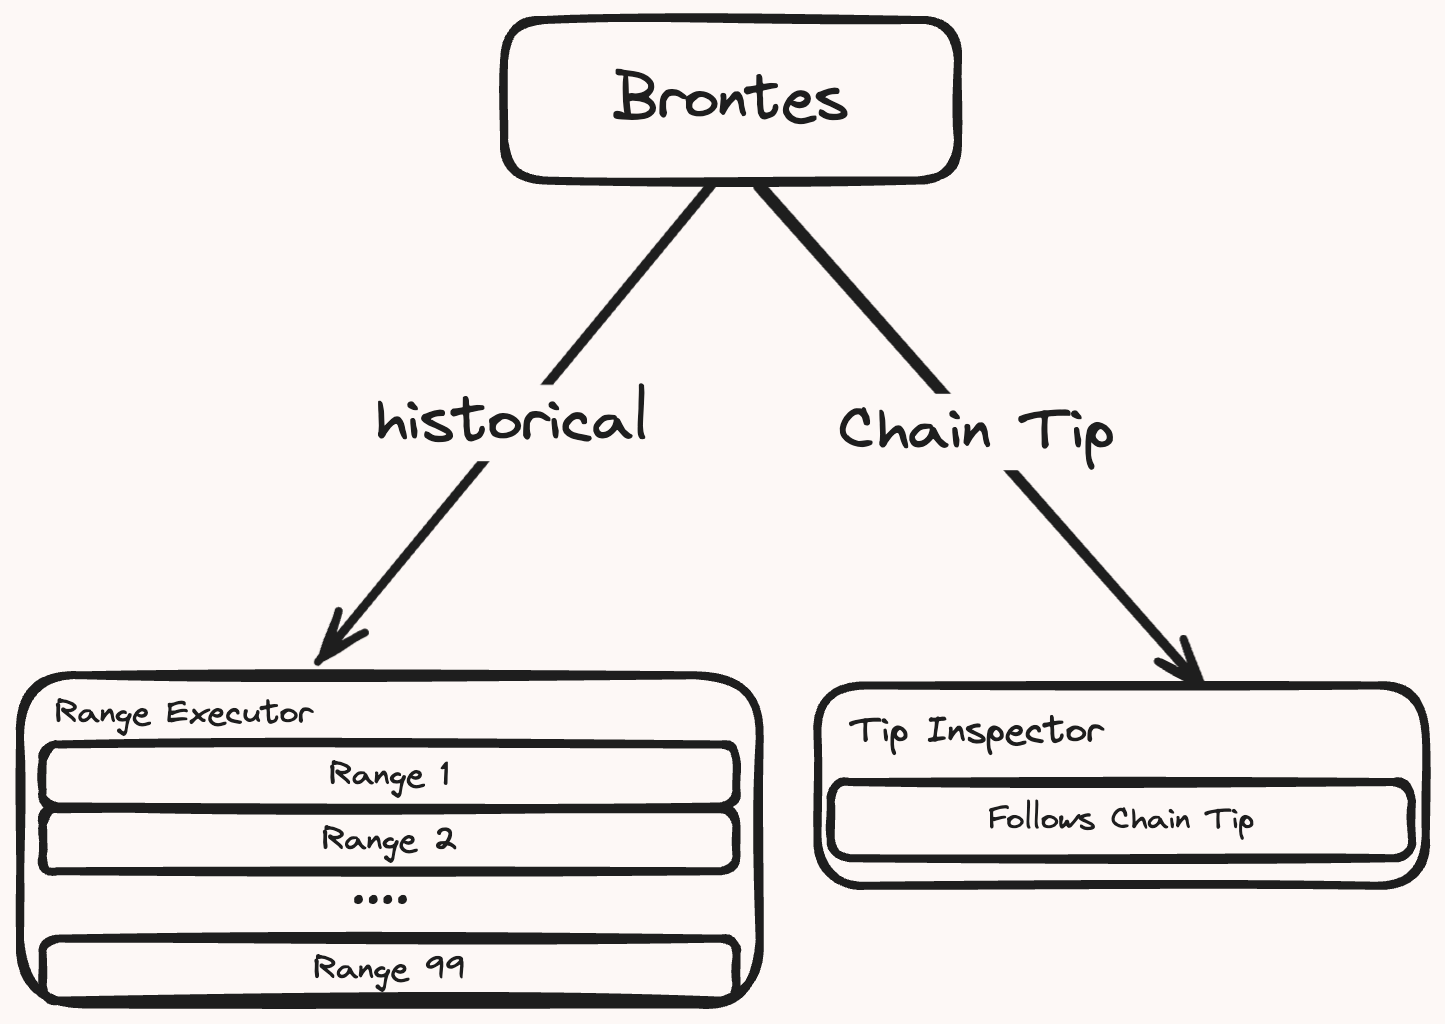
Brontes Architecture
Brontes is designed for efficient analysis of both extensive historical block ranges and the latest chain state. It operates in two distinct modes: the Range Executor parallelizes the processing of historical data, while the Tip Inspector ensures it remains in sync with the chain tip.
-
Range Executor: Processes historical block data. It divides a specified block range into chunks for concurrent processing.
-
Tip Inspector: Ensures synchronization with the chain tip, automatically engaging at startup if no end block is specified. It begins by targeting the latest block and then processes each new block as it arrives.
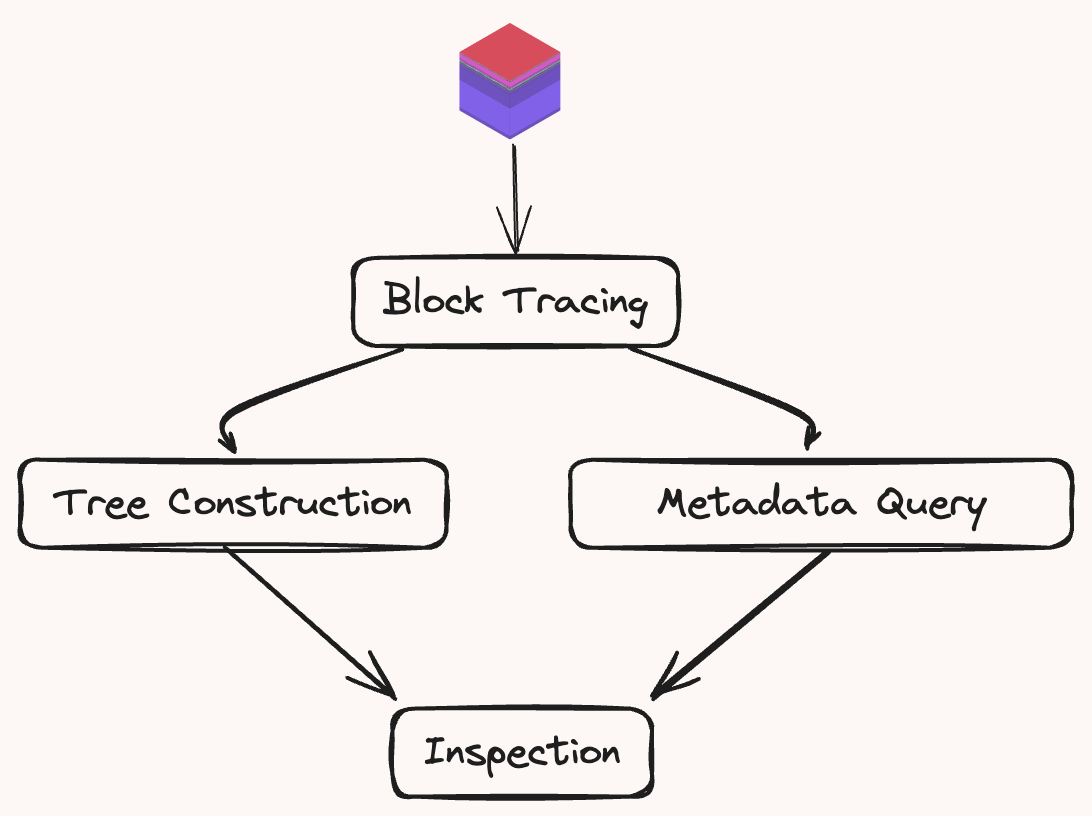
Block Pipeline
The Range Executor and the Tip Inspector both handle blocks through the same sequential processing pipeline. Each block is subject to the following four stages:
-
Block Tracing: Generates the block trace using a custom
revm-inspector -
Tree Construction: Constructs a
BlockTreeencapsulating each transaction in its ownTransactionTree. Traces are classified intoNormalizedActions. See Block Tree for more details. -
Metadata Query: In parallel to the tree construction, Brontes fetches the block metadata from the brontes database, composed of DEX pricing, CEX pricing, private transaction sets and more.
-
Inspection: Specialized Inspectors process the classified blocks and metadata to identify various forms of MEV. The results are collected & analyzed by the
Composer(a sort of master inspector) which composes & deduplicates the results and stores them in the local libmbx database.
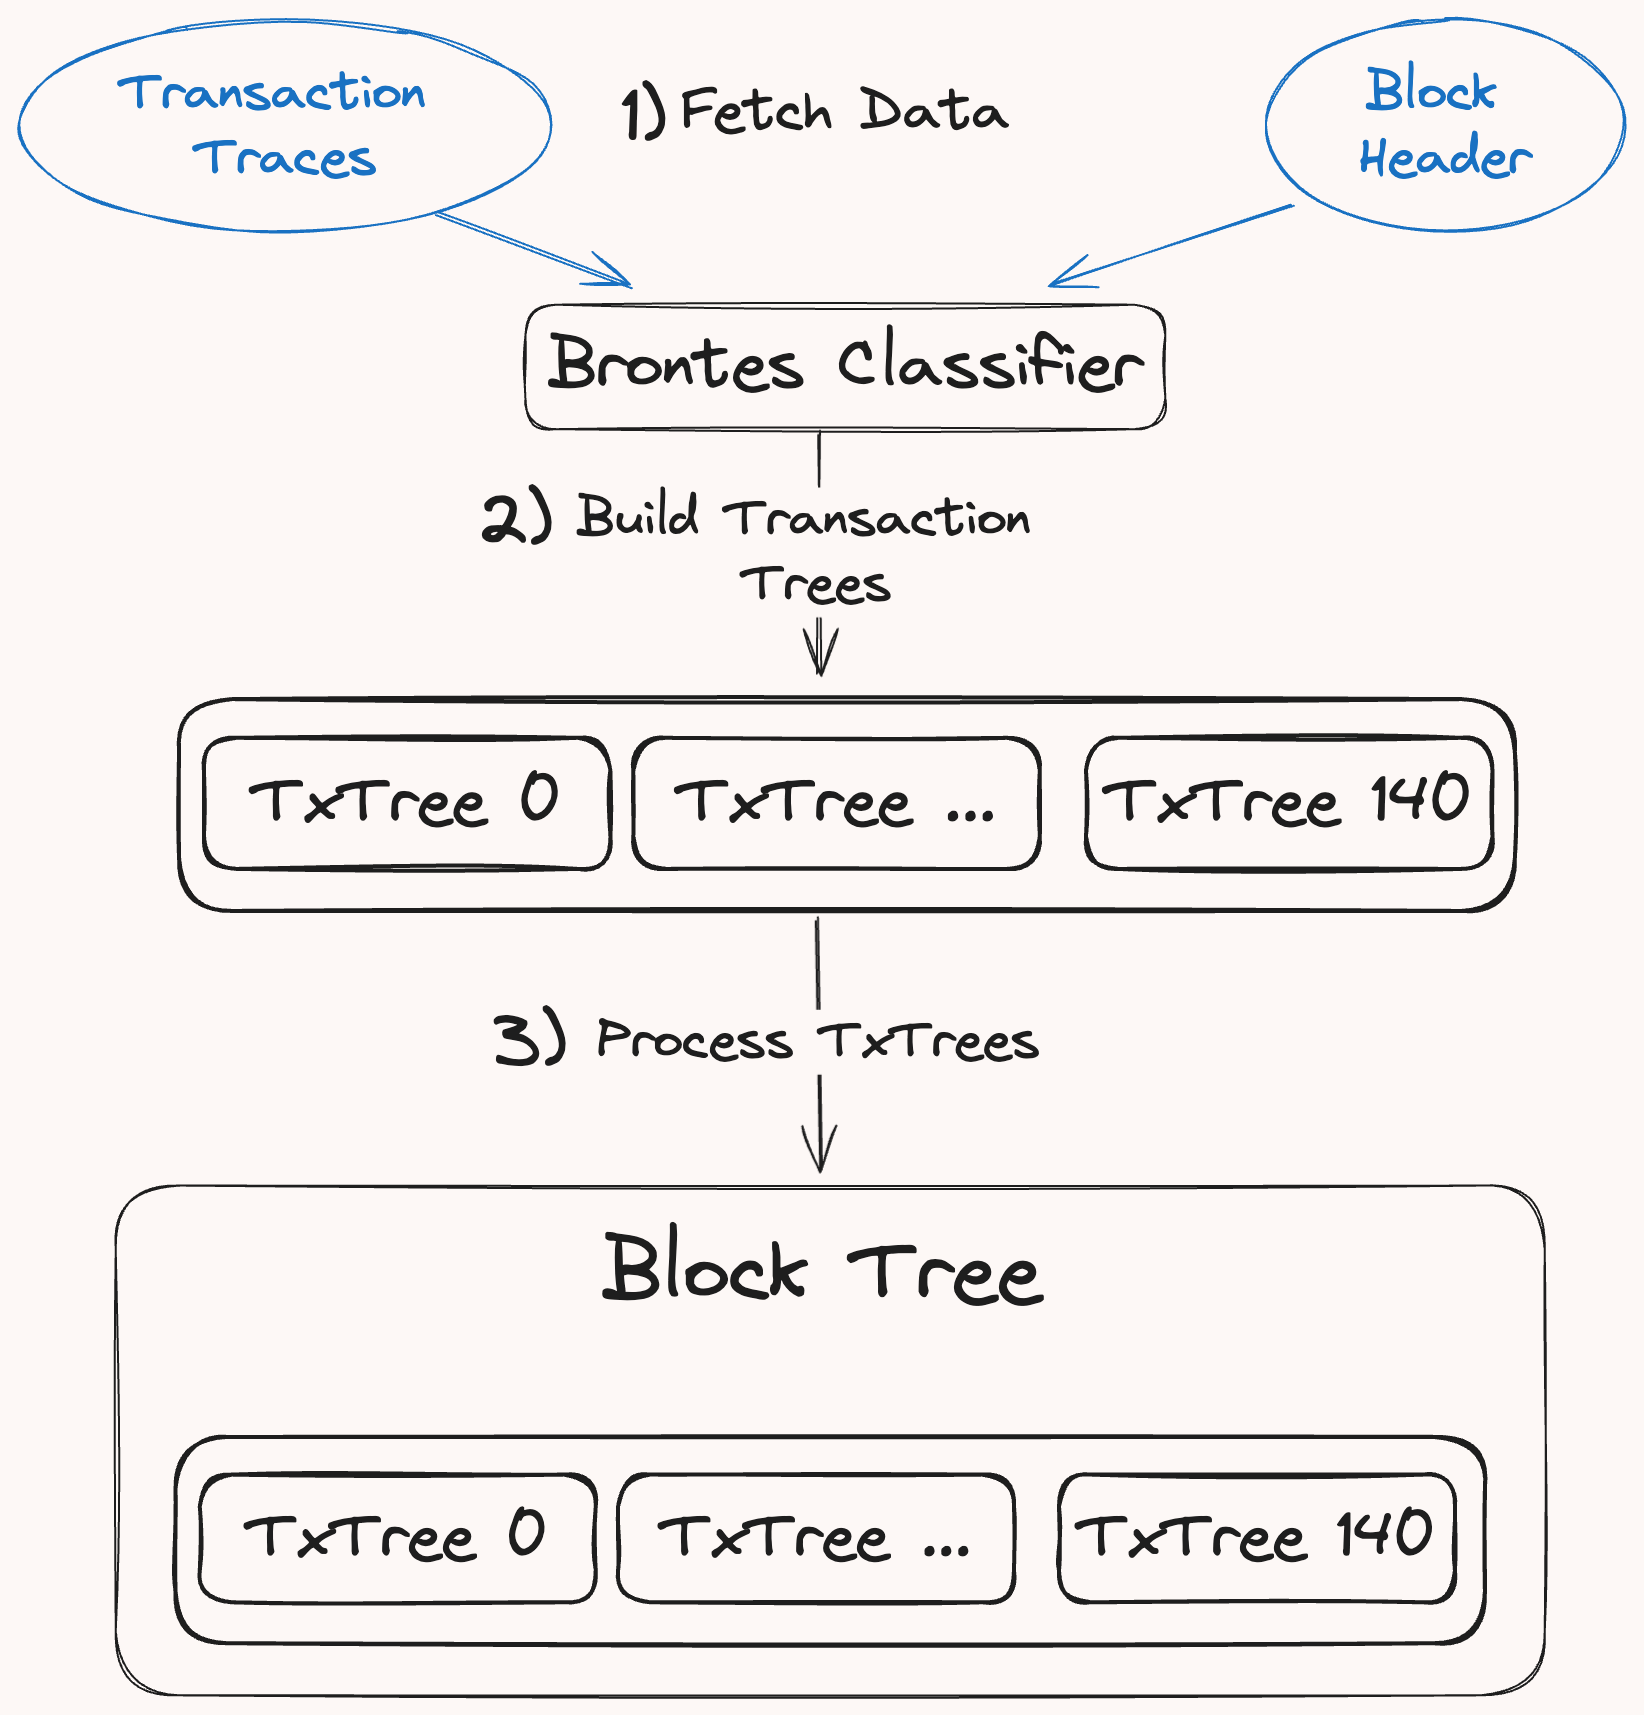
Block Tree
The BlockTree decodes, and classifies a block's transaction traces into a collection of TransactionTrees, each representing a transaction's call hierarchy.
A TransactionTree structures EVM traces as a series of Action, which serve as the nodes of the tree. Each Action normalizes core DeFi operations, such as swaps, flash loans, and mints. This approach harmonizes idiosyncratic protocol implementations, generalizing their representation to establish a consistent analytical framework.
Block Tree Building
At a high level, generating the Block Tree involves three primary steps:
-
Fetching Raw EVM Data: Brontes retrieves the transaction traces and the
BlockHeaderfor a block, first querying the database. If the data is not available, it is generated using a customrevm-inspectorand cached in the database for future use. -
Tree Building: Traced transactions are individually passed to the TxTree builder which descends through the call hierarchy, classifying each trace into an
Action. Decoding and normalization occur via thedispatchmacro which routes call data to itsProtocolClassifier. See the Action Classification section for more. -
Processing: The newly built BlockTree undergoes sanitization to account for tax tokens and duplicate transfers. It also classifies multi-call frame actions, which span multiple traces. More on this in the Multi Call Frame Classification section.
Action Classification
Each transaction trace is classified into an Action and an optional DexPriceMsg if it should be priced. The diagram below illustrates the classification process:
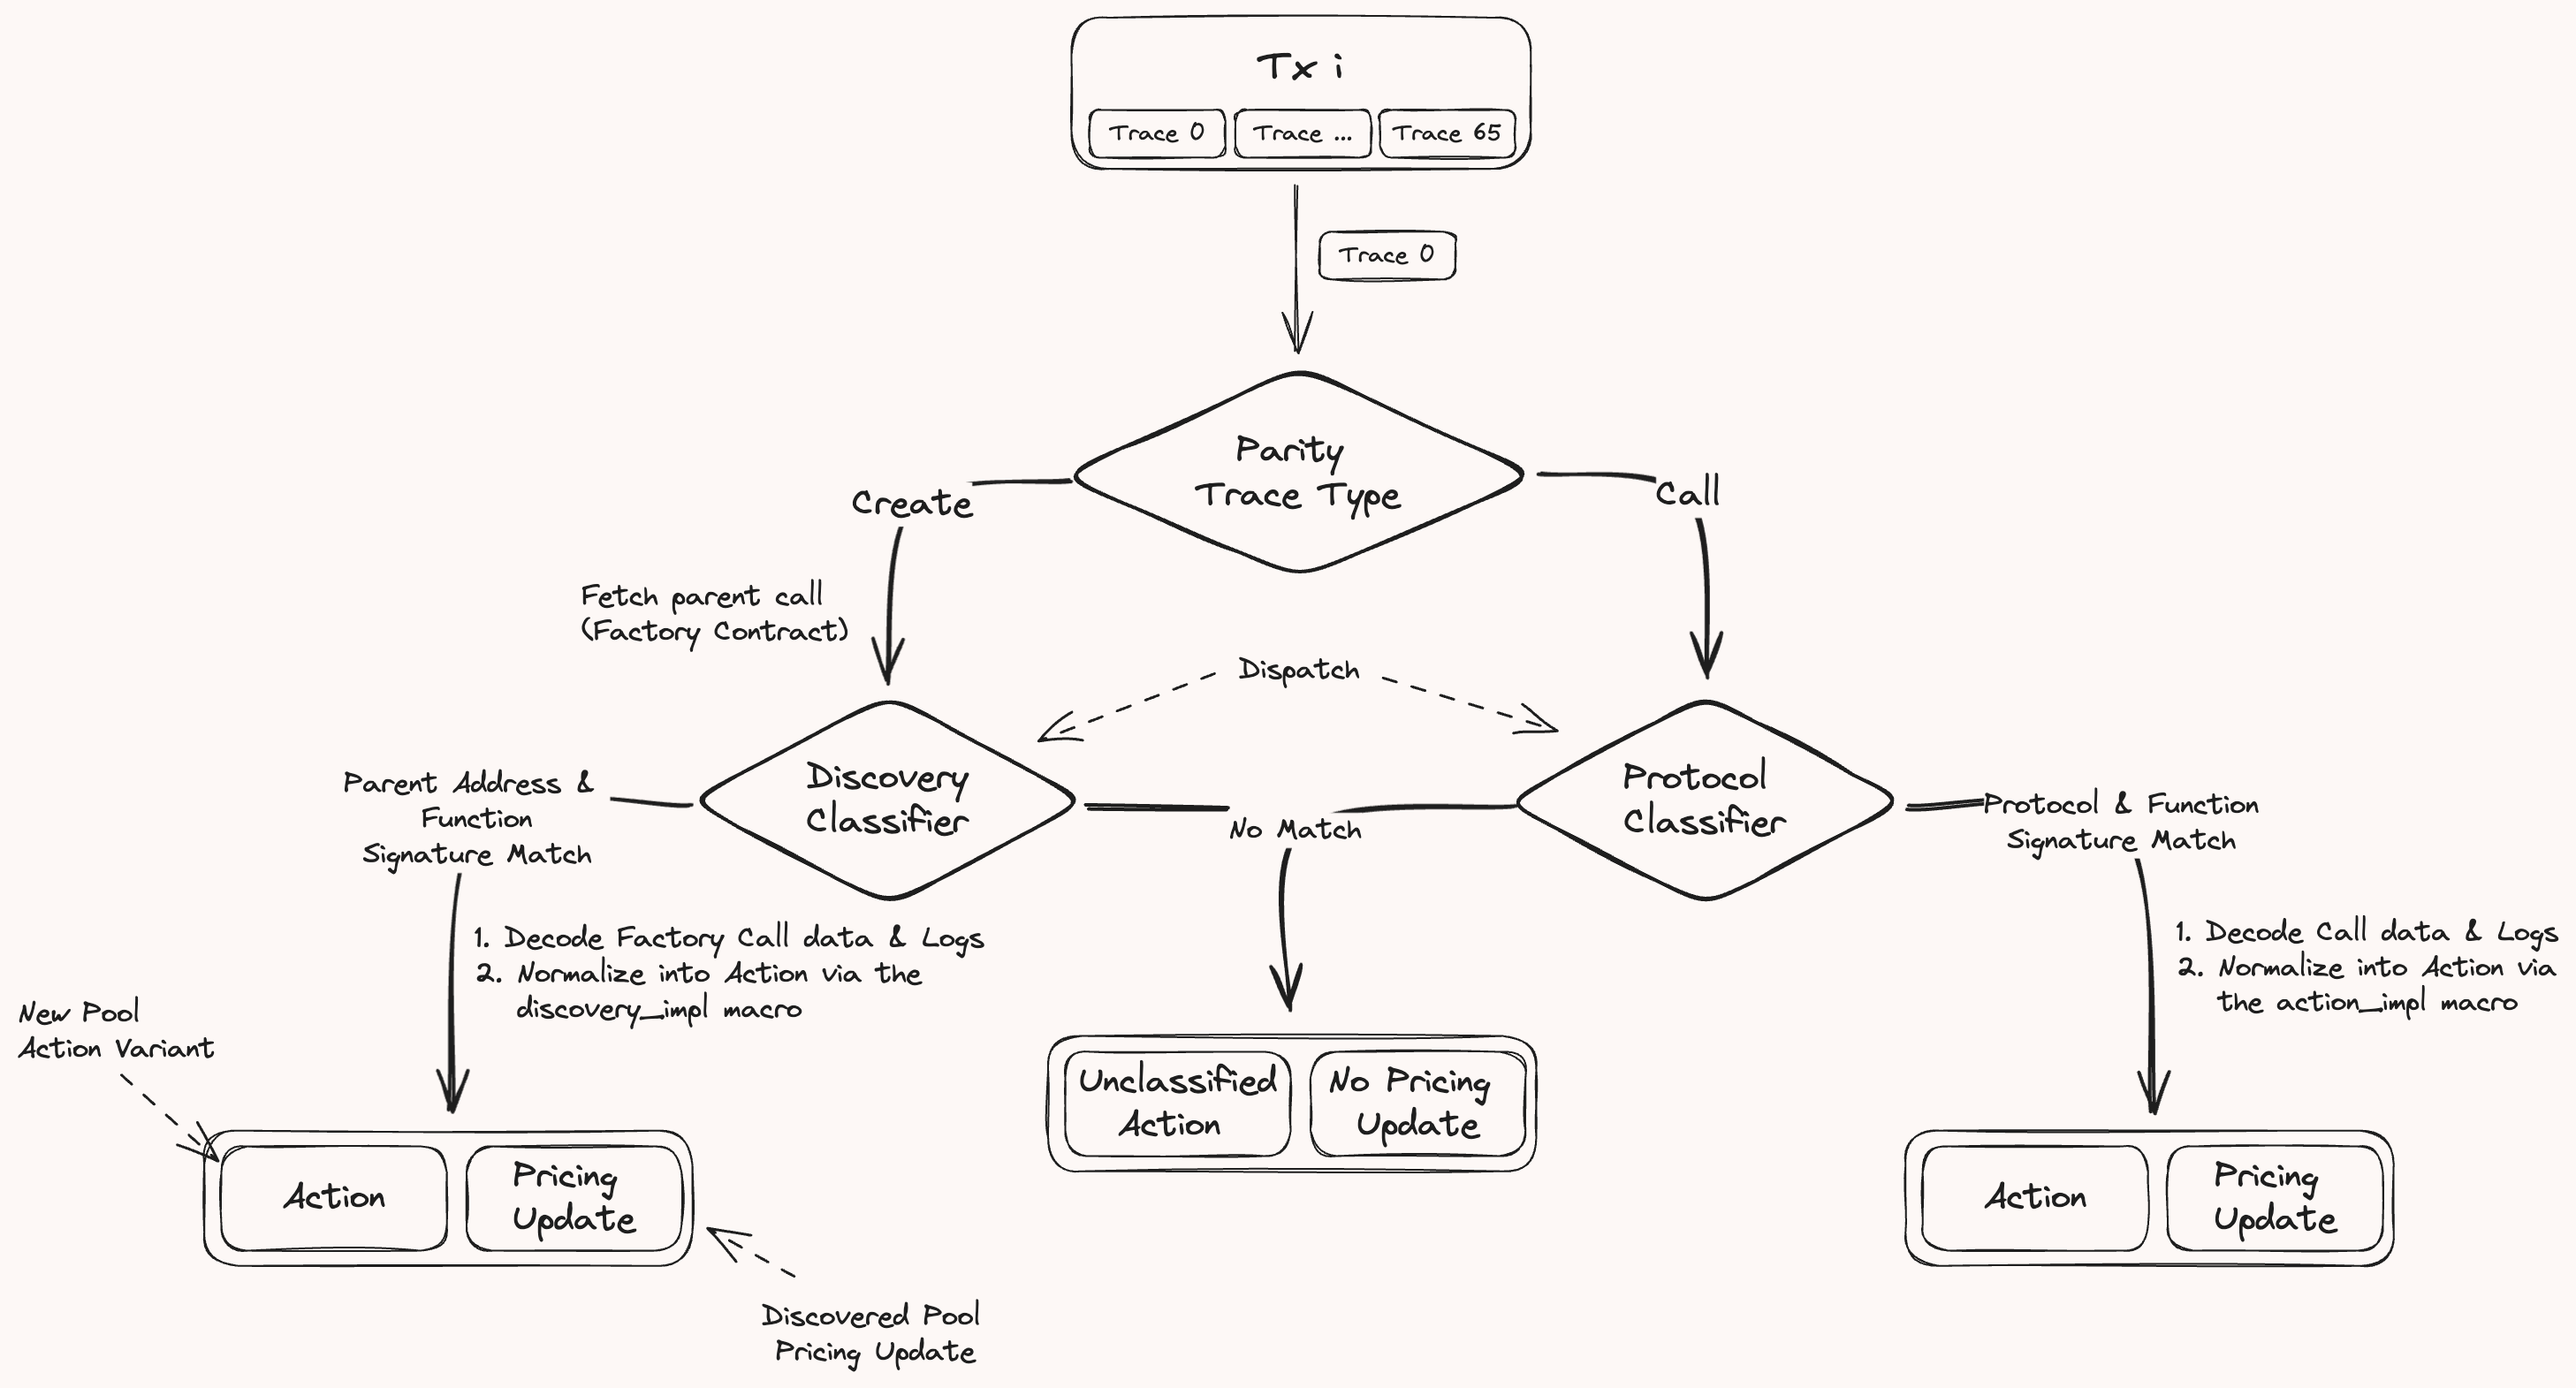
Protocol Classifier
The ProtocolClassifier, generated by the action_dispatch proc macro, orchestrates the call trace classification. This macro creates the dispatch function which routes each trace to its action classifier based on the protocol and function call. These classifiers decode and normalize trace data into a standardized Action. To incorporate new classifiers, developers simply add them in the macro invocation.
Here is an example of how you'd declare available classifiers using the action_dispatch macro:
action_dispatch!(
    ProtocolClassifier,
    UniswapV2SwapCall,
    PancakeSwapV2BurnCall,
    UniswapV3SwapCall,
    ...
);
Action Dispatch
The dispatch function routes each call trace to its classifiers through these steps:
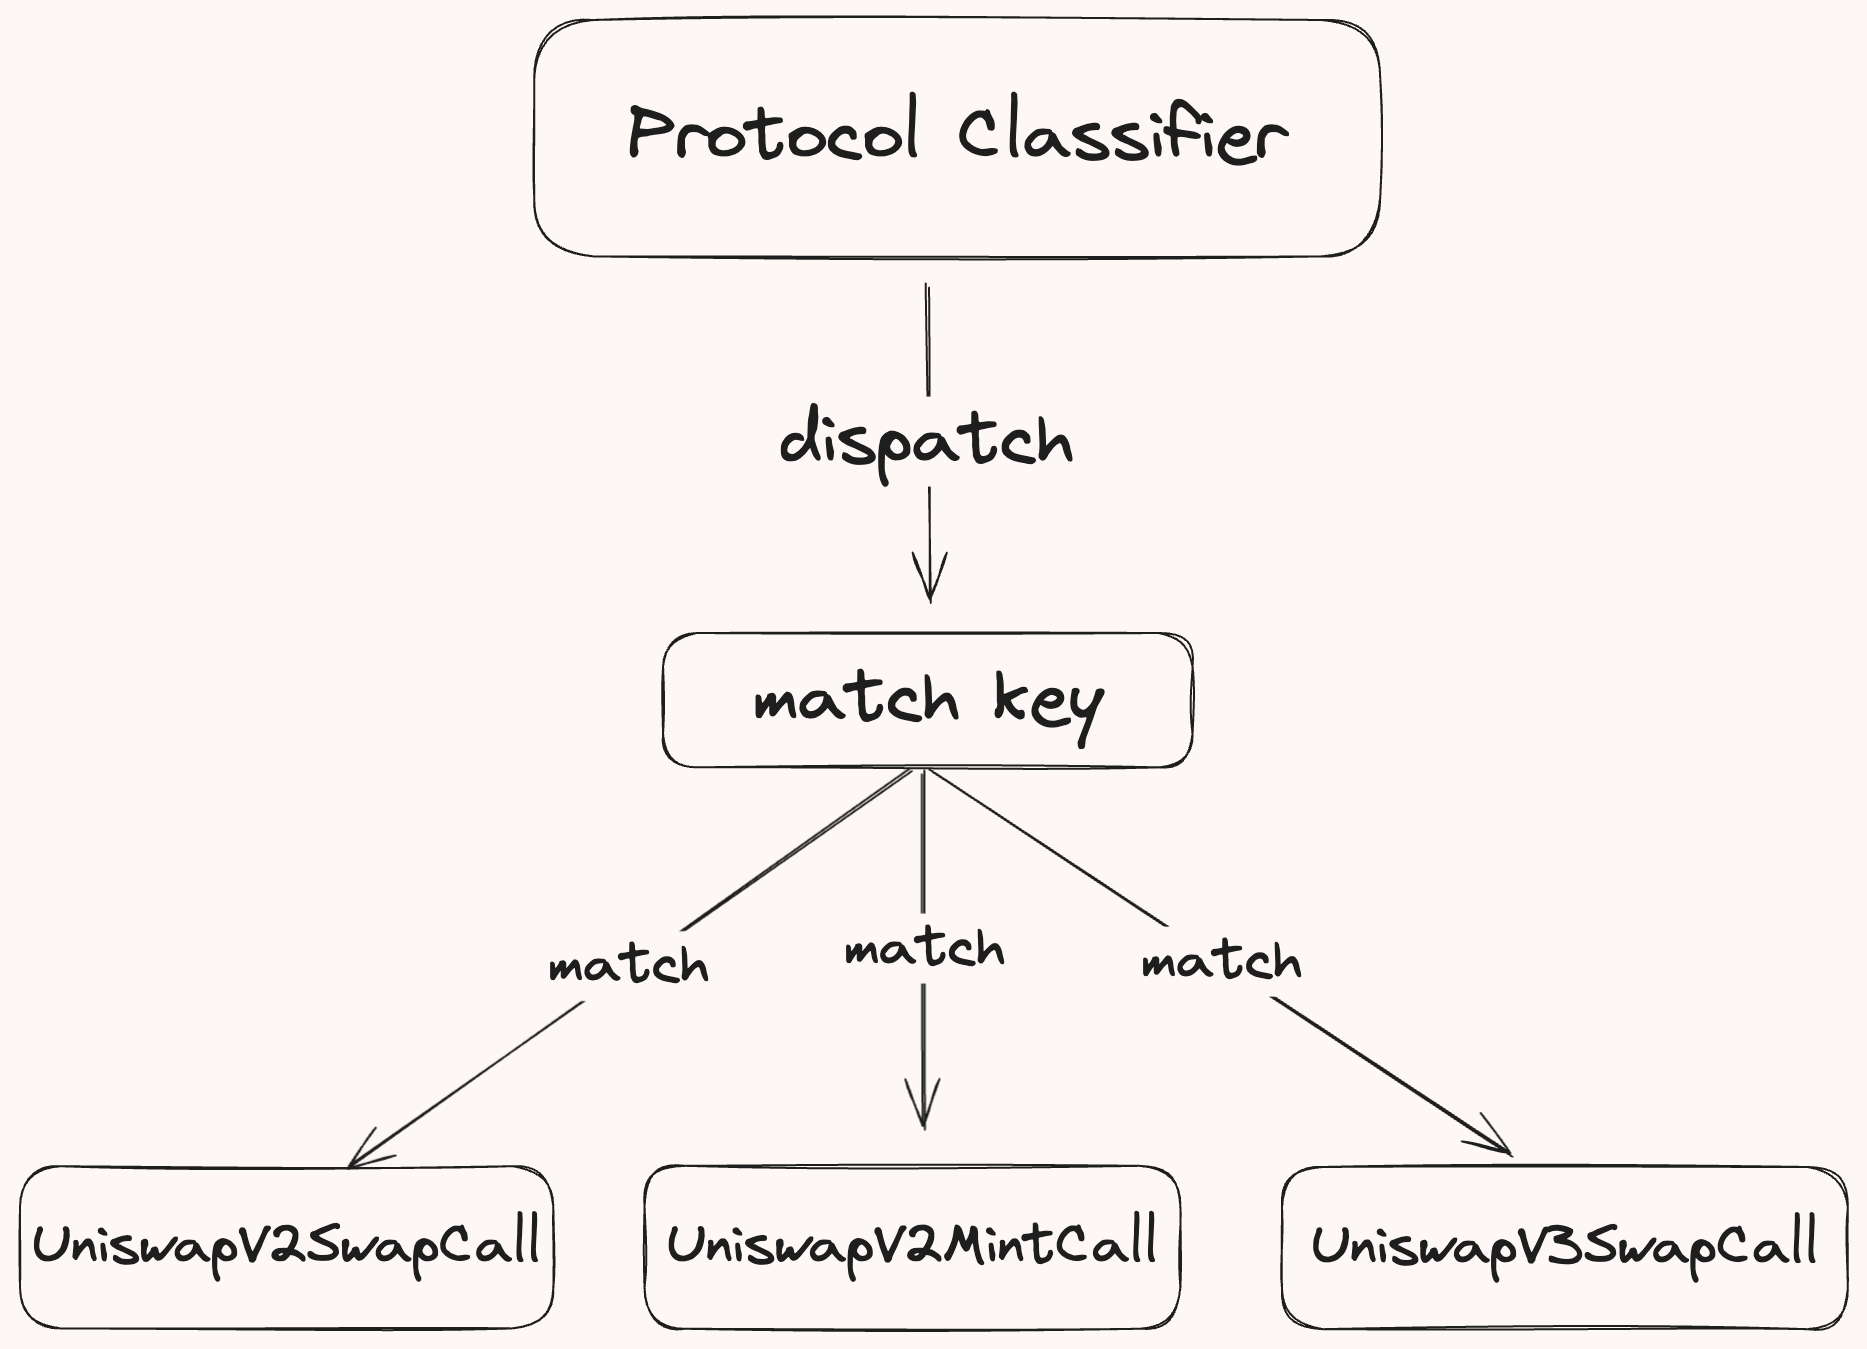
-
Retrieve Protocol Information: Fetches the protocol associated with the trace's target address by querying the
AddressToProtocolInfotable, consistently updated by theDiscoveryClassifier. -
Create a Match Key: Append the protocol to the function signature to form a match key.
-
Identify the action classifier: Compares the match key against the set of classifiers. If a match is found,
decode_call_traceis called on the corresponding classifier, passingCallInfo, database connection (db_tx),block, and transaction index (tx_idx) as inputs.
Classifying the Action
The decode_call_trace method of the action classifier, generated by the action_impl proc macro, decodes & classifies the trace. Developers specify the expected data inputs and the transformation logic, and the macro handles all aspects of data decoding.
Understanding the action_impl Macro
The action_impl macro generates all necessary decoding logic based on specified flags — namely call data, logs, and return data — allowing developers to focus solely on how the data is transformed into a normalized Action.
Here’s a breakdown of the macro's usage:
action_impl!(
    ProtocolPath,            // Path to the protocol module
    PathToCall,              // Path to the alloy binding for that function
    CallType,                // The type of action, e.g., Swap, Mint
    [LogType],               // Array of log types, in the order they are emitted
    logs: bool,              // Flag to specify if logs should be decoded
    call_data: bool,         // Flag to specify if call data should be decoded
    return_data: bool        // Flag to specify if return data should be decoded
    call_function: ExprClosure, // Closure defining the logic to construct the action
);
Example: Classifying a Maker PSM Swap Action
Let's consider this macro invocation to classify swap actions for the Maker PSM module.
action_impl!(
    Protocol::MakerPSM,               // Path to the protocol module
    crate::MakerPSM::buyGemCall,      // Specifies the function
    Swap,                             // Action type
    [BuyGem],                         // Log type emitted by the function
    call_data: true,                  // Decode call data
    logs: true,                       // Decode log data
    |info: CallInfo,
     call_data: buyGemCall,
     log_data: MakerPSMBuyGemCallLogs,
     db_tx: &DB| {
        // Custom logic to process the data and classify the action into a swap action

        // Fetches the details of this contract
        let details = db_tx.get_protocol_details(info.target_address)?;

        // For the PSM, the token0 should always be set to DAI and token1
        // is the gem (USDC or USDP)
        let [token_0, token_1] = [details.token0, details.token1];

        // Retrieves the token symbol and decimals
        let t0_info = db_tx.try_fetch_token_info(token_0)?;
        let t1_info = db_tx.try_fetch_token_info(token_1)?;

        // Extracts the amount of tokens being bought from the decoded call data
        let amount_out = call_data.gemAmt.to_scaled_rational(t1_info.decimals);

        // Extracts the fee in DAI decimals from the decoded log
        let fee = log_data.buy_gem_field?.fee;
        let fee_amount = fee.to_scaled_rational(t0_info.decimals);

        // The amount of DAI being spent, amount out + fee
        let amount_in = &amount_out + &amount_out * fee_amount;

        // Returns the normalized swap action
        Ok(NormalizedSwap {
            protocol: Protocol::MakerPSM,
            trace_index: info.trace_idx,
            from: info.from_address,
            recipient: call_data.usr,
            pool: info.target_address,
            token_in: t0_info,
            token_out: t1_info,
            amount_in,
            amount_out,
            msg_value: info.msg_value,
        })
    }
);
In this implementation:
- The required inputs are specified via the flags (
call_dataandlogs). - The closure uses the decoded call data & logs to normalize the call into a
NormalizedSwapaction.
Discovery Classifier
The DiscoveryClassifier, generated by the discovery_dispatch proc macro, manages the indexing of new protocol contracts. This macro creates the dispatch function which routes each create trace to its factory contract classifier. These classifiers the create trace a corresponding factory contract initialization function into a NormalizedNewPool action variant. To incorporate discovery for a protocol, developers simply add them in the macro invocation.
Here is an example of how you'd declare available factory classifiers using the discovery_dispatch macro:
discovery_dispatch!(
    DiscoveryClassifier,
    UniswapV2Discovery,
    UniswapV3Discovery,
    PancakeSwapV3Discovery,
    CurveV1MetaDiscovery,
    CurveV2PlainDiscovery0,
    ...
);
Discovery Dispatch
The dispatch function routes each call trace to its classifiers through these steps:
-
Create a Match Key: Gets the immediate parent call of the create trace to retrieve the factory contract address and the factory contract initialization function signature. Appends the factory address and the function signature to form a match key.
-
Identify the factory classifier: Compares the match key against the set of factory classifiers. If a match is found,
decode_create_traceis called on the corresponding classifier, passing thetracer,deployed_address,parent_calldata(factory contract function call), andtrace_idxas inputs.
Classifying the Contract
The decode_call_trace method of the factory classifier, generated by the discovery_impl proc macro, decodes the factory deploy function call to extract the contract parameters. Developers specify the factory address, function and transformation logic, and the macro handles the decoding.
Understanding the discovery_impl Macro
Here’s a breakdown of the macro's usage:
discovery_impl!(
    UniswapV2Discovery,                         // DiscoveryName
    crate::UniswapV2Factory::createPairCall,    //  Path::To::Factory::DeployCall
    0x5C69bEe701ef814a2B6a3EDD4B1652CB9cc5aA6f, // Factory Address
    |deployed_address: Address, trace_index: u64,
     _,                                         // Here the tracer is not used
     call_data: createPairCall|  async move {
        // Custom logic to classify the action into a new pool action

        // Extracts the token addresses from the factory deploy call data
        let token_a = call_data.tokenA;
        let token_b = call_data.tokenB;

        // Returns the normalized new pool action
        vec![NormalizedNewPool {
            pool_address: deployed_address,
            trace_index,
            protocol: Protocol::UniswapV2,
            tokens: vec![token_a, token_b],
        }]
    }
);
In this implementation:
- The closure uses the decoded call data from the factory deploy call and the deployed address from the CREATE trace to create a
NormalizedNewPoolaction which contains all relevant information about this newly created Uniswap pool.
Adding a step for generating the necessary bindings for the Uniswap V3 factory and pool contracts will ensure that users have all the components they need for a complete classifier setup. Here's how to integrate this information into your existing guide:
Implementing a New Classifier: Uniswap V3 Example
Step 1: Generate Contract Bindings
Before implementing classifiers, you'll need to generate bindings for the Uniswap V3 factory and pool contracts. This involves the following steps:
- Obtain the ABI for both the factory and pool contracts.
- Place these ABI files in the classifier-abis folder.
- Use the alloy
sol!macro to generate the contract bindings. Add the invocation tobrontes_classifierlib.rsfile
sol!(UniswapV3Factory, "./classifier-abis/UniswapV3Factory.json");
sol!(UniswapV3, "./classifier-abis/UniswapV3.json");
Note
The
action_implanddiscovery_implmacros will automatically import the generated bindings.
Finally, add the protocol name to the Protocol enum in protocol.rs.
Step 2: Adding a Discovery Classifier for Uniswap V3
Implement a discovery classifier for the Uniswap V3 pools. This classifier will identify and classify new pools created via the Uniswap V3 Factory.
use alloy_primitives::Address;
use brontes_macros::discovery_impl;
use brontes_pricing::Protocol;


discovery_impl!(
    UniswapV3Discovery,                         // Discovery classifier name
    crate::UniswapV3Factory::createPoolCall,    // Path to the deploy call binding
    0x1F98431c8aD98523631AE4a59f267346ea31F984, // Factory address
    |deployed_address: Address, trace_index: u64,
     call_data: createPoolCall, _| async move {
        // Extract the pool token addresses from the factory deploy function call data
        let token_a = call_data.tokenA;
        let token_b = call_data.tokenB;

        // Return the normalized new pool action
        vec![NormalizedNewPool {
            pool_address: deployed_address,
            trace_index,
            protocol: Protocol::UniswapV3,
            tokens: vec![token_a, token_b],
        }]
    }
);
Add the new discovery classifier to the discovery_dispatch! macro in the classifiers mod.rs:
discovery_dispatch!(
    DiscoveryClassifier,
    SushiSwapV2Discovery,
    UniswapV2Discovery,
    UniswapV3Discovery
);
Step 3: Implementing an Action Classifier for Uniswap V3 Mint Function
Define an action classifier for the Uniswap V3 mint function to process mint actions:
use brontes_macros::action_impl;

action_impl!(
    Protocol::UniswapV3,
    crate::UniswapV3::mintCall, // Path to the alloy binding for the mint function
    Mint,                       // Action type
    [Mint],                     // Log type emitted by the mint function
    return_data: true,          // Decode return data
    logs: true,                 // Decode logs
    call_data: true,            // Decode call data
     |
     info: CallInfo,
     call_data: mintCall,
     return_data: mintReturn, _logs: UniswapV3MintCallLogs,  db_tx: &DB| {
        // Extract the token deltas from the decoded return data
        let token_0_delta = return_data.amount0;
        let token_1_delta = return_data.amount1;

        // Fetch the protocol details from the database
        let details = db_tx.get_protocol_details_sorted(info.target_address)?;
        let [token_0, token_1] = [details.token0, details.token1];

        // Fetch the token info from the database
        let t0_info = db_tx.try_fetch_token_info(token_0)?;
        let t1_info = db_tx.try_fetch_token_info(token_1)?;

        // Convert U256 to malachite Rational using the token decimals
        let am0 = token_0_delta.to_scaled_rational(t0_info.decimals);
        let am1 = token_1_delta.to_scaled_rational(t1_info.decimals);

        // Return the normalized mint action
        Ok(NormalizedMint {
            protocol: Protocol::UniswapV3,
            trace_index: info.trace_idx,
            from: info.from_address,
            recipient: call_data.recipient,
            pool: info.target_address,
            token: vec![t0_info, t1_info],
            amount: vec![am0, am1],
        })
    }
);
- Check out the full Uniswap V3 action implementation, which also includes swap, burn, and collect functions here.
Register the new action classifier in the action_dispatch! macro in the classifiers mod.rs:
action_dispatch!(
    ProtocolClassifier,
    UniswapV2SwapCall,
    UniswapV2MintCall,
    UniswapV3MintCall
);
And that's it! You've successfully implemented support for automated pool discovery and mint action classification for Uniswap V3.
Multi Call Frame Classification
In certain scenarios, actions extend beyond a single trace and involve nested actions that span through the child call frames, such as flash loans or aggregator swaps. Multi call frame classification is designed to handle such scenarios, where a single call-frame is insufficient for complete action classification.
Process
- Mark Complex Classification during classification: When we classify a trace into an action that requires multi call frame classification, we mark the trace index for retrieval during the multi call frame classification phase.
- Request Retrieval: After all traces are classified, retrieve multi call frame classification requests and process each request in reverse transaction tree order. This ensures that nested complex classifications are handled correctly.
- Child Node Retrieval: For each classification request, retrieve all child nodes relevant to the action, as specified by the
MultiCallFrameClassifierimplementation.
Example: AaveV2 Liquidation
Consider the AaveV2 classifier for a liquidation action, which requires fetching all child transfer actions. Here’s how the classifier is implemented:
fn create_classifier(request: MultiFrameRequest) -> Option<MultiCallFrameClassification<Action>> {
    Some(MultiCallFrameClassification {
        trace_index: request.trace_idx,
        tree_search_builder: TreeSearchBuilder::new().with_action(Action::is_transfer),
        parse_fn: Box::new(parse_v2_v3),
    })
}
This function retrieves the relevant child actions for a node and passes them to a parsing function that finalizes the classification of the complex action. These actions are then integrated into the main action and pruned from the tree to prevent duplication.
fn parse_v2_v3(this: &mut Action, child_nodes: Vec<(NodeDataIndex, Action)>) -> Vec<NodeDataIndex> {
    let this = this.try_liquidation_mut().unwrap();
    child_nodes.into_iter().find_map(|(index, action)| {
        if let Action::Transfer(transfer) = action {
            if transfer.to == this.liquidator {
                this.liquidated_collateral = transfer.amount;
                return Some(index);
            }
        }
        None
    })
    .map(|e| vec![e])
    .unwrap_or_default()
}
Classifier Configuration
The Classifier configuration file, located at config/classifier_config.toml, allows you to manually map contract addresses to their corresponding protocols when automated discovery is impractical.
Configuration Example
Configure classifiers in TOML format as shown:
[AaveV3."0x5faab9e1adbddad0a08734be8a52185fd6558e14"]
init_block = 18979624

[[AaveV3."0x5faab9e1adbddad0a08734be8a52185fd6558e14".token_info]]
address = "0xa0b86991c6218b36c1d19d4a2e9eb0ce3606eb48"
decimals = 6
symbol = "USDC"

[[AaveV3."0x5faab9e1adbddad0a08734be8a52185fd6558e14".token_info]]
address = "0x2260fac5e5542a773aa44fbcfedf7c193bc2c599"
decimals = 8
symbol = "WBTC"
This configuration populates the AddressToProtocolInfo table, which maps contract addresses to detailed protocol data, which is used in the dispatch functions to apply the correct classifiers based on the contract address and protocol.
Important Notes
- Protocol Compatibility: The protocol name in the configuration must correspond to one listed in the protocol enum in
protocol.rs. - Token Information: Includes blockchain addresses, decimals, and symbols.
- Initialization Block: Marks at what block the contract was created.
Brontes Database
Brontes uses a local libmdbx database to store off-chain data for its analysis pipeline. The data comes from a Clickhouse database managed by Sorella Labs. It includes centralize exchange quotes and trade data, mempool and relay data, address metadata, and more.
- For details on the specific tables and their schemas, see the Tables Schema page.
Database Sync
On startup, Brontes syncs its local database by downloading the necessary data from Clickhouse.
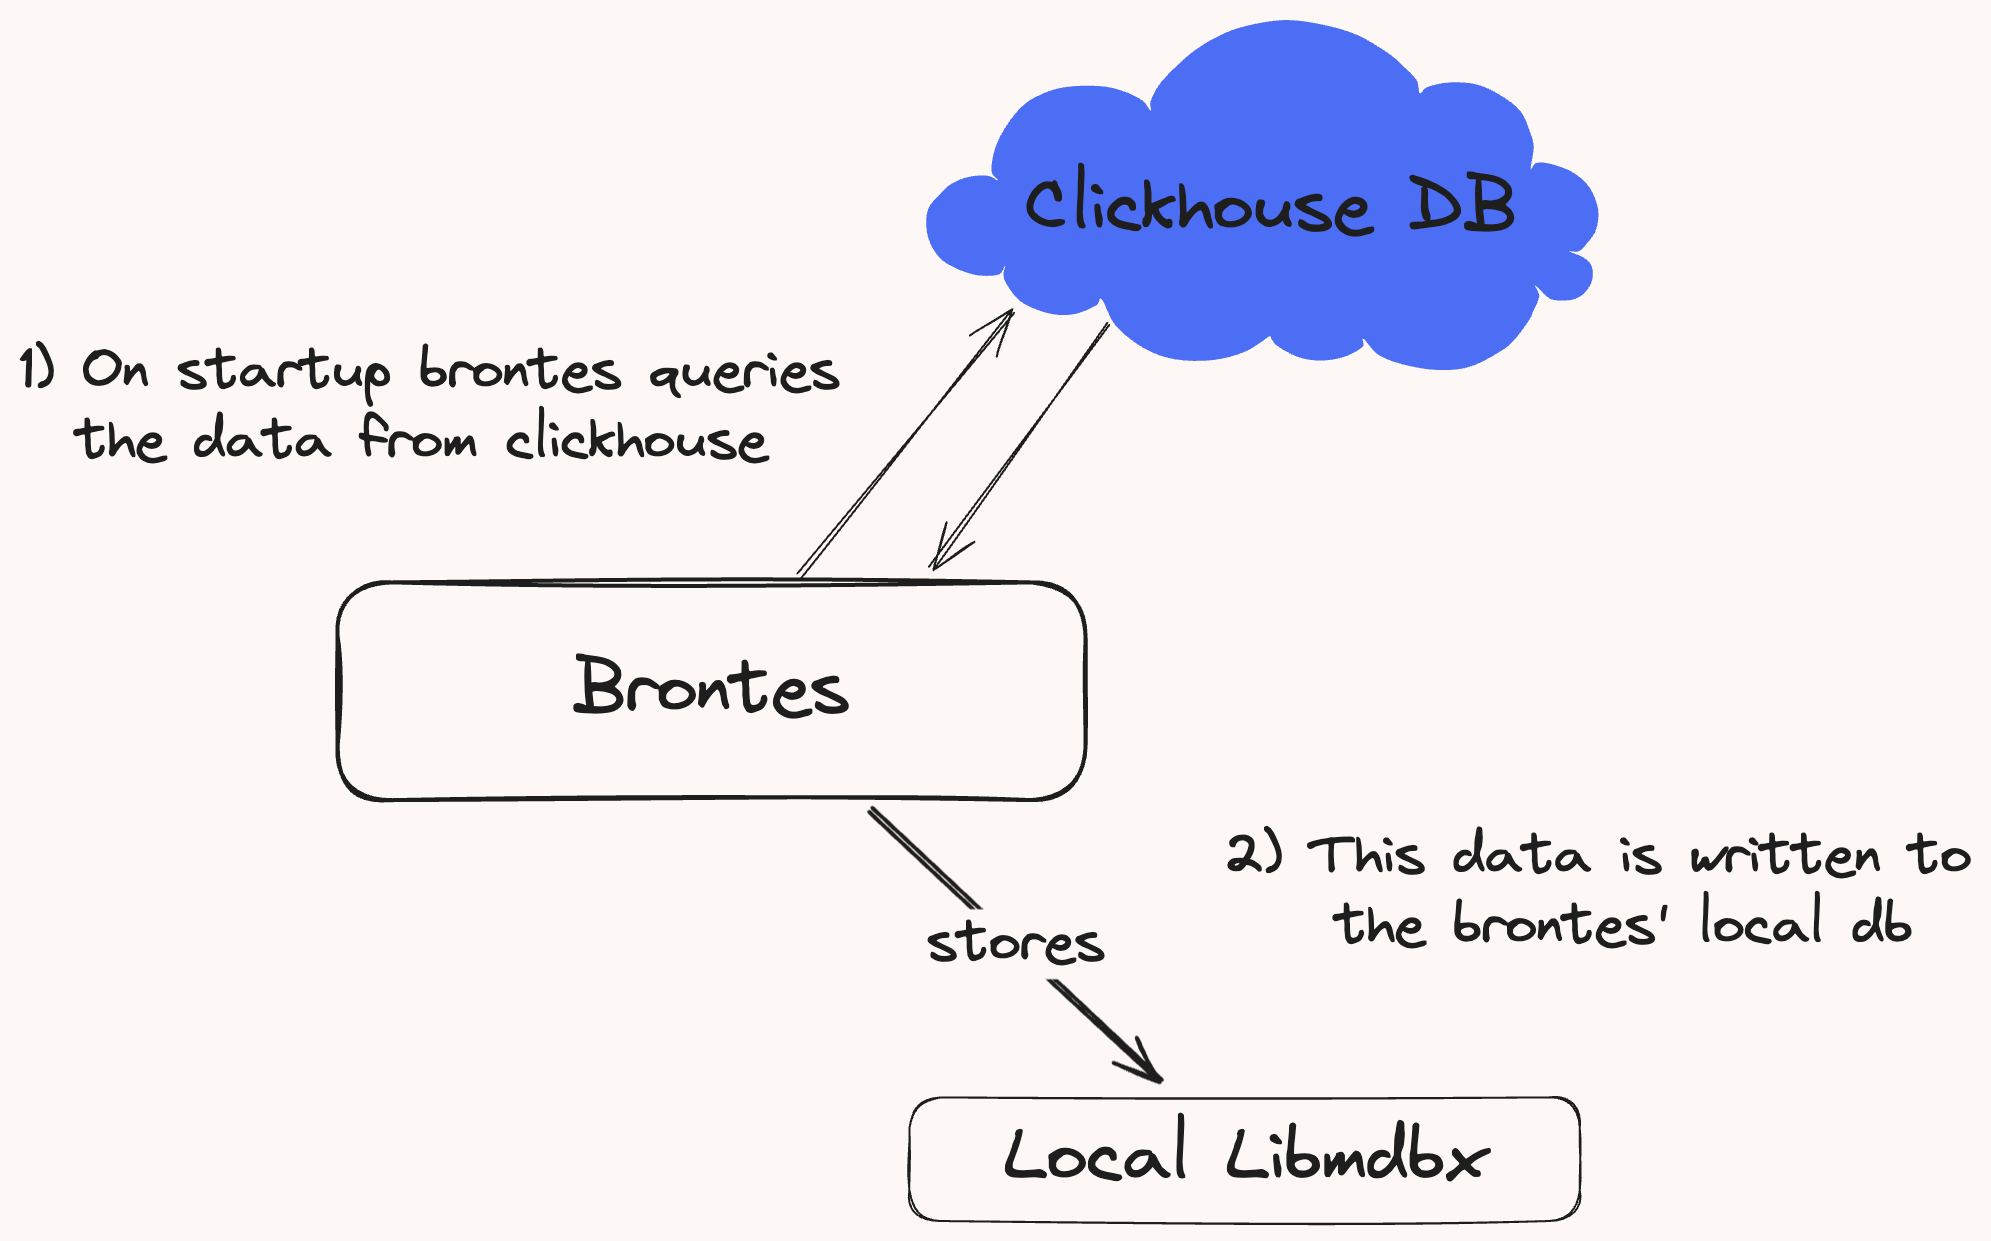
Figure 1: Data download from Clickhouse to Brontes local storage
Snapshot Sync
To manage cloud egress costs, we don't currently provide api access to our clickhouse database for historical sync. Instead, users must download the latest db snapshot made available every Monday and Thursday. See the Installation Guide for detailed instructions.
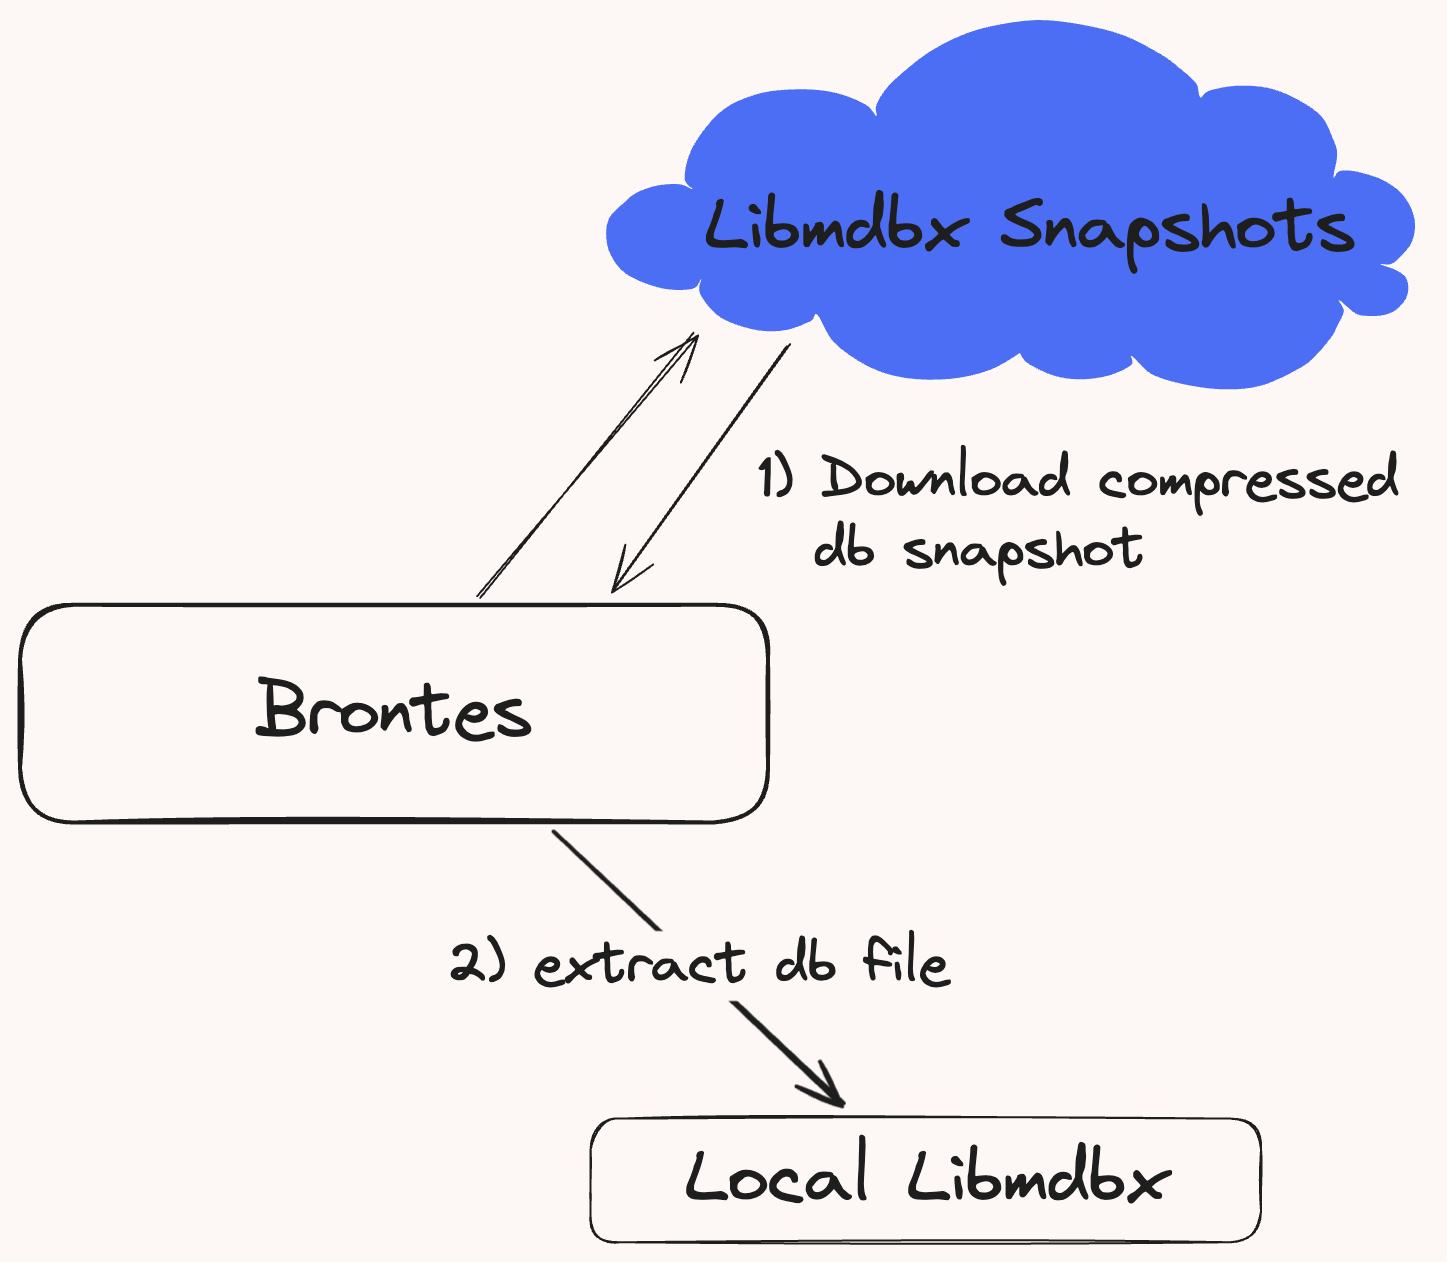
Figure 2: User db snapshot download process.
Data Flow
Brontes adapts its data retrieval method based on its operational mode: for historical block analysis, it accesses the stored data locally; when operating at chain tip, it retrieves data through the Brontes API.
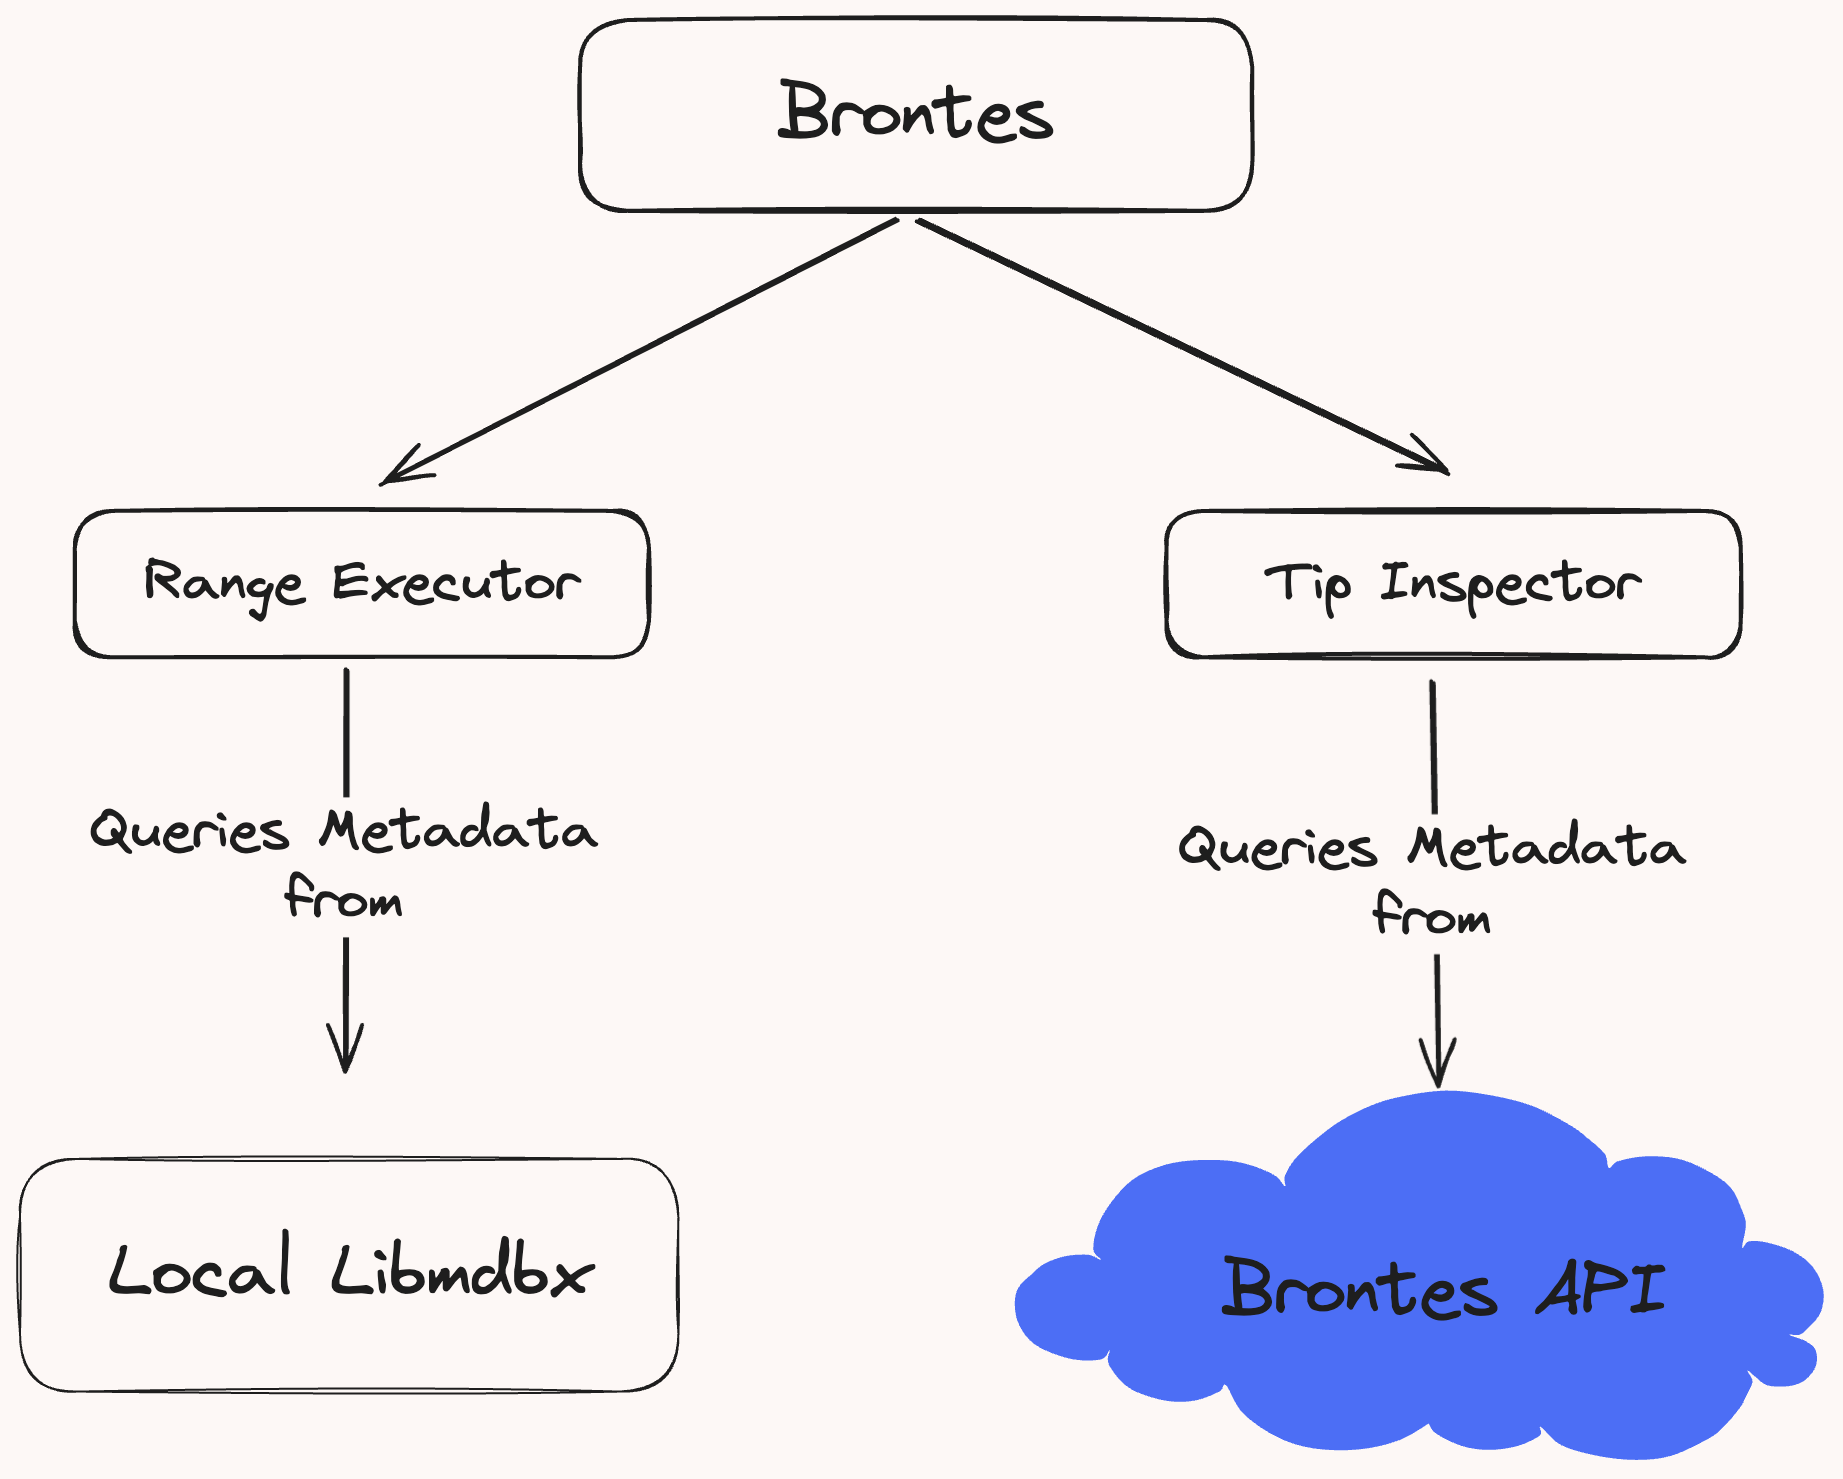
Figure 3: Querying methods for historical blocks and chain tip.
Note Users that want to run Brontes at chain tip, must request API access to query the data at chain tip. Configuration details for API access can be found in the Installation Guide.
Data and Usage
The data stored by Brontes can be categorized into three main types.
1. Block-Specific Data
Each value is mapped to a specific block. This data is fetched at each block before the inspectors are run.
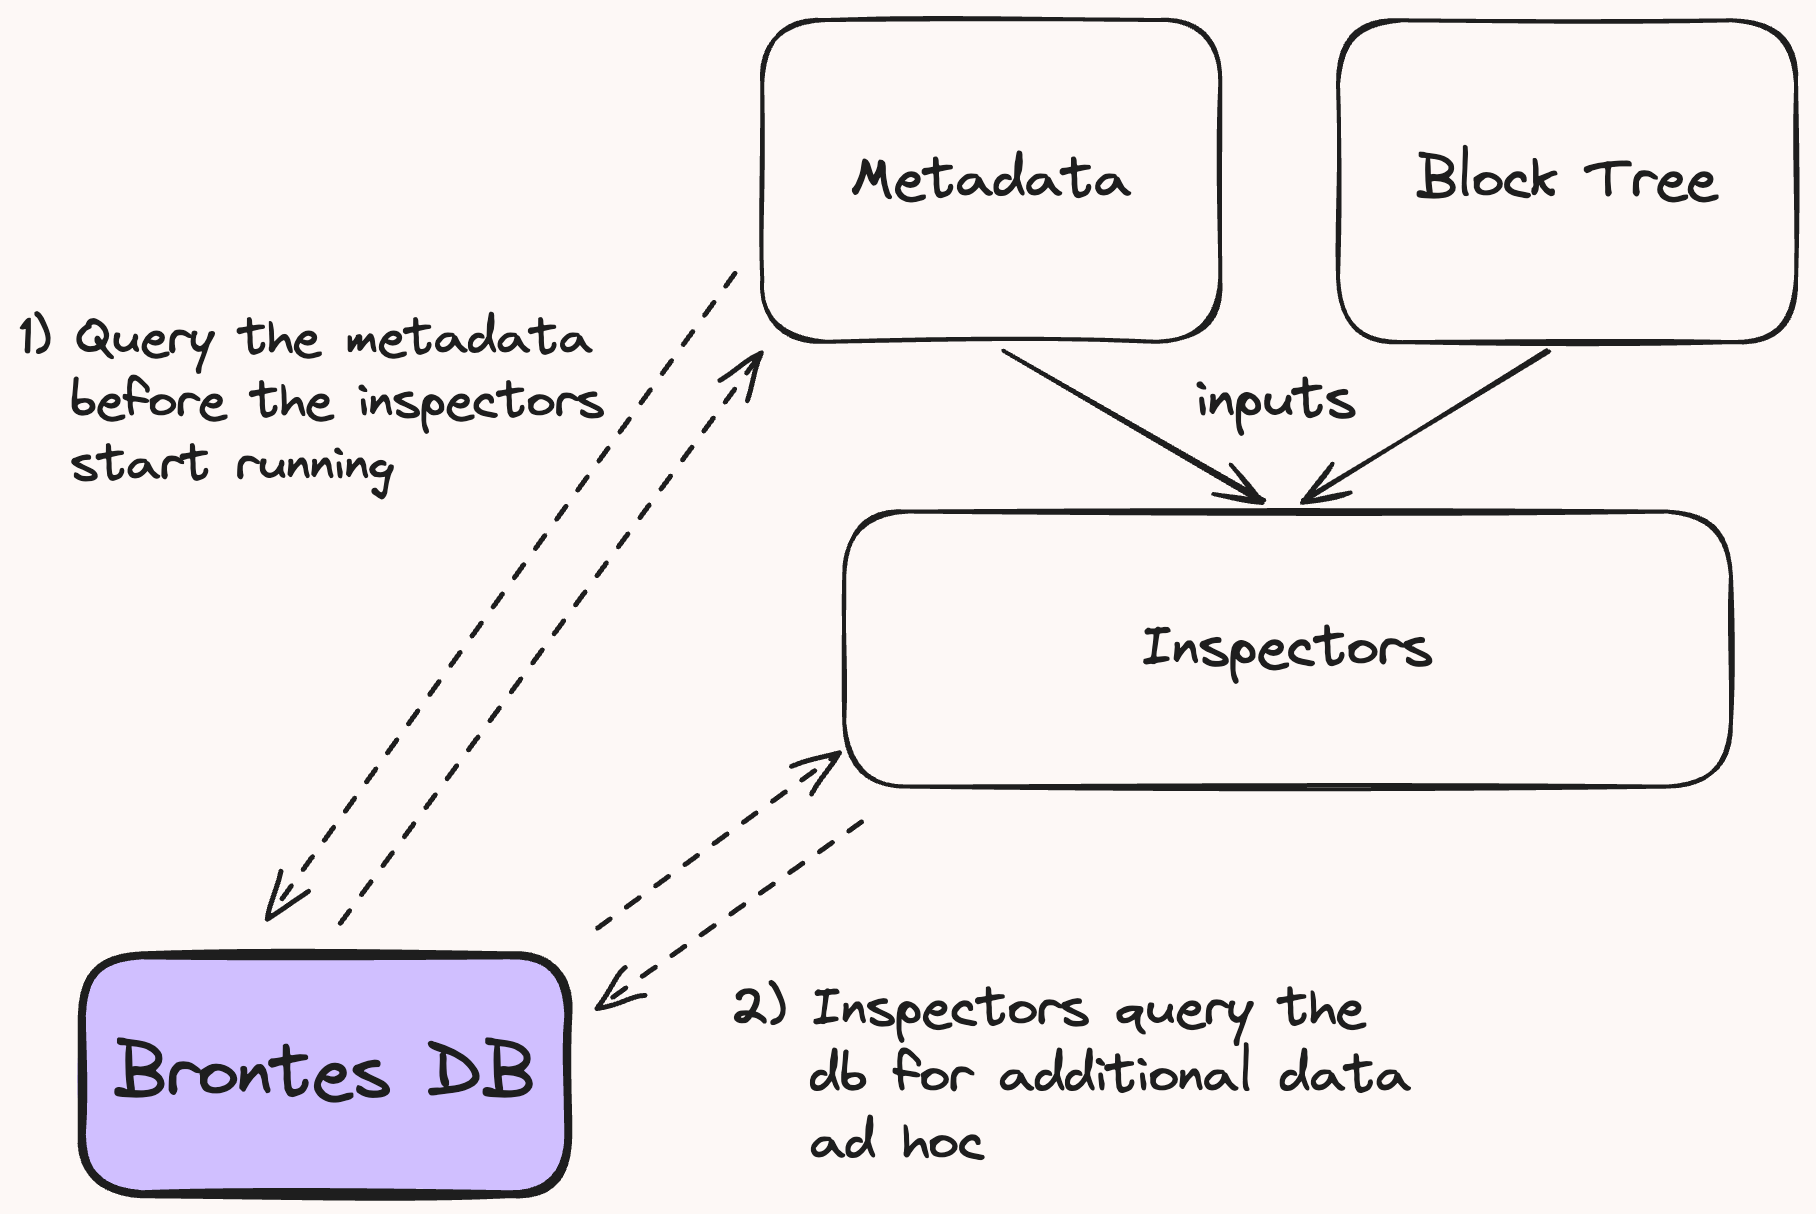
Figure 4: Data usage.
The Metadata struct aggregates the essential block specific data, used by all Inspectors.
pub struct Metadata {
    pub block_metadata: BlockMetadata,
    pub cex_quotes:     CexPriceMap,
    pub dex_quotes:     Option<DexQuotes>,
    pub builder_info:   Option<BuilderInfo>,
    pub cex_trades:     Option<Arc<Mutex<CexTradeMap>>>,
}
BlockInfo: P2P transaction, block and mev-boost data.DexPrice: DEX pricing with transaction level granularity for all active tokens in the block.CexPriceandCexTrades: Centralized exchange quotes and trade data.BuilderInfo: Metadata on the Block builder.
2. Range-Agnostic Data
Valid across the full block range. This includes:
Data for Decoding & Normalization:
TokenDecimals: Token decimals and symbols.AddressToProtocolInfo: Maps contract addresses to their protocol, used during transaction decoding and normalization.
Metadata used by the Inspectors:
This data is used by the inspectors for filtering and analysis. It is queried ad-hoc via the database handle provided by the inspectors' SharedInspectorsUtils. See Fig 4.
BuilderInfo: Information on ethereum block builders, including aggregate pnl & block count.SearcherInfo: Information on searchers eoas and contracts, including summary statistics on mev bundle count and pnl by mev type.AddressMetadata: Detailed address metadata.
3. Analysis Output Data
Stores the output of the analysis pipeline in the MevBlocks table.
Tables Schema
This page serves as a directory for the Brontes database tables. Click on the links provided for detailed schemas and further explanations about each table’s role and contents.
Pricing Data
DexPrice: DEX pricing data at a transaction level of granularity.CexPrice: Price data from centralized exchanges.CexTrades: Trade data from centralized exchanges.
Block Data
Metadata
AddressMetadata: Detailed address metadata.Searcher: Sarcher eoas and contracts metadata.Builder: Ethereum block builders.
Classification Data
These tables are used during the classification process.
AddressToProtocolInfo: Maps addresses to specific protocols & pool tokens.TokenDecimals: Token decimals & symbols.
Brontes Output Data
MevBlocks: Output of Brontes’ analysis, containing the mev bundles identified in each block.
Misc
PoolCreationBlocks: Tracks the creation of liquidity pools, which informs the dex pricing module on what pools to initialize for a given block range.InitializedState: Indicates the state loaded into Brontes to identify the data that needs to be downloaded from Clickhouse.
Pricing
DexPrice Table
Table Name: DexPrice
Description: This table stores DEX pricing data, providing transaction-level granularity for all active tokens within a block.
Key: DexKey
- Type:
DexKey - Description: A unique identifier combining the block number and transaction index.
Value: DexQuoteWithIndex
- Type:
DexQuoteWithIndex - Description: Contains a vector of quotes pair for all active tokens at that transaction index.
Fields:
- tx_idx:
- Type:
u16 - Description: The index of the transaction within the block.
- Type:
- quote:
- Type:
Vec<(Pair, DexPrices)> - Description: A list of
DexPricesfor all active tokens in the transaction.
- Type:
- DexPrices:
- Type:
DexPrices - Description: Dex Quote including the state before and after the transaction and if the pricing originates from a swap or transfer.
- Type:
CexPrice Table
Table Name: CexPrice
Description: Contains price data from centralized exchanges, organized by exchange and pairs.
Key: Block number (u64)
Value: CexPriceMap
- Type:
CexPriceMap - Description: A map of exchange names to another map of currency pairs and their corresponding quotes.
Fields:
- exchange:
- Type:
CexExchange - Description: The exchange from which the quote data is sourced.
- Type:
- Pair:
- Type:
Pair - Description: The pair (e.g., BTC/USD) for which the price is provided.
- Type:
- CexQuote:
- Type:
Vec<CexQuote> - Description: A list of bid and ask prices along with the amounts and timestamp of the quote.
- Type:
CexTrades Table
Table Name: CexTrades
Description: Holds trade data from centralized exchanges.
Key: Block number (u64)
Value: CexTradeMap
- Type:
CexTradeMap - Description: A map organizing trade data by exchange and currency pairs, detailing each trade's price and amount.
Fields:
-
exchange:
- Type:
CexExchange - Description: Identifies the exchange where the trade occurred.
- Type:
-
Pair:
- Type:
Pair - Description: The cryptocurrency pair involved in the trade.
- Type:
-
CexTrades:
- Type:
Vec<CexTrades> - Description: Records of each trade, including the timestamp, price, and amount.
- Type:
Block Tables
Block Info Table Schema
Table Name: BlockInfo
Description: Stores p2p & mev-boost data for each block.
Key: Block number (u64)
Value: BlockMetadataInner
Fields:
- block_hash:
- Type:
U256 - Description: The block hash.
- Type:
- block_timestamp:
- Type:
u64 - Description: Block timestamp.
- Type:
- relay_timestamp:
- Type:
Option<u64> - Description: Timestamp when the block was received by the first relay.
- Type:
- p2p_timestamp:
- Type:
Option<u64> - Description: Timestamp when the block was first seen by a fibernode.
- Type:
- proposer_fee_recipient:
- Type:
Option<Address> - Description: Address of the proposer fee recipient.
- Type:
- proposer_mev_reward:
- Type:
Option<u128> - Description: Amount of MEV reward payed to the proposer.
- Type:
- private_flow:
- Type:
Vec<TxHash> - Description: List of transaction hashes that were not seen in the mempool via Chainbound fibernodes.
- Type:
TxTraces Table Schema
Table Name: TxTraces
Description: Contains the transaction traces produced by the custom revm-inspector for each block.
Key: Block number (u64)
Value: TxTracesInner
Fields:
- traces:
- Type:
Option<Vec<TxTrace>> - Description: A block's transaction traces.
- Type:
Metadata Tables
AddressMeta Table
Table Name: AddressMeta
Description: Comprehensive address metadata.
Key: Address
Value: AddressMetadata
Fields:
- entity_name, nametag: Entity name and alias.
- labels: List of address labels.
- address_type: Type of address (DEX, CEX, Aggregator...).
- contract_info:
ContractInfo- Details about the contract if the address is a smart contract. - ens: Optional ENS name associated with the address.
- social_metadata:
Socials- Links to social media profiles related to the entity.
Searcher Info Tables
Table Names: SearcherEOAs and SearcherContracts
Description: Searcher EOA & Contract Metadata.
Key: Address
Value: SearcherInfo
Fields:
- fund: Fund the searcher address is associated with.
- mev_count:
TollByType- MEV bundle count by type. - pnl:
TollByType- Aggregate Pnl by MEV type. - gas_bids:
TollByType- Gas bids by MEV type. - builder: If the searcher is vertically integrated, the builder's address.
- config_labels: Types of MEV this searcher address captures. This is set at the config level in
config/searcher_config.toml. - sibling_searchers: Addresses of searcher accounts associated with this address. This is needed so that we can accurately calculate PnL when searchers send their profit to a bank address or on of their other searcher addresses.
Builder Table
Table Name: Builder
Description: Contains information about Ethereum block builders.
Key: Address (Coinbase transfer address)
Value: BuilderInfo
Fields:
- name, fund, pub_keys: Basic identification and operational details.
- searchers_eoas, searchers_contracts: Lists of the builder's searcher addresses.
- ultrasound_relay_collateral_address: Address used to deposit collateral for the optimistic ultrasound relay.
Classification Tables
AddressToProtocolInfo Table
Table Name: AddressToProtocolInfo
Description: Stores mappings of blockchain addresses to specific protocol info, used by the classifier dispatch to decode and normalize traces.
Key: Address
- Type:
Address - Description: Contract Address.
Value: ProtocolInfo
- Description: Contains information linking an address to a protocol and its associated tokens.
Fields:
- protocol:
- Type:
Protocol - Description: The protocol associated with the address.
- Type:
- token0, token1, token2, token3, token4:
- Type:
Address - Description: Addresses of tokens associated with the contract, where
token0andtoken1are mandatory and others are optional. If the contract doesn't contain a token the addresses are set to the zero address.
- Type:
- curve_lp_token:
- Type:
Option<Address> - Description: Address of the Curve liquidity pool token, if applicable.
- Type:
- init_block:
- Type:
u64 - Description: The block at which the contract was created.
- Type:
TokenDecimals Table
Table Name: TokenDecimals
Description: Token decimals and symbols.
Key: Address
- Type:
Address - Description: Token Address.
Value: TokenInfo
- Description: Contains token decimals and symbols.
Fields:
- decimals:
- Type:
u8 - Description: Token decimals.
- Type:
- symbol:
- Type:
String - Description: Token symbol.
- Type:
MevBlocks Table
Table Name: MevBlocks
Description: This table stores the output of Brontes' analytics pipeline.
Key: Block number (u64)
- Type:
u64 - Description: Block number.
Value: MevBlockWithClassified
- Description: Contains MEV info at the block level and a list of MEV bundles detected within the block.
Fields:
- block:
- Type:
MevBlock - Description: General information about the block, including MEV-related metrics and builder mev & non mev profits.
- Type:
- mev:
- Type:
Vec<Bundle> - Description: A list of mev bundles identified within the block.
- Permalink: Bundle Structure
- Type:
MevBlock Fields
- block_hash:
- Type:
B256 - Description: Block hash.
- Type:
- block_number:
- Type:
u64 - Description: Block number.
- Type:
- mev_count:
- Type:
MevCount - Description: A count of various types of MEV bundles detected.
- Type:
- eth_price
- Description: The CEX price of ETH when the block was produced.
- total_gas_used
- Description: The total gas used in the block.
- total_priority_fee
- Description: The total priority fee paid in the block.
- total_bribe
- Description: The total direct builder payment in the block.
- total_mev_priority_fee_paid:
- Description: The total priority fee paid by MEV bundles in the block.
- builder_address:
- Type:
Address - Description: Address of the block builder.
- Type:
- builder_eth_profit
- Description: Builder PnL in ETH.
- builder_profit_usd
- Description: Builder PnL in USD.
- builder_mev_profit_usd
- Description: Vertically integrated searcher PnL in USD.
- builder_searcher_bribe
- Description: Builder bribe paid by vertically integrated searchers to the block builder.
- builder_searcher_bribe_usd
- Description: Builder bribe paid by vertically integrated searchers to the block builder in USD.
- proposer_fee_recipient:
- Type:
Option<Address> - Description: Proposer fee recipient address.
- Type:
- proposer_mev_reward
- Description: Proposer MEV reward queried from the relay data API.
- proposer_profit_usd
- Description: Proposer PnL in USD.
- total_mev_profit_usd
- Description: Total MEV profit of all MEV bundles in the block.
Bundle Fields
- header:
- Type:
BundleHeader - Description: Header information of the MEV bundle
- Type:
- data:
- Type:
BundleData - Description: Enum that encapsulates specific data structures for each type of MEV.
- Type:
Bundle Header
Bundle Header: The Bundle Header is common to all MEV types within Brontes. It provides a uniform structure for capturing essential transaction details, enabling the classification and analysis of MEV activities.
Fields:
- block_number: Identifies the block number where the MEV event occurred.
- Type:
u64
- Type:
- tx_index: Index of the transaction within the block.
- Type:
u64
- Type:
- tx_hash: Hash of the transaction involved in the MEV event.
- Type:
B256
- Type:
- eoa: Address of the externally owned account initiating the transaction.
- Type:
Address
- Type:
- mev_contract: Optionally, the address of a smart contract involved in the MEV strategy.
- Type:
Option<Address>
- Type:
- profit_usd: Profit in USD derived from the MEV activity.
- Type:
f64
- Type:
- bribe_usd: Cost in USD paid as a priority fee or bribe.
- Type:
f64
- Type:
- mev_type: Categorizes the type of MEV activity.
- Type:
MevType - Enum Values: CexDex, Sandwich, Jit, JitSandwich, Liquidation, AtomicArb, SearcherTx, Unknown
- Type:
- no_pricing_calculated: Indicates if the MEV was calculated without specific pricing models.
- Type:
bool
- Type:
- balance_deltas: A list of balance changes across different addresses.
TransactionAccounting
Fields:
- tx_hash: Transaction hash where the balance change occurred.
- Type:
B256
- Type:
- address_deltas: List of balance changes by address.
AddressBalanceDeltas
Fields:
- address: Blockchain address experiencing the balance change.
- Type:
Address
- Type:
- name: Optional name or alias for the address.
- Type:
Option<String>
- Type:
- token_deltas: Detailed changes in token balances.
- Type:
Vec<TokenBalanceDelta>
- Type:
TokenBalanceDelta
Fields:
- token: Detailed information about the token.
- Type:
TokenInfoWithAddress
- Type:
- amount: Amount of the token that has changed.
- Type:
f64
- Type:
- usd_value: USD value of the token change.
- Type:
f64
- Type:
Bundle Data
Bundle Data is an enumeration that encapsulates specific data structures representing different MEV strategies.
- Type:
BundleData
pub enum BundleData {
    Sandwich(Sandwich),
    AtomicArb(AtomicArb),
    JitSandwich(JitLiquiditySandwich),
    Jit(JitLiquidity),
    CexDex(CexDex),
    Liquidation(Liquidation),
    Unknown(SearcherTx),
}
- Description: Each variant in the Bundle Data enum represents a distinct type of MEV, with a specific struct that contains the details of the bundle.
Sandwich
Description: Represents a range of sandwich attack strategies, from standard to complex variations. These attacks typically involve a frontrun and a backrun transaction bracketing a victim's trade, exploiting the victim's slippage.
Type: Sandwich
Fields:
- frontrun_tx_hash: Hashes of transactions that frontrun the victim.
- frontrun_swaps: Details of swaps executed in the frontrunning transactions.
- victim_swaps_tx_hashes: Hashes of victim transactions targeted by the frontrun.
- victim_swaps: Details of swaps executed by the victim.
- backrun_tx_hash: Hash of the transaction that backruns the victim.
- backrun_swaps: Details of swaps executed in the backrunning transaction.
Atomic Arb
Type: AtomicArb
Description: Represents arbitrage strategies that exploit price discrepancies across different liquidity pools or exchanges within a single transaction.
Fields:
- tx_hash: Transaction hash of the arbitrage.
- swaps: List of swaps executed to capitalize on the arbitrage opportunity.
- arb_type: Type of arbitrage strategy, categorized by complexity and methodology, such as Triangle, CrossPair, StablecoinArb, or LongTail.
Jit Liquidity
Type: JitLiquidity
Description: Involves strategies where liquidity is added just-in-time to facilitate trades or other on-chain operations, often to minimize slippage or to setup for subsequent profitable trades.
Fields:
- frontrun_mint_tx_hash: Hash of transactions adding liquidity.
- frontrun_mints: Liquidity additions that precede critical trades.
- victim_swaps_tx_hashes: Hashes of trades that utilize the just-added liquidity.
- victim_swaps: Details of trades using the added liquidity.
- backrun_burn_tx_hash: Hash of transactions removing liquidity post-trade.
- backrun_burns: Liquidity removals following the trading activity.
Jit Sandwich
Type: JitLiquiditySandwich
Description: A combination of JIT liquidity strategies and sandwich attacks, where liquidity is added and removed to exploit and manipulate trade outcomes extensively.
Fields:
- frontrun_tx_hash: Hashes of transactions that both frontrun a victim and add liquidity.
- frontrun_swaps: Swaps executed in the frontrunning phase.
- frontrun_mints: Liquidity added in anticipation of victim trades.
- victim_swaps_tx_hashes: Hashes of victim transactions.
- victim_swaps: Trades executed by the victim.
- backrun_tx_hash: Hash of the transaction that removes liquidity and possibly executes backrun swaps.
Cex Dex
Type: CexDex
Description: Exploits the price differences between centralized exchanges (CEX) and decentralized exchanges (DEX) for arbitrage opportunities.
Fields:
- tx_hash: Transaction hash of the arbitrage.
- swaps: List of swaps executed across exchanges.
- global_vmap_details: Arbitrage details using global VMAP quotes.
- optimal_route_details: Arbitrage executed using the most optimal routing across exchanges.
Liquidation
Description: Involves transactions aimed at executing liquidations on over-leveraged positions in DeFi protocols, often involving complex strategies to trigger these liquidations profitably.
Fields:
- liquidation_tx_hash: Transaction hash of the liquidation.
- trigger: Transaction or event that triggered the liquidation.
- liquidation_swaps: Swaps executed as part of the liquidation process.
Unknown (SearcherTx)
Description: This category captures MEV-related transactions that do not fit into the standard categories, often involving bespoke or highly specialized strategies.
Fields:
- tx_hash: Hash of the transaction.
- transfers: Details of transfers executed within the transaction, often linked to complex MEV strategies.
Miscellaneous Table
PoolsCreationBlock Table
Table Name: PoolsCreationBlock
Description: Tracks the creation of liquidity pools within specific blocks, essential for the dex pricing module which uses this information to identify which pools to initialize for a given block range.
Key: Block number (u64)
- Type:
u64 - Description: The block at which liquidity pools were created.
Value: PoolsToAddresses
- Type:
Vec<Address> - Description: A list of addresses representing newly created liquidity pools for that block specified block.
InitializedState Table
Table Name: InitializedState
Description: Indicates which state data has been initialized and loaded into Brontes. This table helps in identifying the data that needs to be downloaded from Clickhouse to ensure that Brontes is up-to-date with the required data set.
Key: Block number (u64)
- Type:
u64 - Description: Typically represents the highest block number for which the state has been initialized in the Brontes database.
Value: InitializedStateMeta
- Type:
u8 - Description: A status byte indicating if tables have been initialized initialization for the given block.
Field Details
- State Meta:
- Type:
u8 - Description: BitMap representing which tables have been downloaded and initialized for the given block number.
- Type:
Inspectors
Inspectors are run at the final stage of the block pipeline. Each Inspector applies its own specialized logic to analyze a block, using the BlockTree and Metadata provided during execution. Defined as a trait, Inspectors allow developers to build custom implementations tailored to their analytical needs.
Inspector Trait
The Inspector trait defines the inspect_block method, where you implement your analysis logic. This method accepts BlockTree and Metadata as inputs and returns a Result type that you specify, allowing you to customize the output to meet your analytical needs.
#[async_trait::async_trait]
pub trait Inspector: Send + Sync {
    type Result: Send + Sync;

    async fn inspect_block(
        &self,
        tree: Arc<BlockTree<Action>>,
        metadata: Arc<Metadata>,
    ) -> Self::Result;
}
Mev Inspectors
The brontes_inspect crate includes several MEV-inspectors, each implementing the Inspector trait to identify specific MEV types. Follow the links below to learn more about each their methodologies:
Workflow of Default Inspectors
The default inspector workflow is as follows:
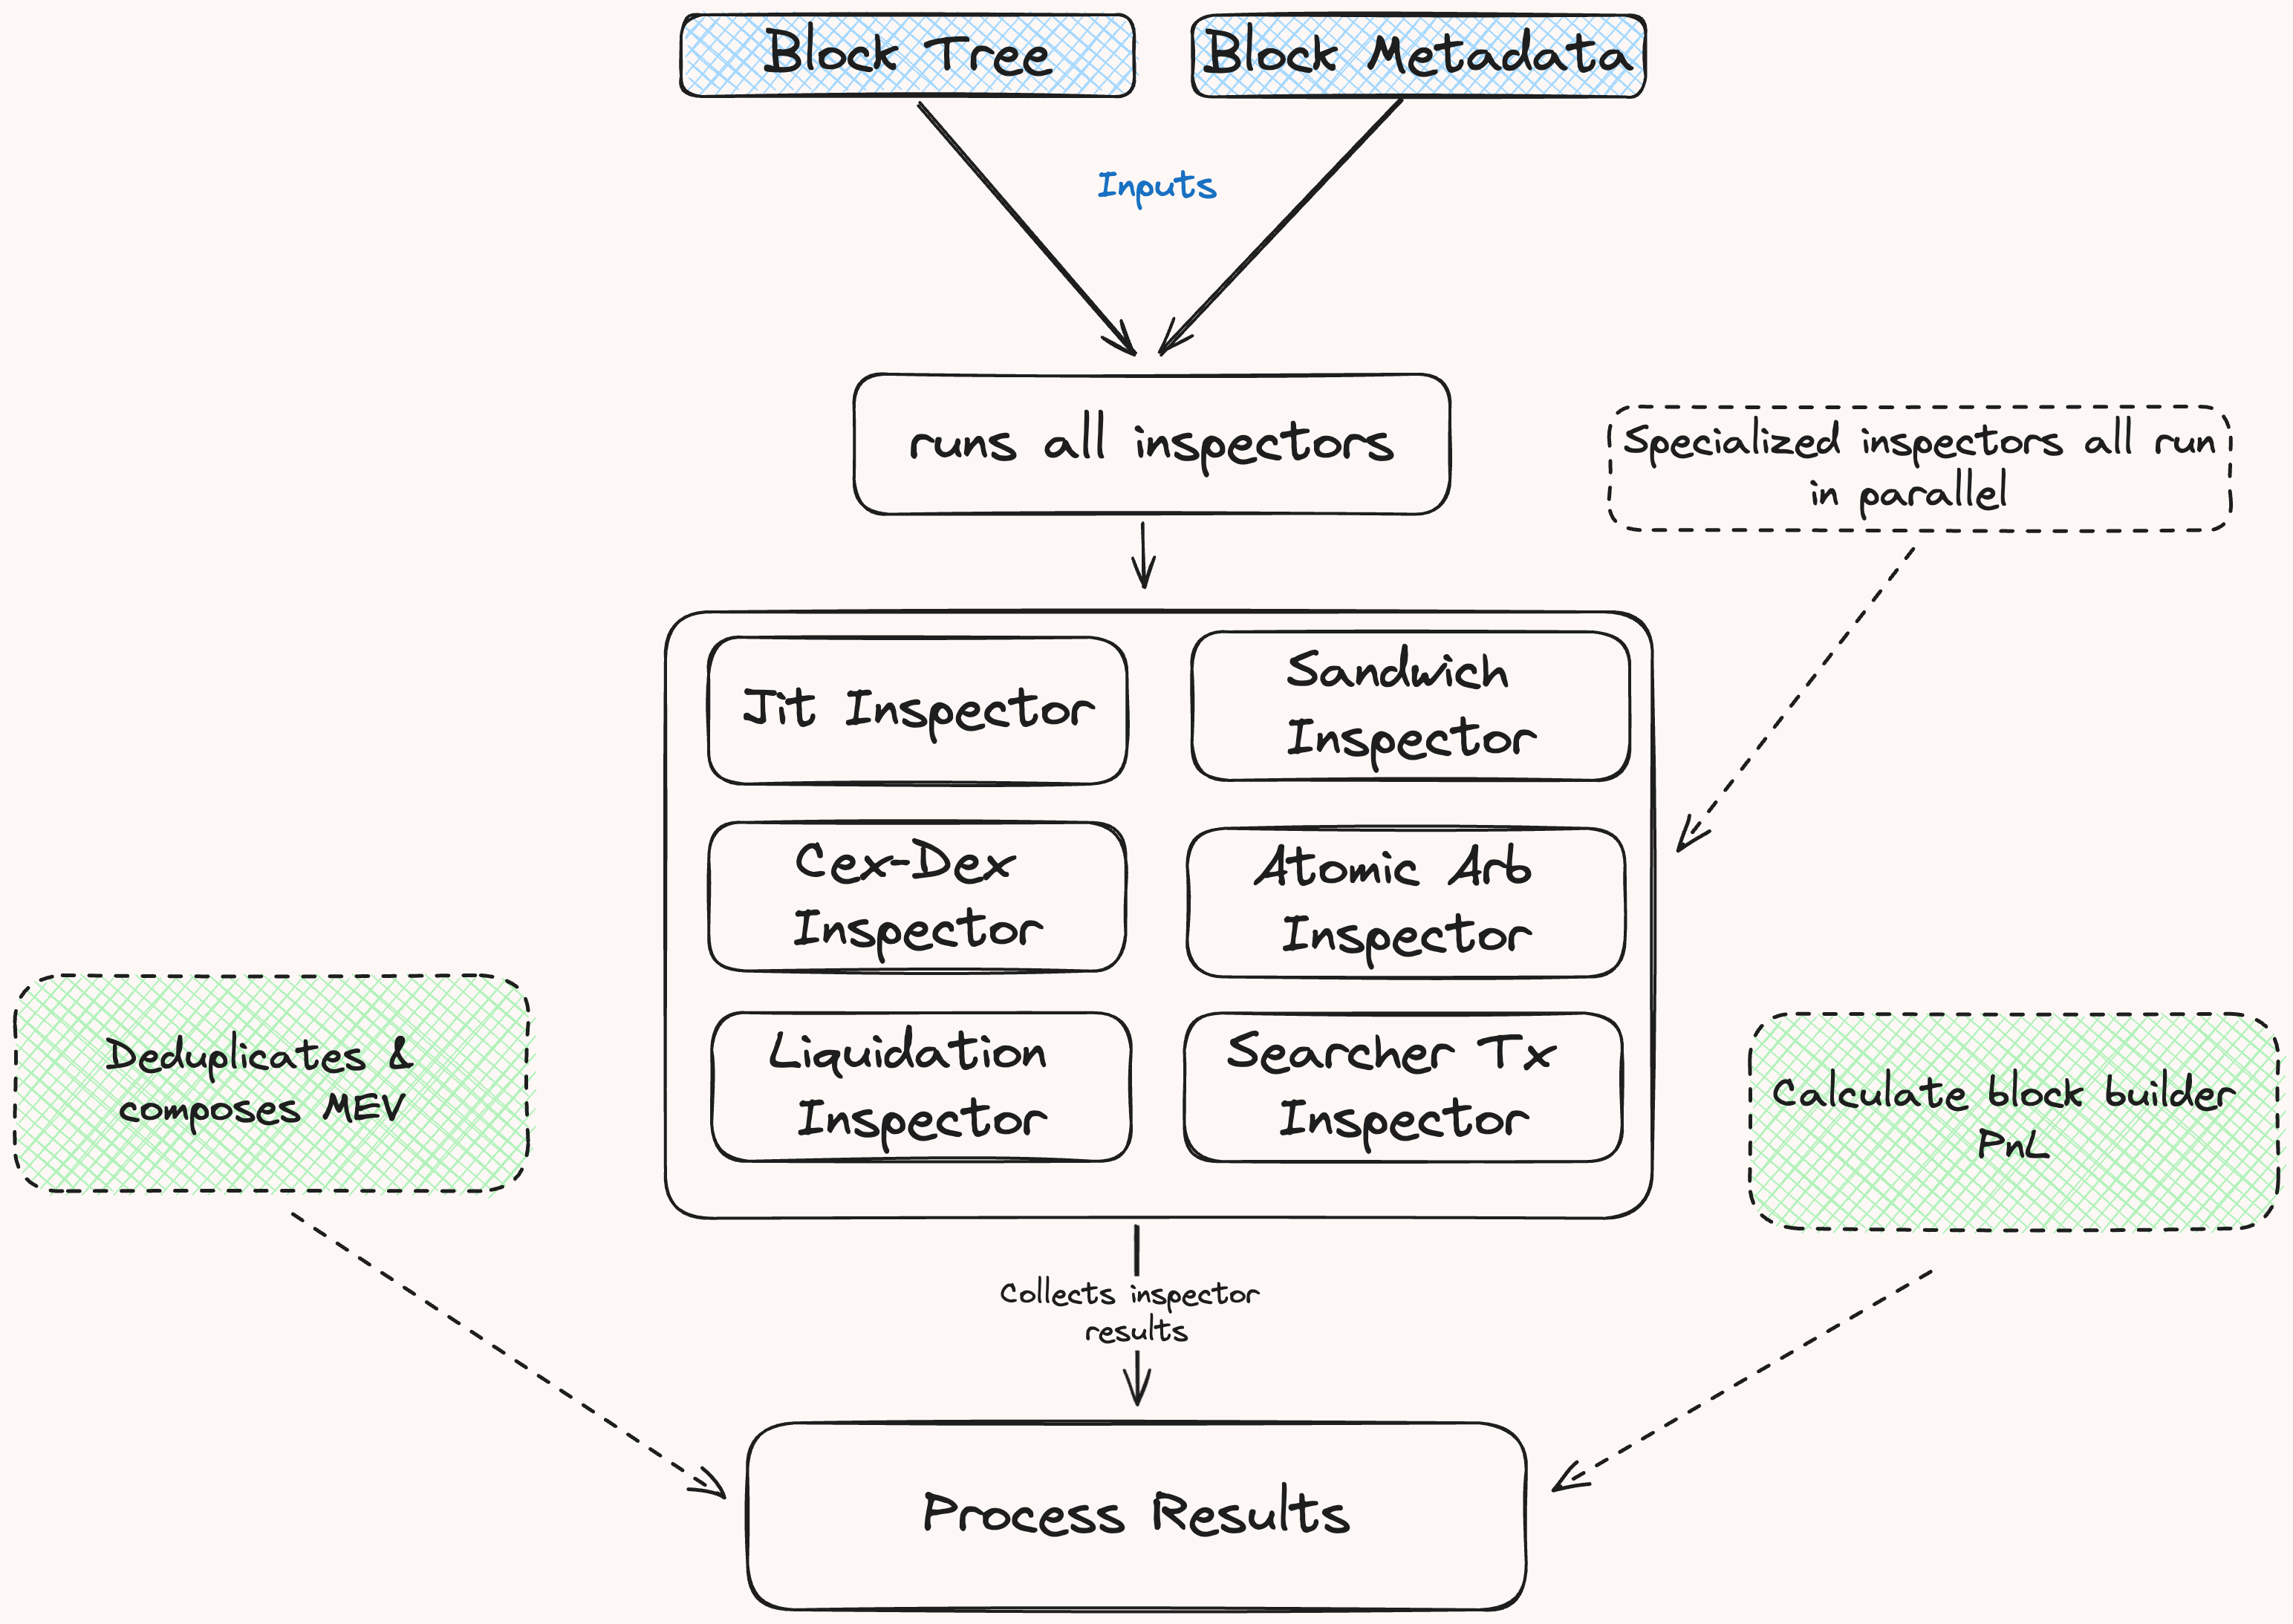
Step 1: Run All Inspectors
All specialized inspectors are run in parallel.
Step 2: Compose & Filter MEV Results
Once all inspectors have completed their analysis we attempt to compose MEV results & filter duplicates.
1: Composition Phase:
The composition phase integrates results from various inspectors to form complex MEV strategies using the MEV_COMPOSABILITY_FILTER. This filter specifies combinations of child MEVs—such as Sandwich and JIT—that merge into a more complex parent MEV, like JIT Sandwich, through a designated ComposeFunction.
The try_compose_mev function applies these rules to the sorted MEV data, seeking out matching transaction hashes among the specified MEV types. When all required child MEV types for a combination are present, they are consolidated into a single, composite parent MEV instance.
2: Deduplication Phase:
Inspectors, such as those identifying atomic arbitrages and sandwich attacks, may label the same transaction as different MEV types due to overlapping criteria. For instance, the backrun transaction of a sandwich attack will also appear as a profitable arbitrage opportunity to the atomic arbitrage inspector. To resolve such overlaps we deduplicate inspector results ensuring that each classified MEV bundle is correctly classified.
How Deduplication Works:
The MEV_DEDUPLICATION_FILTER provides a structured way to prioritize MEV types in scenarios where the classification of a transaction overlap. This filter establishes a hierarchy among detected MEV types, specifying which type should take precedence in the final analysis. For example, in cases involving both atomic backrun and sandwich classifications, the filter dictates that the sandwich type, being more comprehensive, should take precedence over the simpler atomic arbitrage.
Step 3: Calculate Block Builder PnL
After processing the inspector results, we calculate the block builder’s PnL, taking into account their revenues and costs:
-
Revenues:
- Builder Revenue: Total of all priority fees and tips paid to the builder within the block.
- MEV Revenue: Profits or losses from MEV searchers operated by the builder.
-
Costs:
- Proposer Payments: ETH paid by the builder to the block proposer.
- Transaction Sponsorship: ETH spent by the builder to sponsor transactions within the block.
Note: Some builders secretly refund parts of priority fees to searchers or order flow generators (tg bots for example). We can't track these kickbacks without knowing the addresses involved. If you have this information, please share it to help us improve our calculations.
Step 4: Store Results
Finally the resulting MevBlock and Vec<Bundles> are written to the database in the MevBlocks table.
Building New Inspectors
This section explores the common patterns and shared utilities used in building inspectors.
Shared Utilities and Patterns
To create a new inspector, you'll typically follow these steps:
- Implement the
Inspectortrait, defining theinspect_blockmethod. - Use
BlockTreemethods to collect relevant actions and their corresponding transactions. - Analyze the transaction or block(s) (if multi transaction mev or cross block mev) to pattern match, you can also analyze profitability in a more generalized way (but you'll need great heuristics!)
- Leverage the metadata in
TxInfoto contextualize the transaction and apply fine tuned filtering to minimize false positives. - Return results in the format defined by your inspector.
Now that you're familiar with the high level pattern, let's go a bit deeper and explore how that looks in practice.
Block Tree Navigation
Inspectors typically start by specifying which transactions they're interested in. This is done using the collect_all method on the BlockTree:
let search_args = TreeSearchBuilder::default()
    .with_actions([Action::is_transfer, Action::is_eth_transfer]);
let (hashes, transfers): (Vec<_>, Vec<_>) = tree.clone().collect_all(search_args).unzip();
This method allows inspectors to efficiently filter and collect relevant actions of interest from the block, forming the foundation for further analysis.
Rich Transaction Metadata
Each transaction comes with a wealth of metadata encapsulated in the TxInfo struct. This includes:
- Basic transaction details (block number, index, hash)
- Addresses involved (EOA, MEV contract)
- Gas usage information
- Classification flags (private transaction, verified contract, etc.)
- Info on the searcher EOA & Contract if applicable
The TxInfo struct provides easy access to this metadata, allowing inspectors to make informed decisions based on comprehensive transaction context. For full details on the available metadata, refer to the metadata tables in the database schema section.
Shared Inspector Utilities
The SharedInspectorUtils struct offers a collection of helper methods common to many inspector implementations. These include:
- Computing the transaction balance deltas and address value deltas
- Bundle accounting
- Price validation / sanity checks
- Generically identify swaps using transfers
These utilities streamline the process of building complex inspectors by providing reusable, battle-tested components.
Adding Custom Metadata
These configuration files allow you to specify detailed metadata for builders, searchers, and general address classifications.
Builder Configuration
The builder configuration file is used to specify information about builders, including their operational details and associated entities:
Example of a builder configuration:
[builders."0x95222290DD7278Aa3Ddd389Cc1E1d165CC4BAfe5"]
name = "beaverbuild"
fund = "Symbolic Capital Partners"
pub_keys = [
  "0x93582c97ac58670ba118aae52cf6355d8c680a2a538bf77c90873e3fe7ddc0a6dd231e2e2ea06bdc07e9b160883512a3",
  ...
]
searchers_eoas = [
  "0x0cac3d1a887206e0f6169222C4504301A8b4b993",
  ...
]
searchers_contracts = [
  "0xFA103c21ea2DF71DFb92B0652F8B1D795e51cdEf",
  ...
]
ultrasound_relay_collateral_address = "0xa83114a443da1cecefc50368531cace9f37fcccb"
The searcher addresses are used to calculate the builder mev profit, that is, the mev profit that a builder makes from the searchers it operates.
The ultrasound relay collateral address is used to calculate the correct amount paid to the validator after their block bid was bid adjusted.
Searcher Configuration
You can define the fund and builder associations along with the types of MEV (Maximal Extractable Value) strategies they are known for:
Example of a searcher configuration:
[searcher_eoas."0xDBF5E9c5206d0dB70a90108bf936DA60221dC080"]
fund = "Wintermute"
mev_types = ["CexDexQuotes", "CexDexTrades"]
builder = "0x1f9090aaE28b8a3dCeaDf281B0F12828e676c326"
You can also specify sibling searchers associated with the same fund or entity:
[searcher_contracts."0x3FAcE0004bC1003B9d0672e7B23134Cb80115fb6"]
fund = "NC"
sibling_searchers = ["0x3FAcE0004bC1003B9d0672e7B23134Cb80115fb6", "0xA0d5a274F95DEcB536BbBAA922D6D0Fb692a627D"]
Defining sibling searchers and builder addresses ensures accurate profit attribution. This configuration allows Brontes to aggregate profits across related entities, preventing misattribution and providing a comprehensive view of performance. Without it, individual searchers might be incorrectly labeled as unprofitable or highly profitable when they're part of a larger operation.
Manually categorizing searchers by their specific MEV strategies in the configuration file can be advantageous when fine-tuning bundle filtering criteria. This approach allows for more flexible analysis by:
- Relaxing the strictness of heuristics for addresses explicitly labeled as MEV bots for specific strategies.
- Adjusting criteria for addresses with a high count of previously detected bundles.
These adjustments enable more nuanced and inclusive MEV detection, particularly for well-established or manually verified searchers.
Address Metadata Config
The Address Metadata Config lets you customize or add metadata to a given address. You can specify information about associated entities, contract information, and social metadata.
This configuration is especially valuable for excluding specific addresses from analysis or for applying custom handling to addresses with known edge cases that are challenging to incorporate into the general model.
Alpha Leak: We have accumulated extensive metadata, labels, and types that aren't yet fully utilized in our codebase. For the astute developer who can systematically categorize and integrate these data points, there's significant potential to create highly sophisticated long-tail MEV inspectors. If you're interested in working on this project, please reach out to us.
Example of an address metadata configuration:
[metadata."0x111111125421cA6dc452d289314280a0f8842A65"]
entity_name = "1inch"
nametag = "1inch v6: Aggregation Router"
labels = ["DEX", "Aggregation Router V6", "SC:sourcecodeverified", "1inch", "CN:AggregationRouterV6"]
address_type = "dex-aggregator"

[metadata."0x111111125421cA6dc452d289314280a0f8842A65".contract_info]
verified_contract = true
contract_creator = "0xccbdbd9b0309a77fc6a56e087ff2765ff394012e"
reputation = 1

[metadata."0x111111125421cA6dc452d289314280a0f8842A65".social_metadata]
twitter = "https://twitter.com/1inch"
website_url = "https://app.1inch.io/"
crunchbase = "https://www.crunchbase.com/organization/1inch-limited"
linkedin = "https://www.linkedin.com/company/1inch"
Inspector Methodology
This page serves as a directory for the methodologies employed by our inspectors to detect MEV. Click on the links provided for in-depth descriptions of how each inspector type analyzes and identifies MEV transactions.
- Cex-DEX Arbitrage Inspector
- Experimental CEX-DEX Arbitrage Inspector
- Sandwich Attack Inspector
- Atomic Arbitrage Inspector
- JIT Liquidity Inspector
- Liquidation Inspector
CEX-DEX Inspector
The CEX-DEX inspector identifies arbitrage between centralized and decentralized exchanges. While on-chain DEX trades are visible, CEX orderbook data does not reveal the specific parties involved on either side of a fill. Using the available CEX data the inspector estimates the value extracted from onchain LPs via just-in-time CEX markouts with the methodology described below.
Note Work in Progress: This methodology is currently under development and subject to change. We welcome feedback and contributions as we refine our approach.
Background Information
In market microstructure research, two fundamental concepts are used to analyze trading costs and market quality: effective spread and realized spread. These measures provide different perspectives on the costs faced by market participants and the information content of trades.
-
Effective Spread: The effective spread is a measure of the execution cost for a single transaction, calculated relative to the midpoint price at the time of the trade. It captures the immediate cost of demanding liquidity in the market.
-
Realized Spread: The realized spread, on the other hand, is an ex-post measure that attempts to capture the non-information related component of the trading cost. It is calculated by comparing the trade price to a future midpoint price. This future midpoint price is offset from the instantaneous time of execution by a fixed markout period.
The realized spread aims to separate the transitory component of the spread (due to order processing costs and inventory risk) from the permanent component (due to adverse selection or information asymmetry). The use of a future price in calculating the realized spread is based on the intuition that trades themselves convey information to the market. This concept is rooted in the idea of price discovery and information asymmetry in financial markets.
-
Information Content of Trades: When a trade occurs, it potentially signals private information held by the trader. This information is gradually incorporated into the market price following the trade.
-
True Price Indication: As time passes after a trade, the price is expected to move towards its "true" value as more information becomes available and is processed by market participants. Therefore, a future price is often considered more indicative of the true asset value at the time of the original trade.
-
Separating Permanent and Temporary Effects: By using a future price, we attempt to distinguish between the permanent price impact of a trade (related to new information) and temporary effects (such as inventory imbalances or liquidity demands).
However, the choice of the time interval for the future price involves a trade-off. A very short interval might not allow enough time for information to be fully incorporated into the price, potentially underestimating the information content of the trade. On the other hand, an excessively long interval introduces more noise into the measurement. This noise comes from subsequent trading activities, new information arrivals, or broader market movements unrelated to the original trade.
Core Methodology
The core insight is that CEX-DEX arbitrageurs, whether they are trading against on-chain AMMs and hedging instantaneously on a more-liquid centralized exchange or just using the deepest centralized exchange as an accurate oracle that they can utilize to repeatedly extract AMM liquidity at better-than-true price, are taking on-chain liquidity preferentially based on the instantaneous CEX price.
The initial CEX-DEX inspector filter thus looks at all AMM swaps with relative execution prices that are favorable (above a $1.5 in profit after gas for unknown addresses, and positive pnl for know searchers, searchers with more than 20 profitable cex-dex arbs with pnl greater than 1.5 each) to the instantaneous centralized exchange mid price at the most liquid centralized exchange for that given asset pair. This implies that the instantaneous markout to centralized exchanges is always positive for a CEX-DEX arb (or else, if they're trading on some directional alpha, it would make sense for them to employ the same strategy on the centralized exchange given their sophistication).
But, the arbitrageurs favorable on-chain swap also leaks some ex-post information that affects true price. We thus need to determine the optimal markout time to determine the expected true value of these arbitrages. Note that, given we're operating on a true value basis, we're able to compare the extraction from on-chain LPs from arbitrageurs irrespective of the specific strategy that the arbitrageur is running (of which, there are several).
We look at markout intervals of 2 seconds, 12 seconds, 30 seconds, 1 minute, and 5 minutes.
When we query all expected CEX-DEX arbitrages using the above filtering methodology on ETH/USDT marked out against Binance mid price at the aforementioned future time intervals for each trade, we get the following graph:
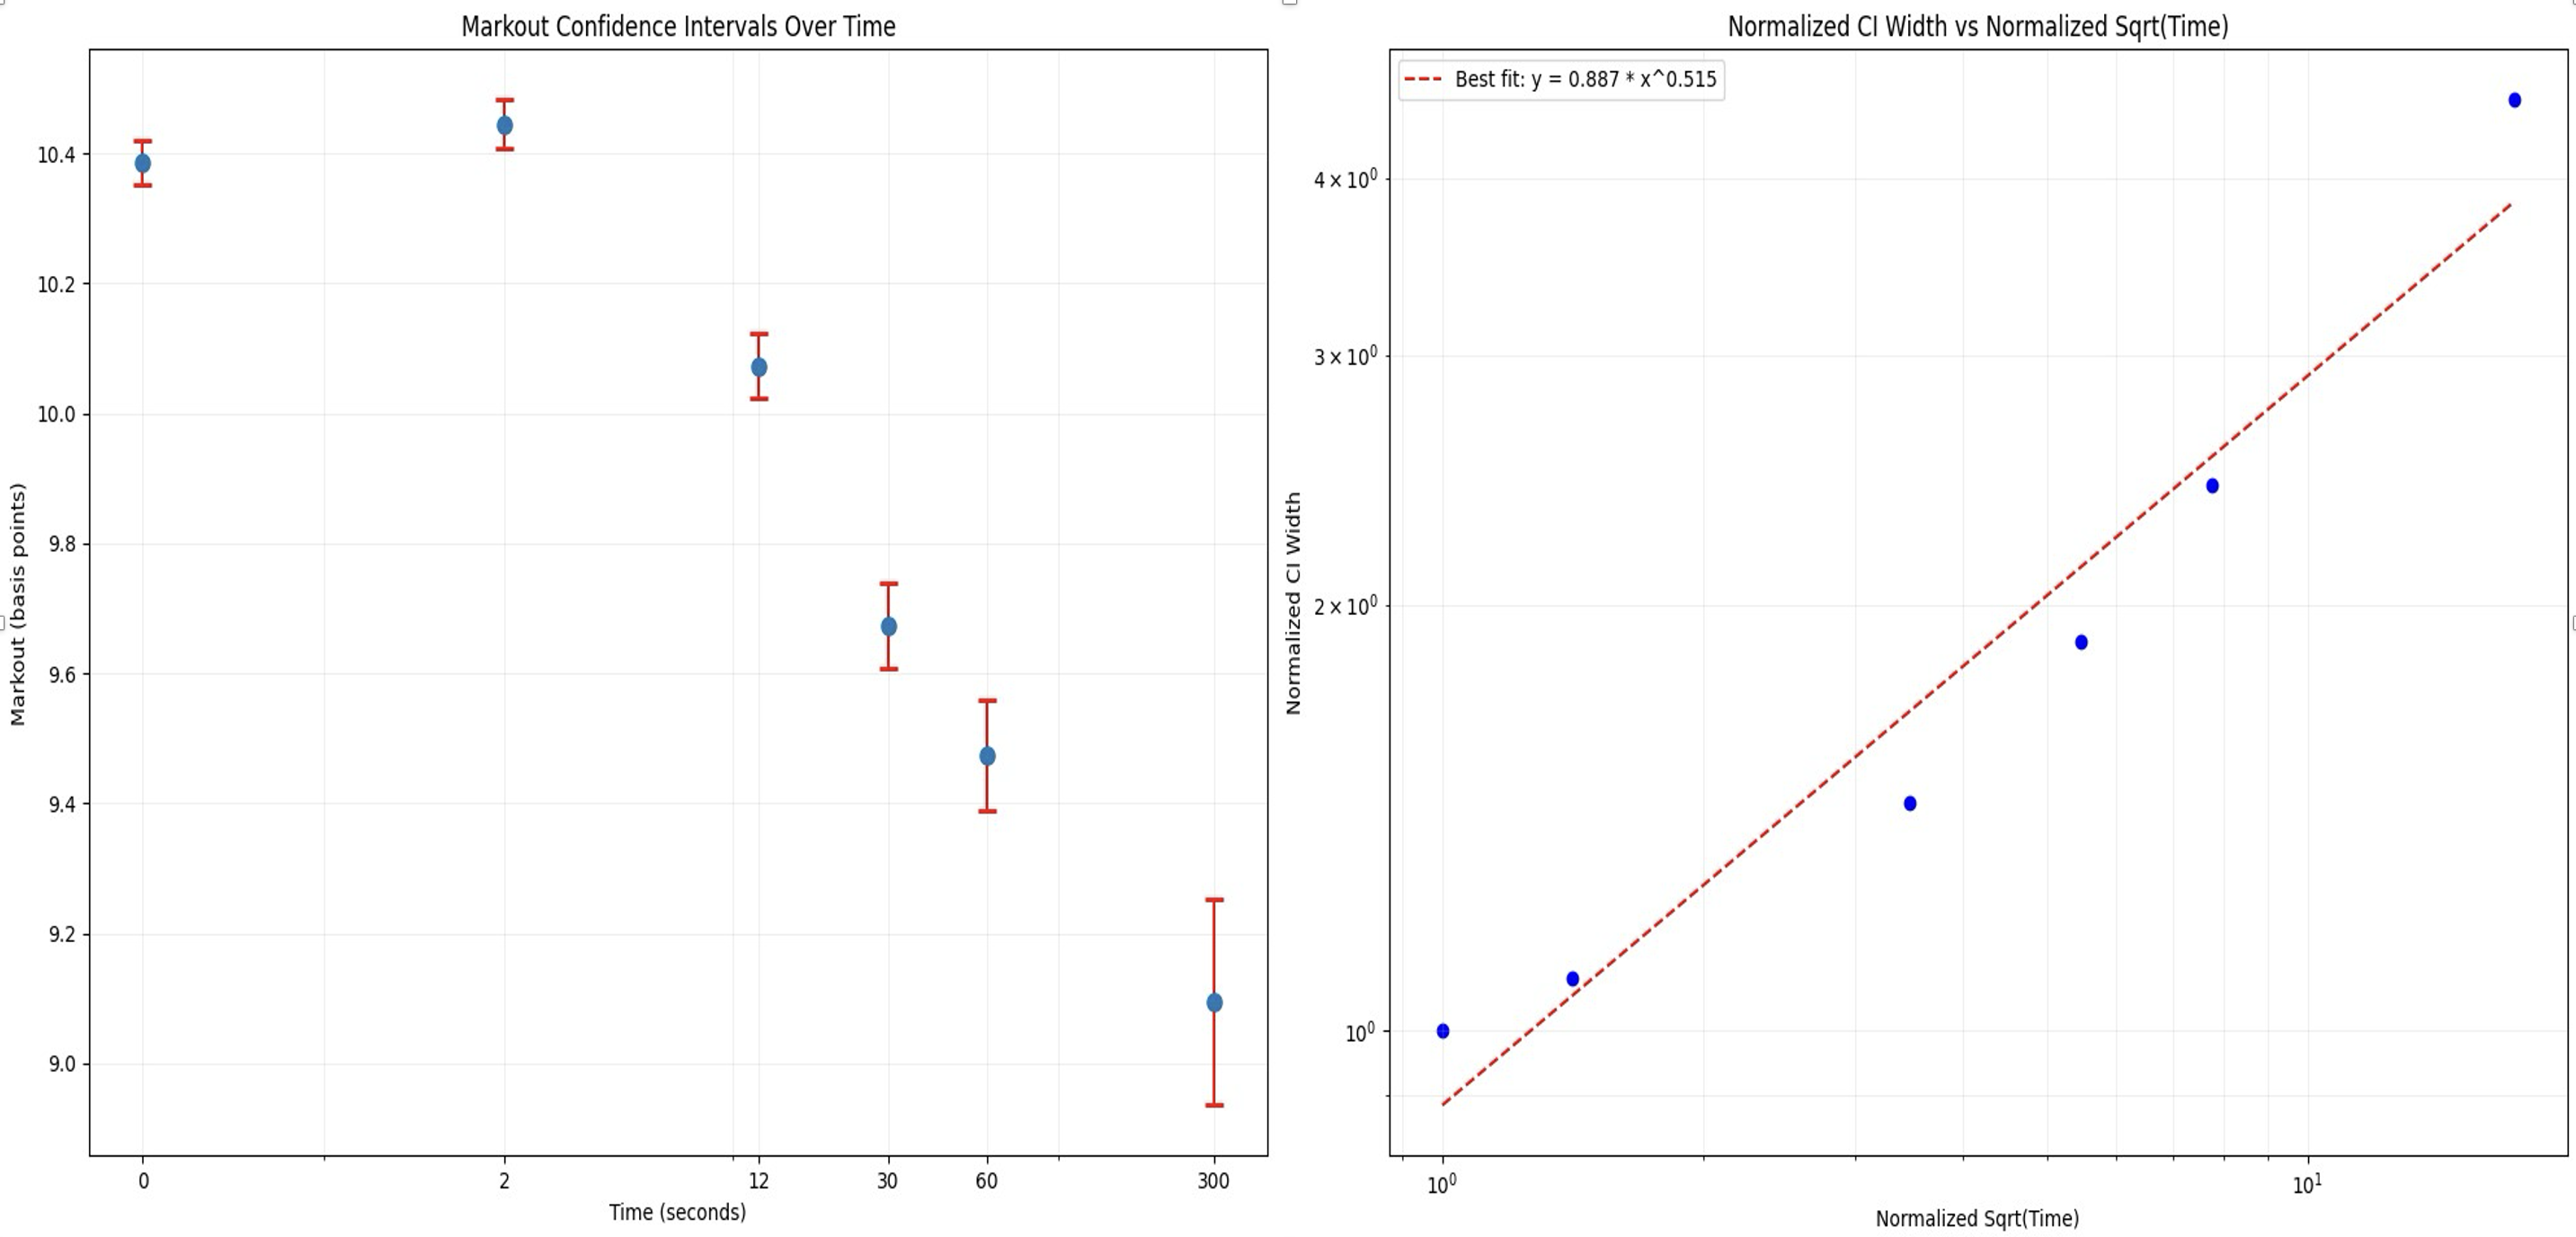
We can see that, as a sanity check, the confidence interval length of each markout grouping is scaling with the square root of time, as expected from theory of stochastic processes. We see that, as expected, the information of the arbitrageurs swap takes time to settle into the market and effect the future true price of the asset. That being said, given that all markouts are within slightly more than a 10% interval of each other (denominated in bps), this information does not have a drastic effect on the future true price. We thus chose a markout time of 5 minutes to provide a happy medium between letting the trade information settle in the market while also not being too noisy of an estimate. As an added benefit is that this is consistent with much traditional finance markout literature.
Assumptions and Future Work
Future Work
- Factor in specific arbitrageur strategies
- Provide more rigorous justification for the specific threshold chosen for improvement over instantaneous mid price (for filtering logic)
- Chose a markout window for each asset pair specifically
- Create methodology to better analyze where we're detecting false positives
Cex-Dex Inspector
The Cex-Dex inspector identifies arbitrage between centralized and decentralized exchanges. While on-chain DEX trades are visible, CEX trades must be inferred. Using available CEX trade data the inspector estimates likely CEX trade prices to approximate the full arbitrage strategy and its profitability.
What is Cex-Dex Arbitrage?
Centralized exchanges (CEX) and decentralized exchanges (DEX) operate on fundamentally different time scales. CEX function in continuous time, allowing trades to be executed at any moment without interruption. In contrast, DEX operate in discrete time intervals, as trades are only executed upon inclusion in a new block - leaving prices stale in between blocks. Consequently, DEX prices consistently lag behind the more frequently updated CEX prices, creating arbitrage opportunities between the two exchange types.
Methodology
Note Experimental Methodology - Work in Progress!
This methodology is highly experimental and currently under active development. Key points to consider:
It has been built iteratively based on continuous testing and real-world observations, rather than a comprehensive theoretical framework.
Many parameters within the methodology have been set arbitrarily based on experimentation. These settings require further testing and analysis before we can present this as a credible framework.
We offer this glimpse into our work-in-progress to encourage community engagement. It is not yet a finalized or validated approach.
We strongly encourage users to approach these results with a critical eye. Your feedback, insights, criticisms, and contributions are invaluable as we refine and improve this methodology.
Please share your experiences, observations, and any issues you encounter. This will help us enhance the accuracy, reliability of this approach.
Step 1: Identify Potential Arbitrage Transactions
First, the inspector collects all block transactions involving swap, transfer, eth_transfer, aggregator_swap actions.
Then, for each transaction it:
- Discards transactions if it's a solver settlements or from a known DeFi automation bot.
- Extract DEX swaps and transfers.
- If no swaps are found, attempt to reconstruct swaps from transfers.
- Discard transactions that represent atomic arbitrage (where trades form a closed loop).
Step 2: Merge Sequential Swaps
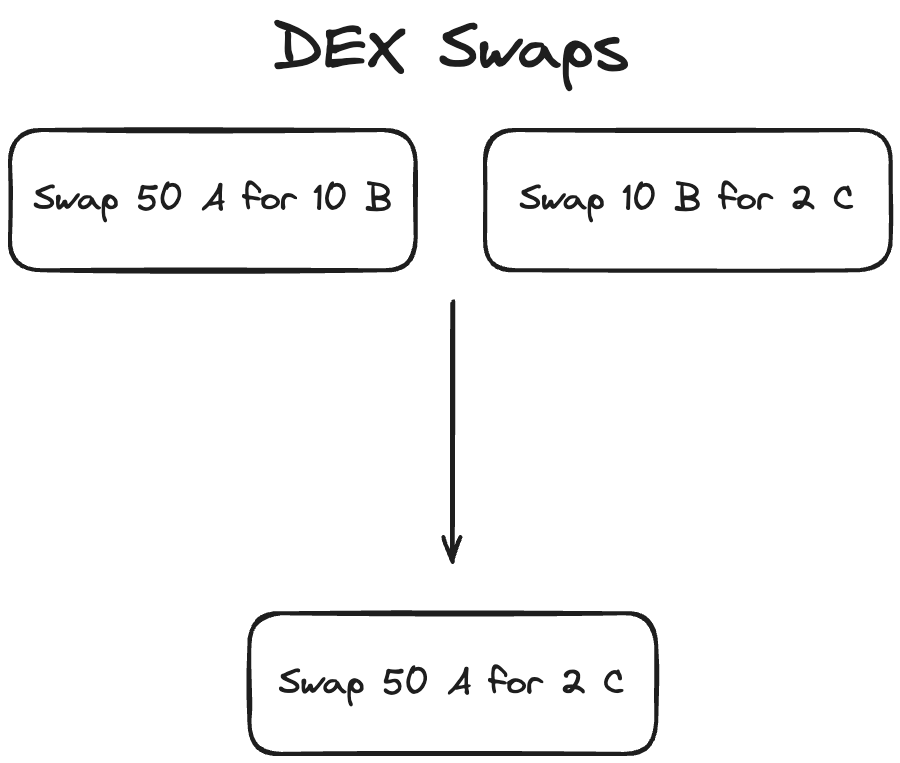
We merge sequential swaps to match on-chain routes with off-chain markets. Here's why:
- On-chain and off-chain liquidity often differ. For example, PEPE-WETH might be the most liquid pair on-chain, while PEPE-USDT dominates off-chain.
- Arbitrageurs might swap PEPE-WETH then WETH-USDT on-chain to arbitrage against the PEPE-USDT off-chain market.
- By merging these on-chain swaps (PEPE-WETH-USDT into PEPE-USDT), we align our analysis with the actual off-chain trade.
Our merge_possible_swaps function combines these sequential swaps, allowing us to evaluate CEX prices more precisely.
Step 3: CEX Price Estimation
To estimate the CEX price the arbitrageur traded at, we use two distinct methods
A. Dynamic Time Window VWAP
This method calculates a Volume Weighted Average Price (VWAP) within a dynamic time window around each block. We use a dynamic window to capture diverse arbitrage scenarios across different market conditions.
Why a Dynamic Window?
-
Highly Competitive Markets (e.g., ETH/USDT):
- Arbitrageurs face uncertainty about DEX trade inclusion until block proposal because of high competition of other arbitrageurs seeking the same opportunity.
- High volume allows rapid trade execution close to block time.
- Window: Narrow, focused around and shortly after block time.
-
Less Competitive and Low-Volume Markets:
- Lower trade volume reduces concerns about DEX trade inclusion.
- Arbitrageurs have more flexibility in timing CEX execution.
- Focus shifts to optimizing execution and minimizing price impact.
- Traders may need extended time to clear positions without excessive slippage.
- Insufficient off-chain volume in tight windows may obscure arbitrage activity.
- Window: Wider, allowing for gradual execution strategies and capturing sparse but significant arbitrage events.
Determining the Trade Time Window
We expand the time window in three phases:
- Default Window
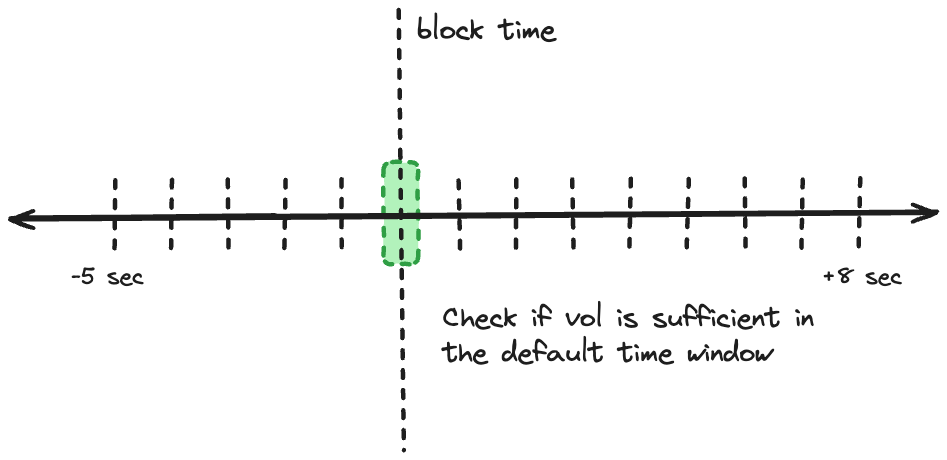
- Setting: -20 +80 milliseconds around block time
- Purpose: Capture highly competitive, time-sensitive arbitrages
- Initial Extension
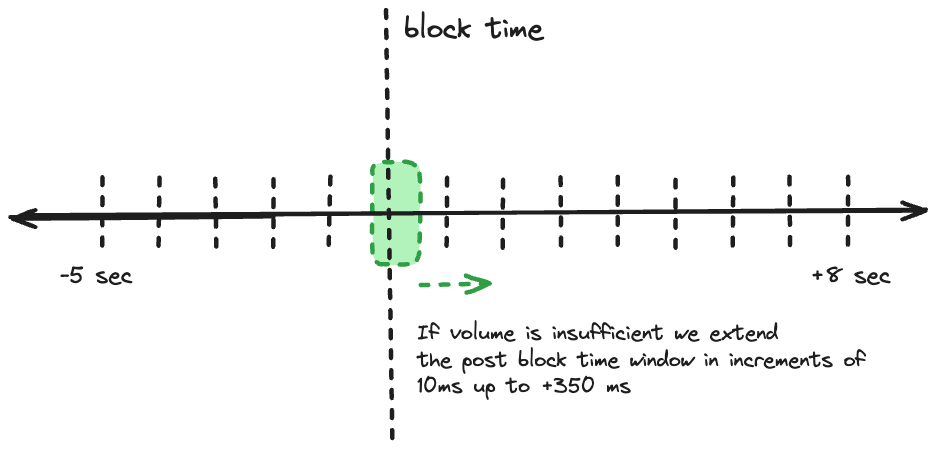
- Action: Extend post-block time up to 350ms in 10ms increments
- Rationale: Traders gain certainty post-block, likely executing shortly after
- Full Extension
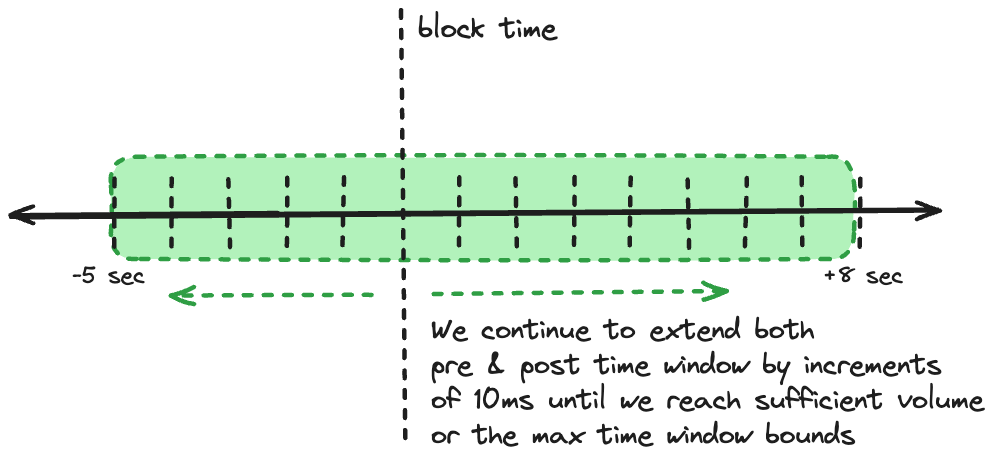
- Action: Extend both pre and post-block time up to -10/+20 seconds
- Purpose: Capture less competitive arbitrages and low-volume pair activity
B. Optimistic Execution Calculation
This method provides an optimistic estimate of potential arbitrage profitability, while attempting to minimize lookahead bias.
Process
-
Dynamic Time Window:
- Start with a narrow window: ±200 milliseconds around block time.
- Expand the window progressively if needed, favoring post-block expansion:
- Extend post-block time up to 450ms in 10ms increments.
- If necessary, extend both pre and post-block time up to -5/+8 seconds.
-
Volume Allocation:
- Calculate total volume needed for arbitrage ($x$) and total trade volume across all time baskets ($y$).
- For each time basket $i$, calculate volume allocation: \(V_i = (z_i / y) * x) \) where \(z_i \) is the volume in basket \(i \) .
-
Trade Sorting and Selection:
- Within each time basket: a. Sort trades by price, from most to least advantageous. b. Select top trades based on a quality parameter (e.g., top 20%). c. Fill up to the volume allocation \(V_i\) for that basket.
-
Progressive Filling:
- Start from the basket closest to block time (usually just after).
- If a basket can't fulfill its allocation, distribute the remainder to subsequent baskets.
-
Price Calculation: Calculate the final price using volume weights: $$\text{FinalPrice} = \frac{\sum(Price_i * V_i)}{\sum V_i}$$
-
Lookahead Mitigation:
- Implement a "sliding window" approach within the dynamic window.
- For each trade, only consider information from its timestamp and before.
Key Considerations
- The dynamic window adapts to market conditions (competitive vs. less liquid markets).
- Volume allocation respects market liquidity while prioritizing times close to block confirmation.
- The quality parameter allows for optimistic selection without assuming perfect execution.
- Progressive filling and sliding window approach reduce lookahead bias.
- The method balances optimism with realism, providing a nuanced view of potential arbitrage opportunities.
Step 4: Calculate Potential Arbitrage Profits
For each swap and CEX price estimate:
- Calculate the price difference between DEX and CEX.
- Estimate potential profit by comparing how much the trader would receive by purchasing token in on the Cex using the token out amount of the swap.
- Calculate profits using both mid-price and ask price.
Step 5: Aggregate and Analyze Results
- Calculate profits for each CEX individually and for a global VWAP across all exchanges.
- Determine the most profitable route across all exchanges.
- Calculate optimistic profits based on the Optimistic VWAP.
Step 6: Account for Gas Costs
Subtract the transaction's gas cost from the calculated profits for each scenario.
Step 7: Validate and Filter Potential Arbitrages
A transaction is considered a valid Cex-Dex arbitrage if it meets any of the following conditions:
- Profitable based on global VWAP or optimistic estimates.
- Profitable on multiple exchanges.
- Executed by an address with significant history of Cex-Dex arbitrage (>40 previous trades).
- Labeled as a known Cex-Dex arbitrageur.
Step 8: Handle Edge Cases and Outliers
- Filter out high-profit outliers (>$10,000 profit) if they are only profitable on less liquid exchanges (Kucoin, Okex) to avoid false positives.
- Apply stricter validation for stable coin pair arbitrages.
Sandwich Inspector
The Sandwich Inspector is designed to detect and analyze the profitability of Sandwich attacks.
What is a Sandwich Attack?
A Sandwich attack unfolds in three steps:
- Front-run: An attacker buys an asset just before a victim's transaction, raising its market price.
- Victim Transaction: The victim purchases the asset at the inflated price.
- Back-run: The attacker sells the asset post-victim transaction, profiting from the price difference.
Methodology
Step 1: Retrieve Relevant Transactions
The inspector retrieves transactions in the block that involve swap, transfer, eth_transfer, FlashLoan, batch_swap or aggregator_swap actions.
Step 2: Identify Potential Sandwiches
We run two functions to find possible sandwich attacks:
- One checks for repeated transactions from the same account:
get_possible_sandwich_duplicate_senders - The other looks for repeated calls to the same contract:
get_possible_sandwich_duplicate_contracts
We use the PossibleSandwich type to represent each potential attack:
pub struct PossibleSandwich {
    pub eoa:                   Address,
    pub possible_frontruns:    Vec<B256>,
    pub possible_backrun:      B256,
    pub mev_executor_contract: Address,
    // Mapping of possible frontruns to the set of possible
    // victims. By definition the victims of latter transactions
    // can also be victims of the former
    pub victims:               Vec<Vec<B256>>,
}
This type holds the attacker's address, frontrun and backrun transactions, the contract used, and sets of victim transactions grouped by frontrun.
How It Works
Our algorithm constructs the largest possible sandwich scenarios by identifying duplicate addresses. Here's the process:
-
Track Duplicates
- Map addresses (contract or EOA) to their most recent transaction hash
-
Build Victim Sets
- For each transaction, track potential victims (transactions that occur after it)
-
Construct a
PossibleSandwich-
When we encounter a duplicate address, we create or update a
PossibleSandwich:a) For the first duplicate:
- Create a new PossibleSandwich
- Set the previous transaction as the frontrun
- Set the current transaction as the backrun
- Add intervening transactions as victims
b) For subsequent duplicates:
- Add the previous transaction to possible frontruns
- Update the backrun to the current transaction
- Add the new set of victims
-
The Result
This step yields a list of PossibleSandwich. Each represents a potential sandwich attack, from simple to complex.
We catch what we call "Big Mac" sandwiches - attacks with multiple frontrun transactions, each targeting its own set of victims. Read more about these complex patterns.
We remove duplicates from our list. What remains are the largest, most comprehensive sandwich scenarios in the block. This wide-net approach ensures we don't miss any potential sandwiches, no matter how intricate. We'll analyze the details in later steps.
Step 3: Partitioning Possible Sandwiches
Here's how partitioning works:
- We iterate through victim sets in each sandwich.
- Empty victim sets signal a break in the sandwich.
- We create new
PossibleSandwichstructs at these breaks.
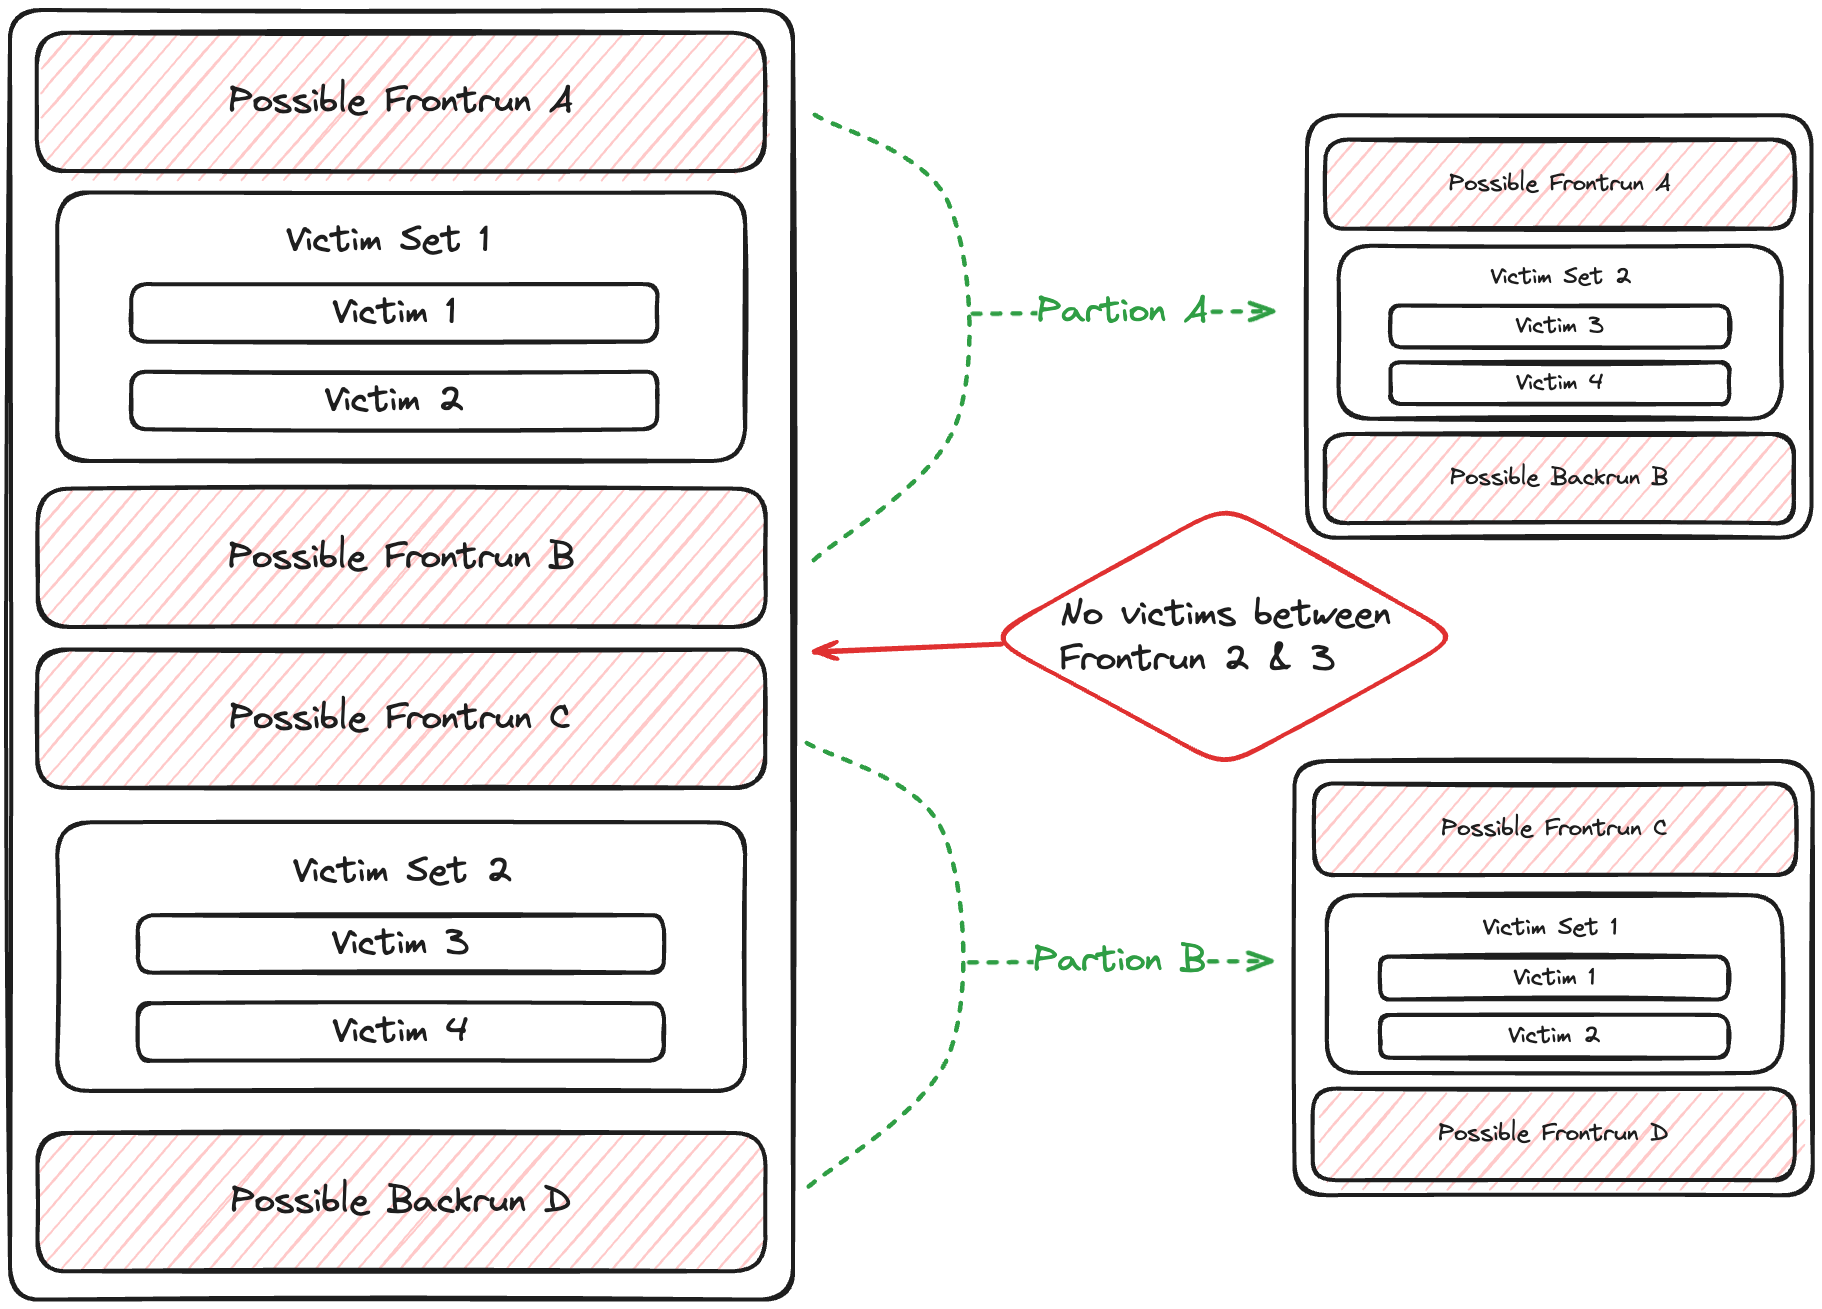
Note: Our partitioning assumes attackers maximize efficiency. Multiple attacker transactions without intervening victims may lead to unexpected results. If you find examples breaking this assumption, please report them for a bounty.
Step 4: Analyze Possible Sandwich Attacks
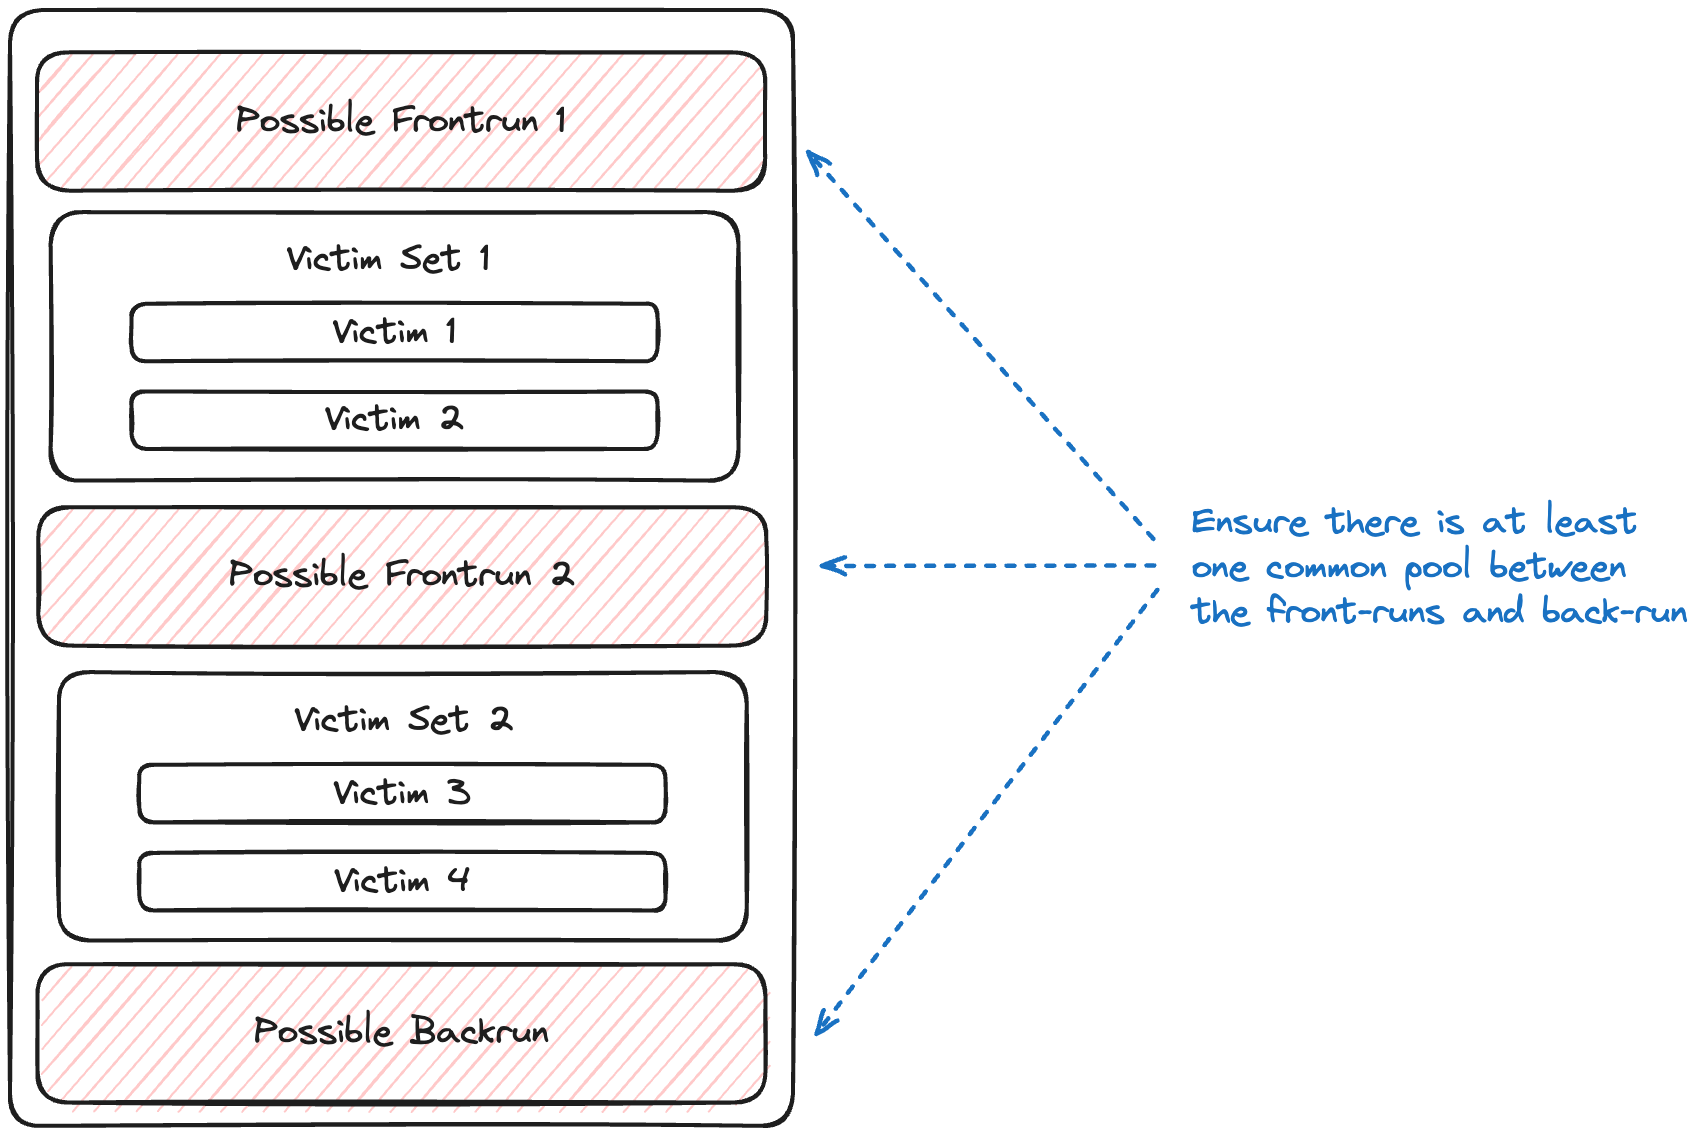
Pool Overlap Check
Front-run and back-run transactions must swap on at least one common liquidity pool.
Victim Verification
After confirming pool overlap, we validate interleaved transactions as victims:
- Group victim transactions by EOA to account for multi-step victim operations (e.g., approval and swap).
- An EOA is a victim if it:
- Swaps on the same pool and direction as the front-run
- Swaps on the same pool and opposite direction as the back-run
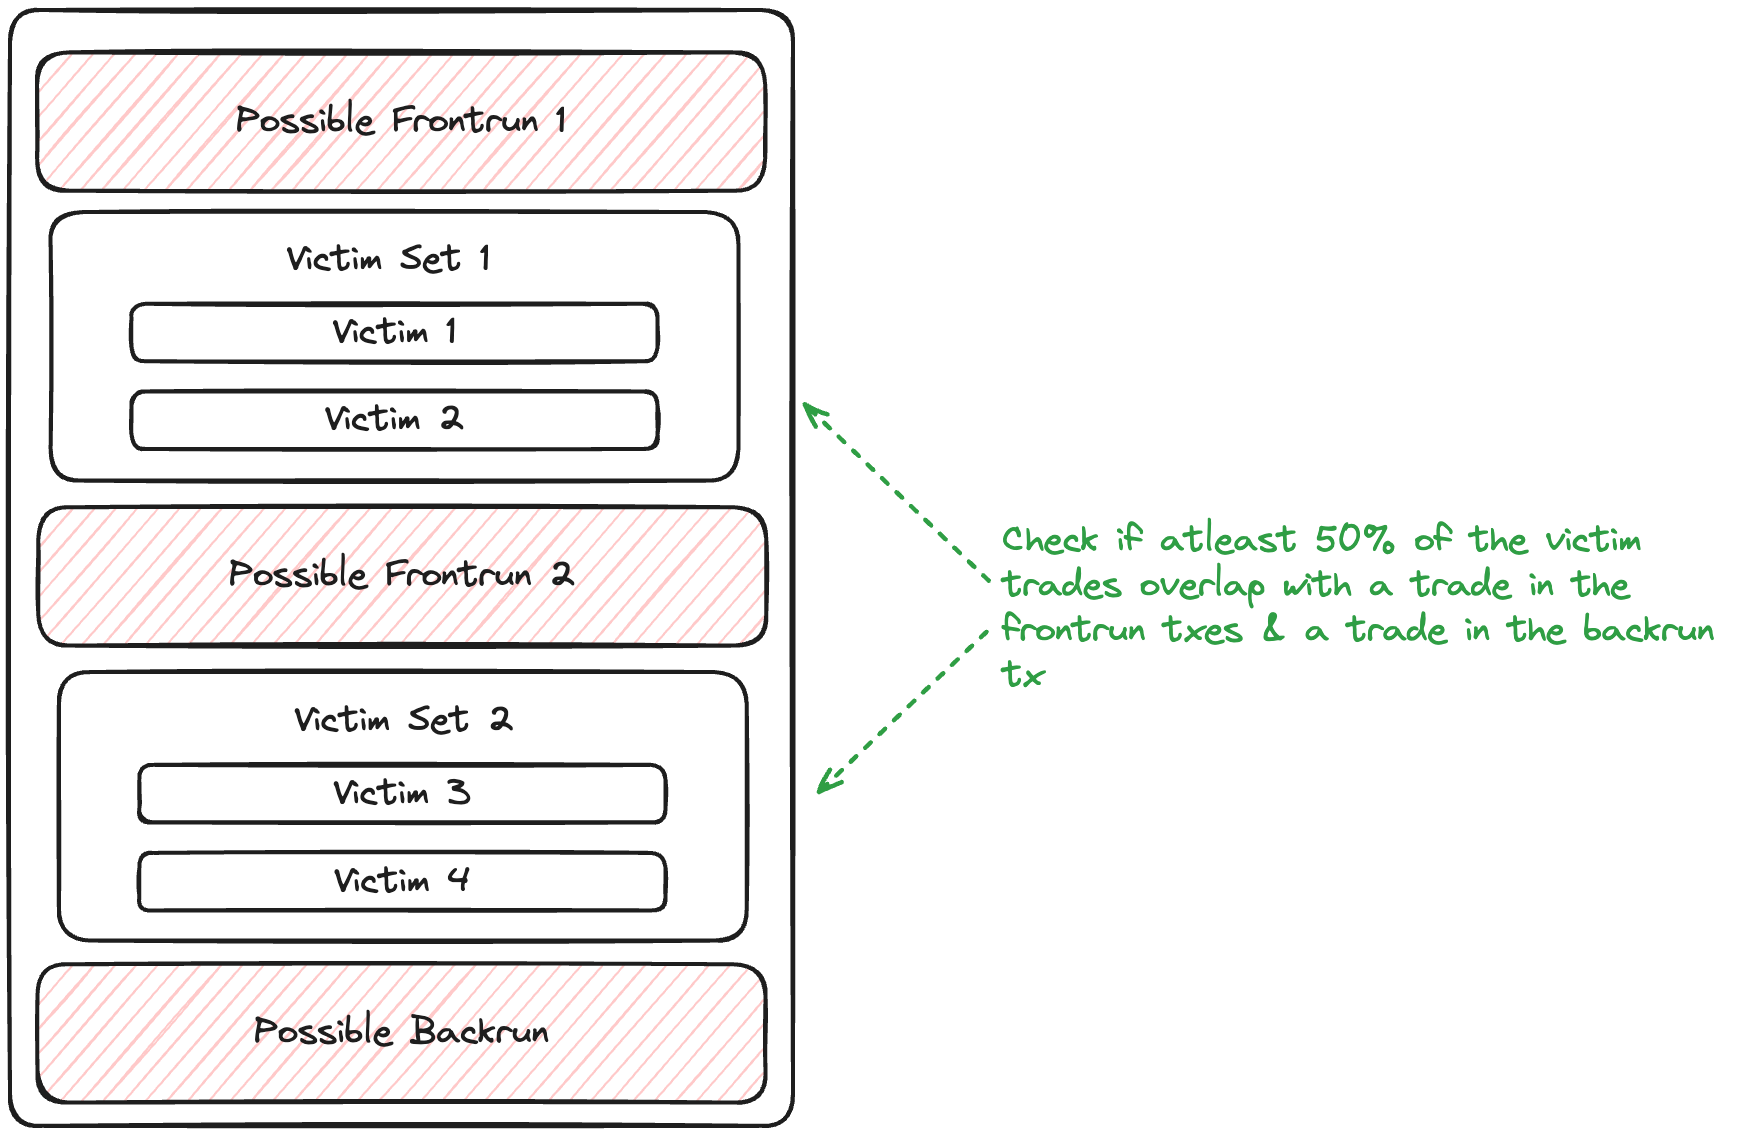
A PossibleSandwich is confirmed if:
- At least 50% of EOAs are considered victims
- At least one complete sandwich is detected (e.g a victim swap overlaps with both front-run and back-run in pool & direction)
If confirmed, we proceed to Step 5. Otherwise, we initiate recursive verification.
Recursive Sandwich Verification
For unconfirmed sandwiches, we employ a recursive strategy to explore all possible transaction combinations:
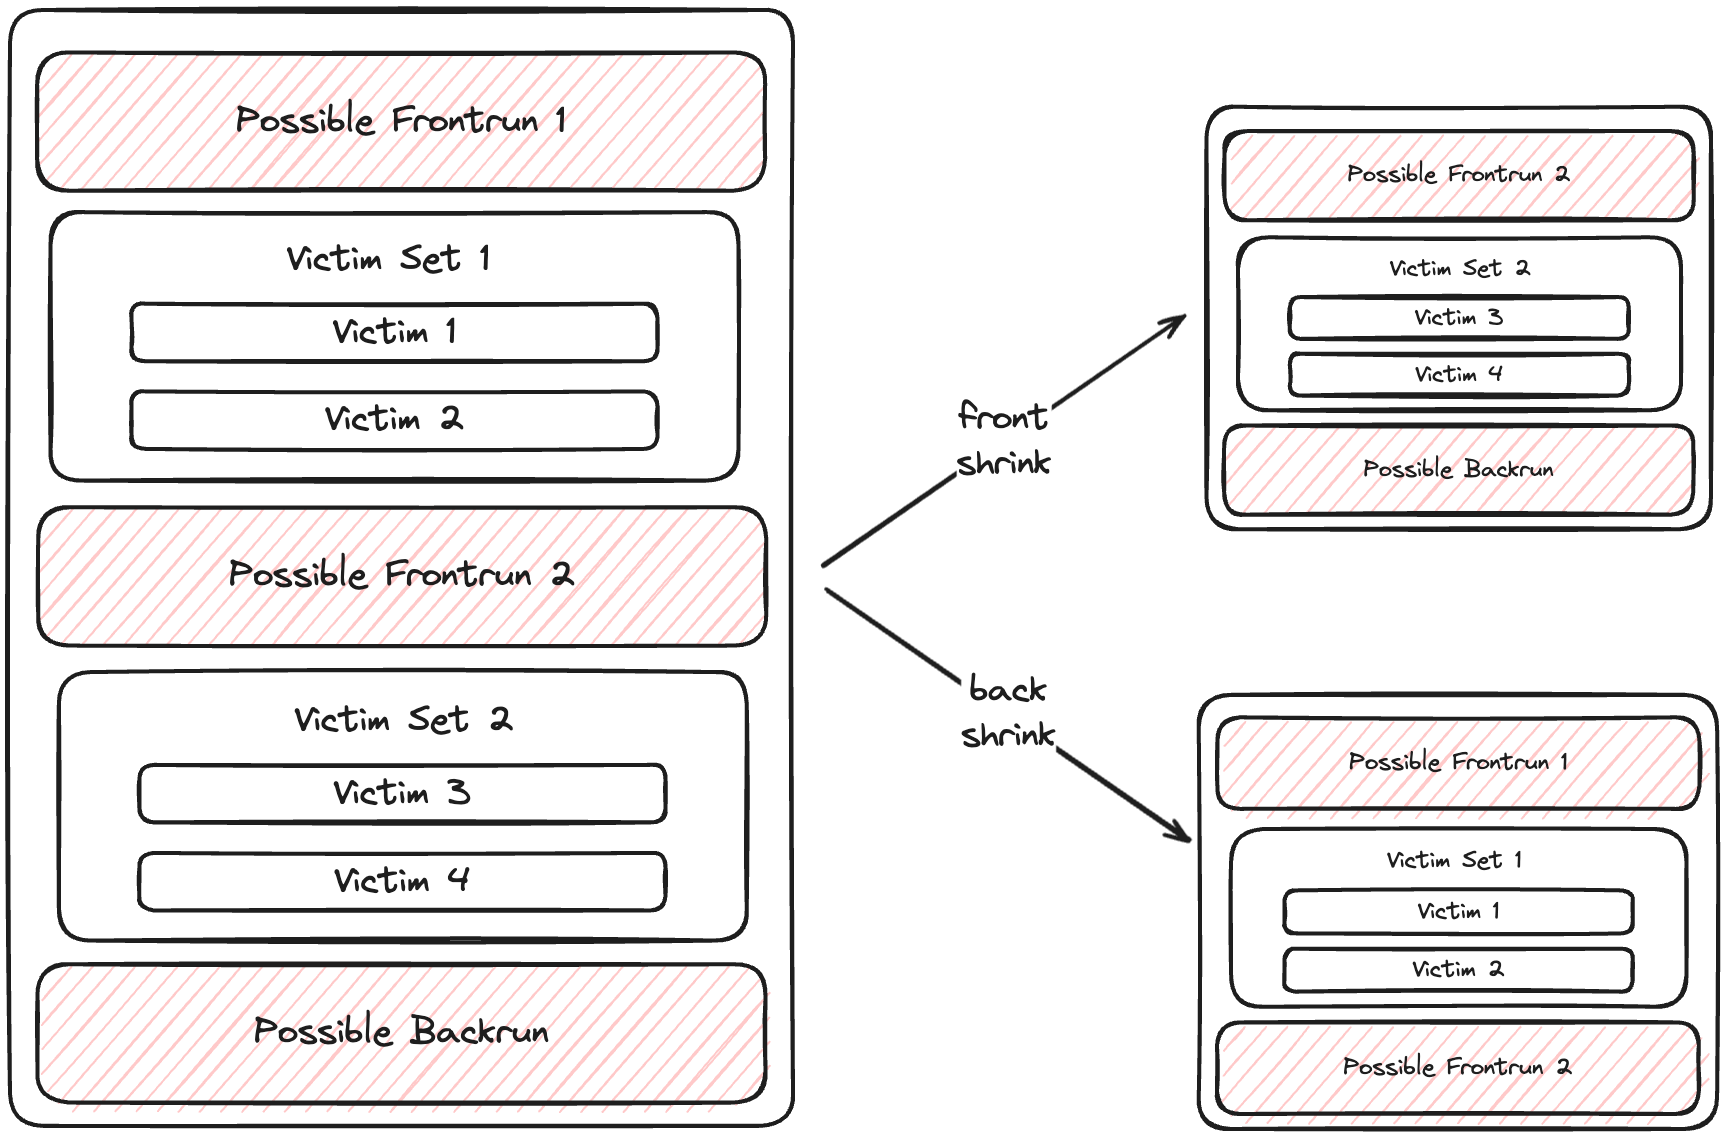
-
The process stops after 6 recursive iterations.
-
We apply two types of "shrinking":
Back Shrink:
- Remove the last victim set
- Use the last front-run as the new back-run
- Recalculate the sandwich (run step 4 on the new sandwich)
Front Shrink:
- Remove the first victim set
- Remove the first front-run transaction
- Retain the original back-run
- Recalculate the sandwich (run step 4 on the new sandwich)
-
We continue this process as long as:
- There's more than one front-run transaction
- Victim sets aren't empty
- At least one victim has non-empty swaps or transfers
Step 5: Calculate Sandwich PnL
For confirmed sandwiches:
- Calculate searcher revenue: Balance deltas of searcher addresses & sibling address (e.g piggy bank address) if applicable
- Calculate searcher cost: Sum of gas costs for all attacker transactions
- Profit = Revenue - Cost
Atomic Arbitrage Inspector
The Atomic Arbitrage Inspector is designed to detect and analyze the profitability of various forms of atomic arbitrage.
What is an atomic arbitrage?
An atomic arbitrage is a type of arbitrage that involves multiple trades that are executed in a single transaction and result in a profit for the trader. Typically, these involve arbitraging price differences between different liquidity pools.
Methodology
Step 1: Retrieve Relevant Transactions
The inspector retrieves transactions in the block that involve swap, transfer, eth_transfer, FlashLoan, batch_swap or aggregator_swap actions.
Step 2: Identify and Classify Potential Atomic Arbitrages
In this step, we analyze the sequence of swaps within each transaction to identify and categorize potential arbitrages.
Classification Criteria
We base our classification on two main factors:
- The number of swaps in the sequence
- The relationships between the tokens involved in these swaps
Arbitrage Types
We categorize atomic arbitrages into four distinct types:
- Triangle: A circular sequence of trades returning to the starting token
- Cross-Pair: Trade sequences where one swap's output doesn't match the next swap's input.
- Stablecoin: Arbitrages involving stablecoin pairs
- Long Tail: Complex patterns not fitting the above categories
The arbitrage type will determine the filtering conditions applied subsequent steps.
Note: This is by no means a comprehensive list of atomic arbitrage types. If you have discovered atomic arbitrages that do not fit these criteria, please let us know. We would love to expand our classification to include new patterns and improve our analysis.
For Zero or One Swap
- Not considered an arbitrage opportunity. We move to the next transaction.
For Two Swaps
-
Triangle Arbitrage
- Condition: Input token of Swap 1 matches output token of Swap 2, and swaps are continuous.
Swap 1: WETH → USDC Swap 2: USDC → WETH -
Stablecoin Arbitrage
- Triangle (stablecoins):
Swap 1: USDC → USDT Swap 2: USDT → USDC- Non-Triangle (input of Swap 1 and output of Swap 2 form a stable pair):
Swap 1: USDC → WETH Swap 2: WETH → USDT -
Cross-Pair Arbitrage
- Condition: The sequence starts and ends with the same token, but there's a break in continuity where the second swap's input token doesn't match first swap's output token.
Swap 1: WETH → USDC Swap 2: WBTC → WETH -
Long Tail
- Any swap pattern not fitting the above categories.
For Three or More Swaps
-
Stablecoin Arbitrage
- Condition: First and last tokens form a stable pair.
Swap 1: USDC → WETH Swap 2: WETH → WBTC Swap 3: WBTC → DAI -
Cross-Pair Arbitrage
- Condition: The sequence starts and ends with the same token, but there's a break in continuity where one swap's output doesn't match the next swap's input.
Example: Swap 1: WETH → USDC Swap 2: WBTC → DAI Swap 3: DAI → WETH -
Triangle Arbitrage
- Condition: All swaps are continuous and the swap sequence ends with the starting token.
Swap 1: WETH → USDC Swap 2: USDC → WBTC Swap 3: WBTC → WETH -
Long Tail
- Any swap pattern not fitting the above categories.
Note on Stable Pair Identification: We consider two tokens a stable pair if both are stablecoins of the same type. Our definition of stablecoins extends beyond just USD-pegged tokens:
- USD stablecoins (e.g., USDC, USDT, DAI)
- EURO stablecoins (e.g., EURS, EURT)
- GOLD stablecoins (e.g., PAXG, XAUT)
Step 4: Calculate Arbitrage PnL
We calculate the arbitrage PnL with the following steps:
- Calculate searcher revenue: Balance deltas of searcher addresses & sibling address (e.g piggy bank address) if applicable
- Calculate searcher cost: Gas cost & builder payment of the transaction
- Profit = Revenue - Cost
We filter out atomic arbitrages with more than $50M in profit as this is likely a false positive caused by a bug in our DEX pricing calculation.
Step 5: Validate Potential Arbitrages
We apply specific heuristics to filter out false positives for each identified arbitrage type. A transaction is considered a valid arbitrage if it meets any of the following conditions:
1. Triangle Arbitrage
Valid if any of these conditions are met:
- Arbitrage is profitable
- Searcher has executed > 20 *
requirement_multiplierprevious atomic arbitrages - Searcher is manually labeled as a known atomic arbitrageur
- Transaction is private and includes a direct builder payment
2. Cross-Pair Arbitrage
Valid if any of these conditions are met:
- Arbitrage is profitable
- Swaps form a stable pair at the "jump" point
- Searcher has executed > 10 *
requirement_multiplierprevious atomic arbitrages - Searcher is manually labeled as a known atomic arbitrageur
- Transaction is private
- Transaction includes a direct builder payment
3. Stablecoin Arbitrage
Valid if any of these conditions are met:
- Arbitrage is profitable
- Any condition from Cross-Pair Arbitrage (excluding stable pair check)
4. Long Tail Arbitrage
Valid if both of these conditions are met:
- Arbitrage is profitable
- At least one of the following is true:
- Searcher has executed > 10 *
requirement_multiplierprevious atomic arbitrages - Searcher is manually labeled as a known atomic arbitrageur
- Transaction is private and includes a direct builder payment
- Transaction uses a known MEV contract
- Searcher has executed > 10 *
Note on Requirement Multiplier: The
requirement_multiplieradjusts the threshold for required previous arbitrages:
- 1 with reliable pricing data
- 2 otherwise. This allows for more stringent classification when we have don't have reliable pricing data.
JIT Liquidity and JIT CexDex Inspectors
These inspectors are designed to detect and analyze the profitability of Just-In-Time (JIT) Liquidity and JIT CexDex opportunities.
What is JIT Liquidity?
JIT Liquidity is a type of MEV where a trader sandwiches a large swap on a concentrated liquidity pool by providing & subsequently removing liquidity. It unfolds in three steps:
- Front-run: The attacker provides extremely concentrated liquidity at the ticks that will be active during the large swap.
- Victim Transaction: The victim executes their swap.
- Back-run: The attacker removes the liquidity immediately after the victim's tx, collecting the fees from the swap.
What is JIT CexDex?
JIT CexDex, a variant of JIT Liquidity attacks, exploits the price discrepancies between centralized exchanges (CEX) and decentralized exchanges (DEX). Nearly all JITs observed in practice are JIT CexDex. It occurs when:
- There's is a price discrepancy between a CEX & a DEX that is within the fee bound so executing an arbitrage on the DEX is not profitable after accounting for the swap fee.
- There is a CEX DEX opportunity, but the volume required to execute the arbitrage & rebalance the pool back to the true price is less than the volume of an incoming user swap on the DEX, so the attacker can extract more value by being a maker for the swap as opposed to executing the arbitrage directly against the pool.
In this scenario, market makers provide liquidity for the user swap, effectively arbitraging the price discrepancy between the CEX & DEX while receiving, instead of incurring, the DEX swap fee.
Methodology
Step 1: Identify Potential JIT Opportunities
We analyze the transaction tree to identify potential JIT Liquidity scenarios checking for:
- Repeated transactions from the same account
- Repeated calls to the same contract
The PossibleJit type represents each potential opportunity:
pub struct PossibleJit {
    pub eoa: Address,
    pub frontrun_txes: Vec<B256>,
    pub backrun_tx: B256,
    pub executor_contract: Address,
    pub victims: Vec<Vec<B256>>,
}
This struct holds the attacker's address, frontrun and backrun transactions, the contract used, and sets of victim transactions.
How It Works
Our algorithm constructs the largest possible JIT scenarios by identifying duplicate addresses. Here's the process:
-
Track Duplicates:
- Map addresses (contract & EOA) to their most recent transaction hash
-
Build Victim Sets:
- For each transaction, track potential victims (transactions that occur after it)
-
Construct PossibleJit:
- When we encounter a duplicate address, we create or update a
PossibleJit: a) For the first duplicate:- Create a new PossibleJit
- Set the previous transaction as the frontrun
- Set the current transaction as the backrun
- Add intervening transactions as victims b) For subsequent duplicates:
- Add the previous transaction to possible frontruns
- Update the backrun to the current transaction
- Add the new set of victims
- When we encounter a duplicate address, we create or update a
Step 2: Partitioning & Filter Possible JITs
Here's how partitioning works:
- We iterate through victim sets in each JIT.
- Empty victim sets signal a break in the JIT.
- We create new
PossibleJitstructs at these breaks.
Note: Our partitioning assumes attackers maximize efficiency. Multiple attacker transactions without intervening victims may lead to unexpected results. If you find examples breaking this assumption, please report them for a bounty.
Filter and Refine:
- We filter out
PossibleJitwith more than 10 victim sets or 20 victims - We ensure that the frontrun in the set includes a
mintaction and the backrun includes aburnaction.
Step 3: Analyze JIT Candidates
For each PossibleJit, we:
-
Check for recursive JIT patterns, verifying:
- Mint and Burn Sequence: Logical order of liquidity additions and removals
- Account Consistency: Same account for all transactions
- Token Alignment: Matching tokens in mints and burns
-
If a recursive pattern is detected, initiate recursive analysis. Otherwise, proceed with:
- Splitting actions into mints, burns, and other transfers
- Verifying presence of both mints and burns
- Ensuring mints and burns are for the same pools
Recursive JIT Verification
For non standard JIT patterns, we employ a recursive strategy:
-
The process stops after 10 recursive iterations.
-
We apply two types of "shrinking":
Back Shrink:
- Remove the last victim set
- Use the last front-run as the new back-run
- Recalculate the JIT opportunity
Front Shrink:
- Remove the first victim set
- Remove the first front-run transaction
- Retain the original back-run
- Recalculate the JIT opportunity
-
We continue this process as long as:
- There's more than one front-run transaction
- Victim sets aren't empty
- At least one victim has non-empty actions
Step 4: Validate JIT Opportunities
For confirmed JIT bundles:
- Calculate searcher revenue: Balance deltas for searcher addresses & sibling address (e.g piggy bank address) if applicable, using the all mint, burn and collect actions.
- Calculate searcher cost: Sum of gas costs for all attacker transactions
- Profit = Revenue - Cost
- Filter false positives using the maximum profit threshold
Step 5: Generate JIT Bundle
For confirmed opportunities:
- Construct a
JitLiquiditytype - Create a
Bundlewith a summaryBundleHeaderandJitLiquiditydata - For recursive analyses, deduplicate results, by retaining the largest JIT bundle when multiple JITs with overlapping transaction sets are detected.
Step 6: Identify JIT CexDex
For validated JIT opportunities, we perform additional checks:
- Verify if the searcher is labeled as a known CexDex arbitrageur.
- Analyze the swaps to detect CEX-DEX arbitrage patterns.
- Compare DEX swaps with CEX trade data to confirm price discrepancies.
Liquidation Inspector
The Liquidation Inspector is designed to detect and analyze the profitability of liquidation events.
What is a Liquidation?
A liquidation occurs when a borrower's collateral is forcibly sold to repay their outstanding debt, typically when the collateral's value falls below a certain threshold.
Methodology
Step 1: Retrieve Relevant Transactions
The inspector retrieves transactions in the block that involve swap or liquidation actions.
Step 2: Identify Potential Liquidations
For each relevant transaction, we:
- Split the actions into swaps and liquidations.
- Filter out transactions with no liquidation events.
Step 3: Analyze Liquidation Candidates
For each potential liquidation, we:
- Collect all addresses involved in the transaction.
- Calculate the balance changes (deltas) for all actions in the transaction.
Step 4: Calculate Profitability
We apply specific criteria to determine the profitability of each liquidation:
- Calculate USD value of token transfers using DEX pricing data.
- Compute gas costs for the transaction.
- Determine profitability by subtracting gas costs from revenue.
- Apply a maximum profit threshold to filter out unrealistic opportunities.
Step 5: Generate Liquidation Bundle
For confirmed liquidation opportunities:
-
Construct a
Liquidationstructure containing:- Liquidation transaction hash
- Liquidation swaps
- Liquidation events
- Gas details
-
Create a
Bundlewith:- A header summarizing key information (profit, gas used, transaction hash)
- The detailed
Liquidationdata
Note on Pricing: The inspector uses DEX pricing data to value token transfers. If reliable pricing data is unavailable, the liquidation is flagged, and profit is set to zero to avoid false positives.
CLI Reference
Brontes is operated via the CLI by running the brontes run command. To stop it, press ctrl-c. You may need to wait a bit as brontes completes cleanup tasks.
However, Brontes has more commands:
brontesbrontes runbrontes dbbrontes db insertbrontes db querybrontes db clearbrontes db generate-tracesbrontes db cex-querybrontes db initbrontes db table-statsbrontes db exportbrontes db download-snapshotbrontes db download-clickhousebrontes db r2-uploadbrontes db test-traces-initbrontes db trace-at-tipbrontes db run-discovery
brontes
The verbosity settings for the cli
$ brontes --help
Usage: brontes [OPTIONS] <COMMAND>

Commands:
  run   Run brontes
  db    Brontes database commands
  help  Print this message or the help of the given subcommand(s)

Options:
      --brontes-db-path <BRONTES_DB_PATH>
          path to the brontes libmdbx db

  -h, --help
          Print help (see a summary with '-h')

  -V, --version
          Print version

Display:
  -v, --verbosity...
          Set the minimum log level.

          -v      Errors
          -vv     Warnings
          -vvv    Info
          -vvvv   Debug
          -vvvvv  Traces (warning: very verbose!)

      --quiet
          Silence all log output

      --metrics-port <METRICS_PORT>
          [default: 6923]

      --skip-prometheus
brontes run
Run brontes
$ brontes run --help
Usage: brontes run [OPTIONS]

Options:
  -s, --start-block <START_BLOCK>
          Optional Start Block, if omitted it will run at tip until killed

  -e, --end-block <END_BLOCK>
          Optional End Block, if omitted it will run historically & at tip until killed

      --brontes-db-path <BRONTES_DB_PATH>
          path to the brontes libmdbx db

      --ranges <RANGES>...
          Optional Multiple Ranges, format: "start1-end1 start2-end2 ..." Use this if you want to specify the exact, non continuous block ranges you want to run

  -m, --max-tasks <MAX_TASKS>
          Optional Max Tasks, if omitted it will default to 80% of the number of physical cores on your machine

      --min-batch-size <MIN_BATCH_SIZE>
          Optional minimum batch size

          [default: 500]

  -q, --quote-asset <QUOTE_ASSET>
          Optional quote asset, if omitted it will default to USDT

          [default: 0xdAC17F958D2ee523a2206206994597C13D831ec7]

  -i, --inspectors <INSPECTORS>
          Inspectors to run. If omitted it defaults to running all inspectors

      --initial-pre <INITIAL_VWAP_PRE>
          The initial sliding time window (BEFORE) for cex prices or trades relative to the block timestamp

          [default: 0.05]

      --initial-post <INITIAL_VWAP_POST>
          The initial sliding time window (AFTER) for cex prices or trades relative to the block timestamp

          [default: 0.05]

  -b, --max-vwap-pre <MAX_VWAP_PRE>
          The maximum sliding time window (BEFORE) for cex prices or trades relative to the block timestamp

          [default: 10.0]

  -a, --max-vwap-post <MAX_VWAP_POST>
          The maximum sliding time window (AFTER) for cex prices or trades relative to the block timestamp

          [default: 20.0]

      --vwap-scaling-diff <VWAP_SCALING_DIFF>
          Defines how much to extend the post-block time window before the pre-block

          [default: 0.3]

      --vwap-time-step <VWAP_TIME_STEP>
          Size of each extension to the vwap calculations time window

          [default: 0.01]

      --weights-vwap
          Use block time weights to favour prices closer to the block time

      --weights-pre-vwap <PRE_DECAY_WEIGHT_VWAP>
          Rate of decay of bi-exponential decay function see calculate_weight in brontes_types::db::cex

          [default: -0.0000005]

      --weights-post-vwap <POST_DECAY_WEIGHT_VWAP>
          Rate of decay of bi-exponential decay function see calculate_weight in brontes_types::db::ce

          [default: -0.0000002]

      --initial-op-pre <INITIAL_OPTIMISTIC_PRE>
          The initial time window (BEFORE) for cex prices or trades relative to the block timestamp for fully optimistic calculations

          [default: 0.05]

      --initial-op-post <INITIAL_OPTIMISTIC_POST>
          The initial time window (AFTER) for cex prices or trades relative to the block timestamp for fully optimistic calculations

          [default: 0.3]

      --max-op-pre <MAX_OPTIMISTIC_PRE>
          The maximum time window (BEFORE) for cex prices or trades relative to the block timestamp for fully optimistic calculations

          [default: 5.0]

      --max-op-post <MAX_OPTIMISTIC_POST>
          The maximum time window (AFTER) for cex prices or trades relative to the block timestamp for fully optimistic calculations

          [default: 10.0]

      --optimistic-scaling-diff <OPTIMISTIC_SCALING_DIFF>
          Defines how much to extend the post-block time window before the pre-block

          [default: 0.2]

      --optimistic-time-step <OPTIMISTIC_TIME_STEP>
          Size of each extension to the optimistic calculations time window

          [default: 0.1]

      --weights-op
          Use block time weights to favour prices closer to the block time

      --weights-pre-op <PRE_DECAY_WEIGHT_OPTIMISTIC>
          Rate of decay of bi-exponential decay function see calculate_weight in brontes_types::db::cex

          [default: -0.0000003]

      --weights-post-op <POST_DECAY_WEIGHT_OPTIMISTIC>
          Rate of decay of bi-exponential decay function see calculate_weight in brontes_types::db::ce

          [default: -0.00000012]

      --quote-offset <QUOTE_OFFSET>
          Cex Dex Quotes price time offset from block timestamp

          [default: 0.0]

  -c, --cex-exchanges <CEX_EXCHANGES>
          CEX exchanges to consider for cex-dex analysis

          [default: Binance,Coinbase,Okex,BybitSpot,Kucoin]

  -f, --force-dex-pricing
          Force DEX price calculation for every block, ignoring existing database values

      --force-no-dex-pricing
          Disables DEX pricing. Inspectors needing DEX prices will only calculate token PnL, not USD PnL, if DEX pricing is unavailable in the database

      --behind-tip <BEHIND_TIP>
          Number of blocks to lag behind the chain tip when processing

          [default: 10]

      --cli-only
          Legacy, run in CLI only mode (no TUI) - will output progress bars to stdout

      --with-metrics
          Export metrics

      --enable-fallback
          Wether or not to use a fallback server

      --fallback-server <FALLBACK_SERVER>
          Address of the fallback server. Triggers database writes if the main connection fails, preventing data loss

  -r, --run-id <RUN_ID>
          Set a custom run ID used when inserting data into the Clickhouse

          If omitted, the ID will be automatically incremented from the last run stored in the Clickhouse database.

  -w, --waterfall
          shows a cool display at startup

  -h, --help
          Print help (see a summary with '-h')

  -V, --version
          Print version

Display:
  -v, --verbosity...
          Set the minimum log level.

          -v      Errors
          -vv     Warnings
          -vvv    Info
          -vvvv   Debug
          -vvvvv  Traces (warning: very verbose!)

      --quiet
          Silence all log output
brontes db
Brontes database commands
$ brontes db --help
Usage: brontes db [OPTIONS] <COMMAND>

Commands:
  insert               Insert into the brontes libmdbx db
  query                Query data from any libmdbx table and pretty print it in stdout
  clear                Clear a libmdbx table
  generate-traces      Generates traces and store them in libmdbx (also clickhouse if --feature local-clickhouse)
  cex-query            Fetches Cex data from the Sorella DB
  init                 Fetch data from the api and insert it into libmdbx
  table-stats          Libmbdx Table Stats
  export               Export libmbdx data to parquet
  download-snapshot    Downloads a database snapshot. Without specified blocks, it fetches the full range. With start/end blocks, it downloads that range and merges it into the current database
  download-clickhouse  Downloads the db data from clickhouse
  r2-upload            For internal use only. Uploads snapshots of db every 100k blocks to r2
  test-traces-init     Traces all blocks required to run the tests and inserts them into clickhouse
  trace-at-tip         Generates traces up to chain tip and inserts them into libmbx
  run-discovery        Only runs discovery and inserts discovered protocols into clickhouse
  help                 Print this message or the help of the given subcommand(s)

Options:
      --brontes-db-path <BRONTES_DB_PATH>
          path to the brontes libmdbx db

  -h, --help
          Print help (see a summary with '-h')

  -V, --version
          Print version

Display:
  -v, --verbosity...
          Set the minimum log level.

          -v      Errors
          -vv     Warnings
          -vvv    Info
          -vvvv   Debug
          -vvvvv  Traces (warning: very verbose!)

      --quiet
          Silence all log output
brontes db insert
Insert into the brontes libmdbx db
$ brontes db insert --help
Usage: brontes db insert [OPTIONS] --table <TABLE> --key <KEY> --value <VALUE>

Options:
  -t, --table <TABLE>
          Table to query

  -k, --key <KEY>
          Key to query

      --brontes-db-path <BRONTES_DB_PATH>
          path to the brontes libmdbx db

      --value <VALUE>
          Value to insert

  -h, --help
          Print help (see a summary with '-h')

  -V, --version
          Print version

Display:
  -v, --verbosity...
          Set the minimum log level.

          -v      Errors
          -vv     Warnings
          -vvv    Info
          -vvvv   Debug
          -vvvvv  Traces (warning: very verbose!)

      --quiet
          Silence all log output
brontes db query
Query data from any libmdbx table and pretty print it in stdout
$ brontes db query --help
Usage: brontes db query [OPTIONS] --table <TABLE> --key <KEY>

Options:
  -t, --table <TABLE>
          Table to query

  -k, --key <KEY>
          Key for table query. Use Rust range syntax for ranges: --key 80 (single key) --key 80..100 (range)

      --brontes-db-path <BRONTES_DB_PATH>
          path to the brontes libmdbx db

  -h, --help
          Print help (see a summary with '-h')

  -V, --version
          Print version

Display:
  -v, --verbosity...
          Set the minimum log level.

          -v      Errors
          -vv     Warnings
          -vvv    Info
          -vvvv   Debug
          -vvvvv  Traces (warning: very verbose!)

      --quiet
          Silence all log output
brontes db clear
Clear a libmdbx table
$ brontes db clear --help
Usage: brontes db clear [OPTIONS]

Options:
  -t, --tables <TABLES>
          Tables to clear

          [default: CexPrice,DexPrice,CexTrades,BlockInfo,InitializedState,MevBlocks,TokenDecimals,AddressToProtocolInfo,PoolCreationBlocks,Builder,AddressMeta,SearcherEOAs,SearcherContracts,SubGraphs,TxTraces]

      --clear-metadata-flags
          Mark metadata as uninitialized in the initialized state table

      --brontes-db-path <BRONTES_DB_PATH>
          path to the brontes libmdbx db

      --clear-cex-quotes-flags
          Mark cex quotes as uninitialized in the initialized state table

      --clear-cex-trades-flags
          Mark cex trades as uninitialized in the initialized state table

      --clear-tx-traces-flags
          Mark tx traces as uninitialized in the initialized state table

      --clear-dex-pricing-flags
          Mark dex pricing as uninitialized in the initialized state table

  -h, --help
          Print help (see a summary with '-h')

  -V, --version
          Print version

Display:
  -v, --verbosity...
          Set the minimum log level.

          -v      Errors
          -vv     Warnings
          -vvv    Info
          -vvvv   Debug
          -vvvvv  Traces (warning: very verbose!)

      --quiet
          Silence all log output
brontes db generate-traces
Generates traces and store them in libmdbx (also clickhouse if --feature local-clickhouse)
$ brontes db generate-traces --help
Usage: brontes db generate-traces [OPTIONS] --start-block <START_BLOCK> --end-block <END_BLOCK>

Options:
  -s, --start-block <START_BLOCK>
          Start Block

  -e, --end-block <END_BLOCK>
          block to trace to

      --brontes-db-path <BRONTES_DB_PATH>
          path to the brontes libmdbx db

  -h, --help
          Print help (see a summary with '-h')

  -V, --version
          Print version

Display:
  -v, --verbosity...
          Set the minimum log level.

          -v      Errors
          -vv     Warnings
          -vvv    Info
          -vvvv   Debug
          -vvvvv  Traces (warning: very verbose!)

      --quiet
          Silence all log output
brontes db cex-query
Fetches Cex data from the Sorella DB
$ brontes db cex-query --help
Usage: brontes db cex-query [OPTIONS] --block-number <BLOCK_NUMBER> --token-0 <TOKEN_0> --token-1 <TOKEN_1>

Options:
  -b, --block-number <BLOCK_NUMBER>
          The block number

      --token-0 <TOKEN_0>
          The first token in the pair

      --brontes-db-path <BRONTES_DB_PATH>
          path to the brontes libmdbx db

      --token-1 <TOKEN_1>
          The second token in the pair

  -w, --w-multiplier <W_MULTIPLIER>
          Time window multiplier (expands it)

          [default: 1]

  -h, --help
          Print help (see a summary with '-h')

  -V, --version
          Print version

Display:
  -v, --verbosity...
          Set the minimum log level.

          -v      Errors
          -vv     Warnings
          -vvv    Info
          -vvvv   Debug
          -vvvvv  Traces (warning: very verbose!)

      --quiet
          Silence all log output
brontes db init
Fetch data from the api and insert it into libmdbx
$ brontes db init --help
Usage: brontes db init [OPTIONS]

Options:
  -i, --init-libmdbx
          Initialize the local Libmdbx DB

  -t, --tables-to-init <TABLES_TO_INIT>
          Libmdbx tables to initialize: TokenDecimals AddressToTokens AddressToProtocol CexPrice Metadata PoolState DexPrice CexTrades

      --brontes-db-path <BRONTES_DB_PATH>
          path to the brontes libmdbx db

      --price-tw-before <QUOTES_TIME_WINDOW_BEFORE>
          The sliding time window (BEFORE) for cex quotes relative to the block time

          [default: 3]

      --price-tw-after <QUOTES_TIME_WINDOW_AFTER>
          The sliding time window (AFTER) for cex quotes relative to the block time

          [default: 3]

      --trades-tw-before <TRADES_TIME_WINDOW_BEFORE>
          The sliding time window (BEFORE) for cex trades relative to the block number

          [default: 3]

      --trades-tw-after <TRADES_TIME_WINDOW_AFTER>
          The sliding time window (AFTER) for cex trades relative to the block number

          [default: 3]

  -c, --cex-exchanges <CEX_EXCHANGES>
          Centralized exchanges that the cex-dex inspector will consider

          [default: Binance,Coinbase,Okex,BybitSpot,Kucoin]

  -s, --start-block <START_BLOCK>
          Start Block to download metadata from Sorella's MEV DB

  -e, --end-block <END_BLOCK>
          End Block to download metadata from Sorella's MEV DB

  -d, --download-dex-pricing
          Download Dex Prices from Sorella's MEV DB for the given block range. If false it will run the dex pricing locally using raw on-chain data

  -h, --help
          Print help (see a summary with '-h')

  -V, --version
          Print version

Display:
  -v, --verbosity...
          Set the minimum log level.

          -v      Errors
          -vv     Warnings
          -vvv    Info
          -vvvv   Debug
          -vvvvv  Traces (warning: very verbose!)

      --quiet
          Silence all log output
brontes db table-stats
Libmbdx Table Stats
$ brontes db table-stats --help
Usage: brontes db table-stats [OPTIONS]

Options:
      --detailed-sizes
          Show only the total size for static files

      --brontes-db-path <BRONTES_DB_PATH>
          path to the brontes libmdbx db

  -h, --help
          Print help (see a summary with '-h')

  -V, --version
          Print version

Display:
  -v, --verbosity...
          Set the minimum log level.

          -v      Errors
          -vv     Warnings
          -vvv    Info
          -vvvv   Debug
          -vvvvv  Traces (warning: very verbose!)

      --quiet
          Silence all log output
brontes db export
Export libmbdx data to parquet
$ brontes db export --help
Usage: brontes db export [OPTIONS]

Options:
  -t, --tables <TABLES>
          Optional tables to exports, if omitted will export all supported tables

          [default: MevBlocks AddressMeta SearcherContracts Builder]

  -s, --start-block <START_BLOCK>
          Optional Start Block, if omitted it will export the entire range to parquet

      --brontes-db-path <BRONTES_DB_PATH>
          path to the brontes libmdbx db

  -e, --end-block <END_BLOCK>
          Optional End Block

  -p, --path <PATH>
          Optional path, will default to "data_exports/"

  -h, --help
          Print help (see a summary with '-h')

  -V, --version
          Print version

Display:
  -v, --verbosity...
          Set the minimum log level.

          -v      Errors
          -vv     Warnings
          -vvv    Info
          -vvvv   Debug
          -vvvvv  Traces (warning: very verbose!)

      --quiet
          Silence all log output
brontes db download-snapshot
Downloads a database snapshot. Without specified blocks, it fetches the full range. With start/end blocks, it downloads that range and merges it into the current database
$ brontes db download-snapshot --help
Usage: brontes db download-snapshot [OPTIONS]

Options:
      --endpoint <ENDPOINT>
          Snapshot endpoint

          [default: https://data.brontes.xyz/]

  -s, --start-block <START_BLOCK>
          Optional start block

      --brontes-db-path <BRONTES_DB_PATH>
          path to the brontes libmdbx db

  -e, --end-block <END_BLOCK>
          Optional end block

  -h, --help
          Print help (see a summary with '-h')

  -V, --version
          Print version

Display:
  -v, --verbosity...
          Set the minimum log level.

          -v      Errors
          -vv     Warnings
          -vvv    Info
          -vvvv   Debug
          -vvvvv  Traces (warning: very verbose!)

      --quiet
          Silence all log output
brontes db download-clickhouse
Downloads the db data from clickhouse
$ brontes db download-clickhouse --help
Usage: brontes db download-clickhouse [OPTIONS] --start-block <START_BLOCK> --end-block <END_BLOCK> --table <TABLE>

Options:
  -s, --start-block <START_BLOCK>
          Start block

  -e, --end-block <END_BLOCK>
          End block

      --brontes-db-path <BRONTES_DB_PATH>
          path to the brontes libmdbx db

  -t, --table <TABLE>
          Table to download

  -c, --clear-table
          Clear the table before downloading

  -h, --help
          Print help (see a summary with '-h')

  -V, --version
          Print version

Display:
  -v, --verbosity...
          Set the minimum log level.

          -v      Errors
          -vv     Warnings
          -vvv    Info
          -vvvv   Debug
          -vvvvv  Traces (warning: very verbose!)

      --quiet
          Silence all log output
brontes db r2-upload
For internal use only. Uploads snapshots of db every 100k blocks to r2
$ brontes db r2-upload --help
Usage: brontes db r2-upload [OPTIONS] --r2-config-name <R2_CONFIG_NAME>

Options:
  -r, --r2-config-name <R2_CONFIG_NAME>
          R2 Config Name

  -s, --start-block <START_BLOCK>
          Start Block

      --brontes-db-path <BRONTES_DB_PATH>
          path to the brontes libmdbx db

  -p, --partition-db-folder <PARTITION_DB_FOLDER>
          Path to db partition folder

          [default: <CACHE_DIR>-db-partitions/]

  -h, --help
          Print help (see a summary with '-h')

  -V, --version
          Print version

Display:
  -v, --verbosity...
          Set the minimum log level.

          -v      Errors
          -vv     Warnings
          -vvv    Info
          -vvvv   Debug
          -vvvvv  Traces (warning: very verbose!)

      --quiet
          Silence all log output
brontes db test-traces-init
Traces all blocks required to run the tests and inserts them into clickhouse
$ brontes db test-traces-init --help
Usage: brontes db test-traces-init [OPTIONS]

Options:
  -b, --blocks <BLOCKS>
          Blocks to trace

      --brontes-db-path <BRONTES_DB_PATH>
          path to the brontes libmdbx db

  -h, --help
          Print help (see a summary with '-h')

  -V, --version
          Print version

Display:
  -v, --verbosity...
          Set the minimum log level.

          -v      Errors
          -vv     Warnings
          -vvv    Info
          -vvvv   Debug
          -vvvvv  Traces (warning: very verbose!)

      --quiet
          Silence all log output
brontes db trace-at-tip
Generates traces up to chain tip and inserts them into libmbx
$ brontes db trace-at-tip --help
Usage: brontes db trace-at-tip [OPTIONS]

Options:
  -s, --start-block <START_BLOCK>
          Start Block

      --brontes-db-path <BRONTES_DB_PATH>
          path to the brontes libmdbx db

  -h, --help
          Print help (see a summary with '-h')

  -V, --version
          Print version

Display:
  -v, --verbosity...
          Set the minimum log level.

          -v      Errors
          -vv     Warnings
          -vvv    Info
          -vvvv   Debug
          -vvvvv  Traces (warning: very verbose!)

      --quiet
          Silence all log output
brontes db run-discovery
Only runs discovery and inserts discovered protocols into clickhouse
$ brontes db run-discovery --help
Usage: brontes db run-discovery [OPTIONS]

Options:
  -s, --start-block <START_BLOCK>
          Start Block

  -m, --max-tasks <MAX_TASKS>
          Max number of tasks to run concurrently

      --brontes-db-path <BRONTES_DB_PATH>
          path to the brontes libmdbx db

  -h, --help
          Print help (see a summary with '-h')

  -V, --version
          Print version

Display:
  -v, --verbosity...
          Set the minimum log level.

          -v      Errors
          -vv     Warnings
          -vvv    Info
          -vvvv   Debug
          -vvvvv  Traces (warning: very verbose!)

      --quiet
          Silence all log output